> ## Documentation Index
> Fetch the complete documentation index at: https://help.cloudtalk.io/llms.txt
> Use this file to discover all available pages before exploring further.
# Salesforce Service Cloud Voice: guia de configuração para administradores
> Configuração de administrador da CloudTalk no Salesforce Service Cloud Voice: ativar o Voice, configurar conjuntos de permissões, criar o contact center…
**Para administradores do Salesforce.** Execute estes passos uma única vez para ativar a CloudTalk dentro do Service Cloud Voice. Após a configuração, os agentes podem seguir o [guia do Salesforce Service Cloud Voice](/pt/articles/14654473-salesforce-service-cloud-voice) para fazer, receber e transferir chamadas.
**Nível de utilizador**: Admin
***
Antes de começar
Vai precisar de:
* Uma org do Salesforce com o **Service Cloud Voice** disponível
* Acesso de **System Administrator** no Salesforce
* O **certificado do contact center** fornecido pela CloudTalk durante o onboarding (não o obtenha a partir de nenhuma outra fonte)
Configuração passo a passo
Passo 1: ativar o Service Cloud Voice
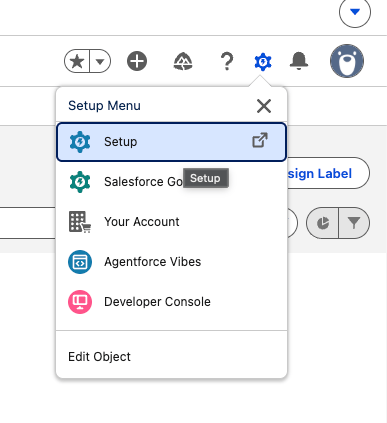
1. Abra o **Setup** e procure **Voice**.
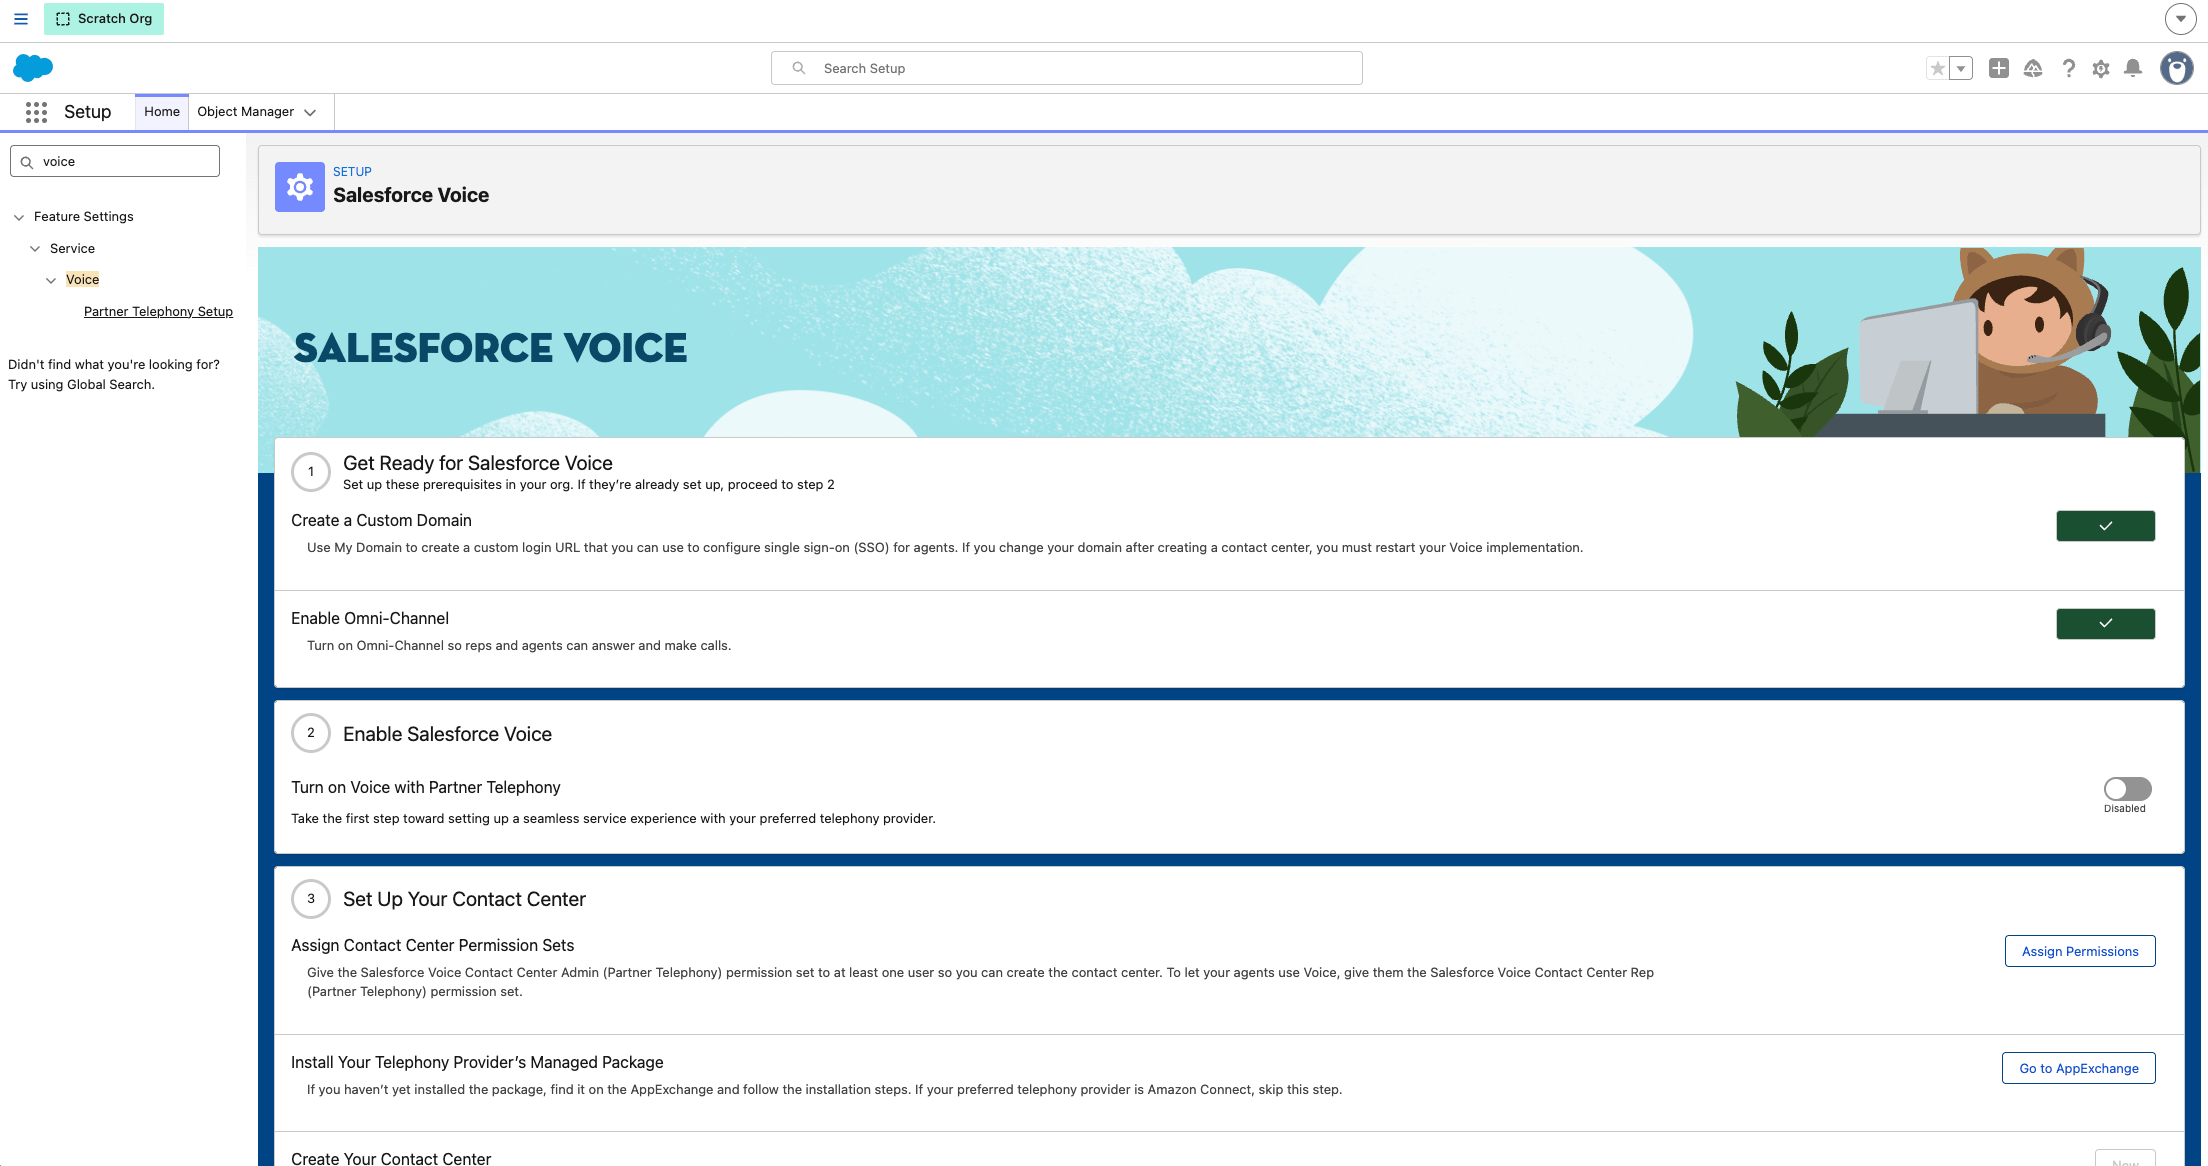 2. Ative a funcionalidade em **Feature Settings > Service > Voice**.

Passo 2: configurar o conjunto de permissões Partner Telephony
1. No Setup, vá a **Permission Sets** e abra **Partner Telephony Permission Set**.
2. Abra **App Permissions > Edit** e ative:
* Control Call Recording
* Salesforce Voice Contact Center Admin (Partner Telephony)
* Salesforce Voice Contact Center Rep (Partner Telephony)
* Salesforce Voice Contact Center Supervisor
3. **Save**.
Passo 3: atribuir o conjunto de permissões aos utilizadores
1. Vá a **Setup > Users > Permission Set Assignments**.
 2. Atribua o **Partner Telephony Permission Set** a cada agente e, pelo menos, a um administrador que vá gerir o contact center.
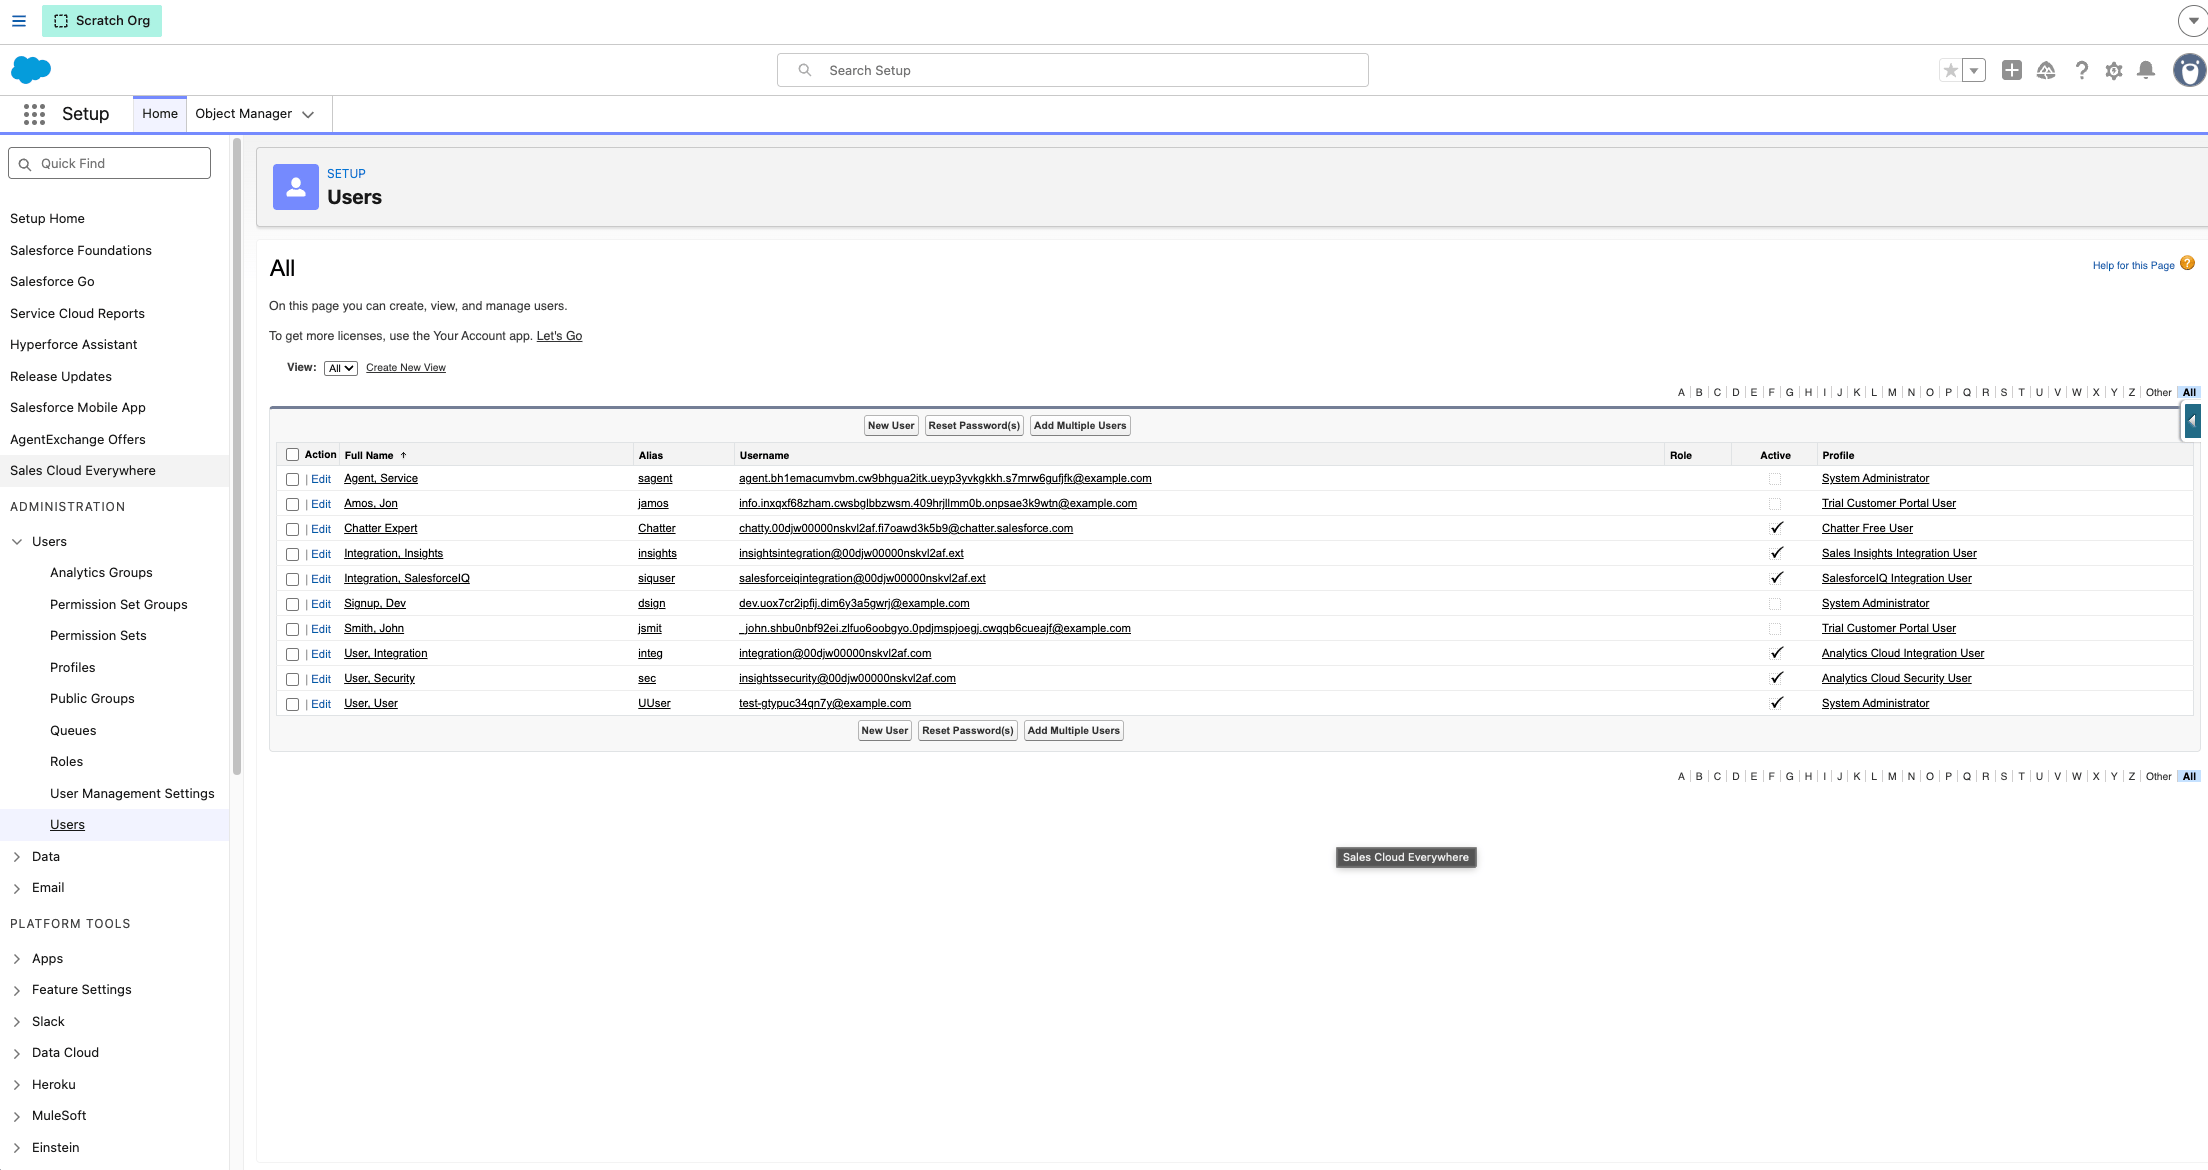 A permissão de **admin** do Contact Center é necessária para instalar ou atualizar o certificado do contact center no passo seguinte.
Passo 4: criar o contact center
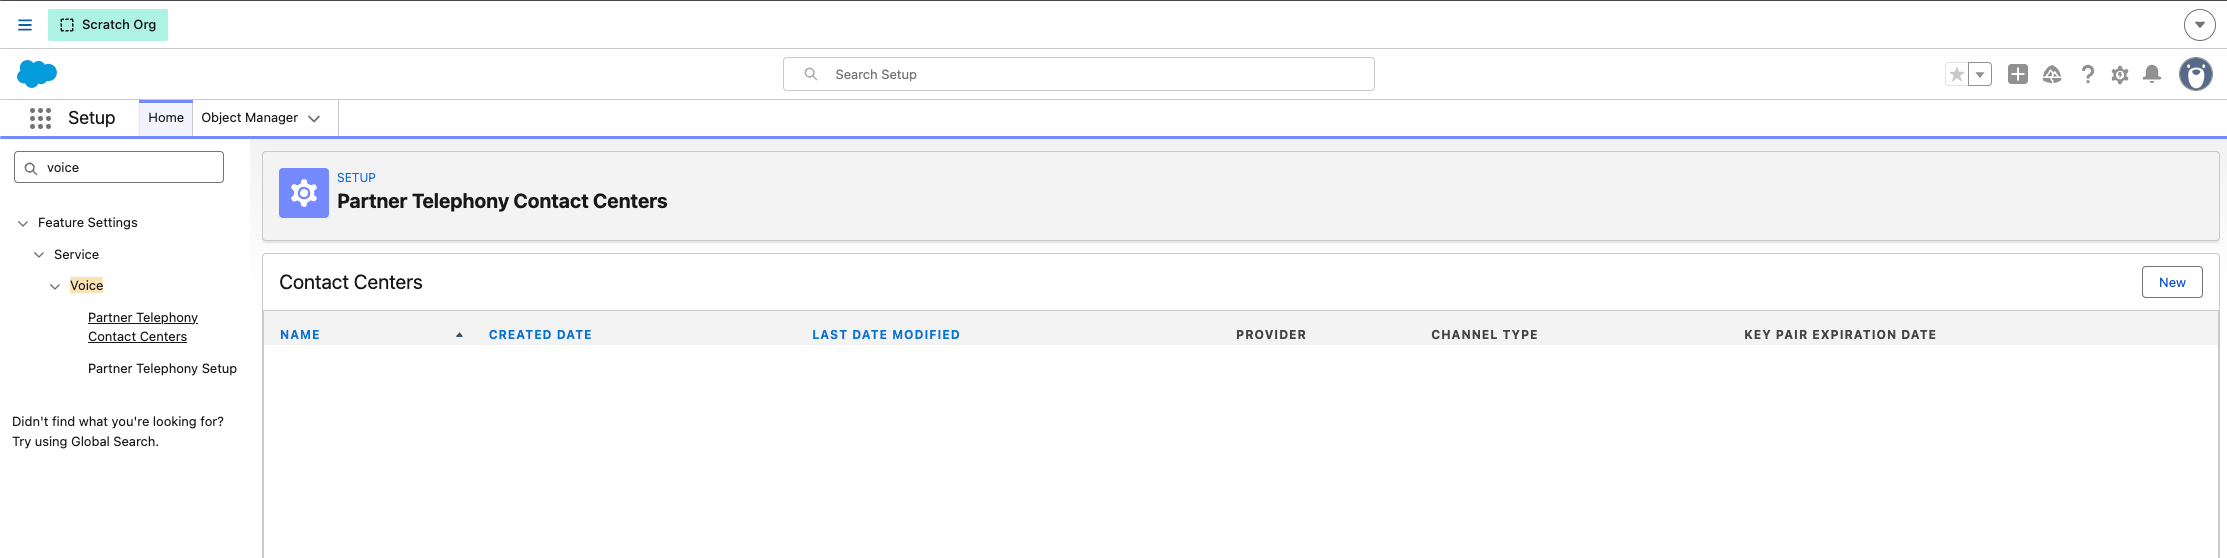
1. No Setup, abra **Voice > Partner Telephony Contact Centers** e crie um novo contact center.
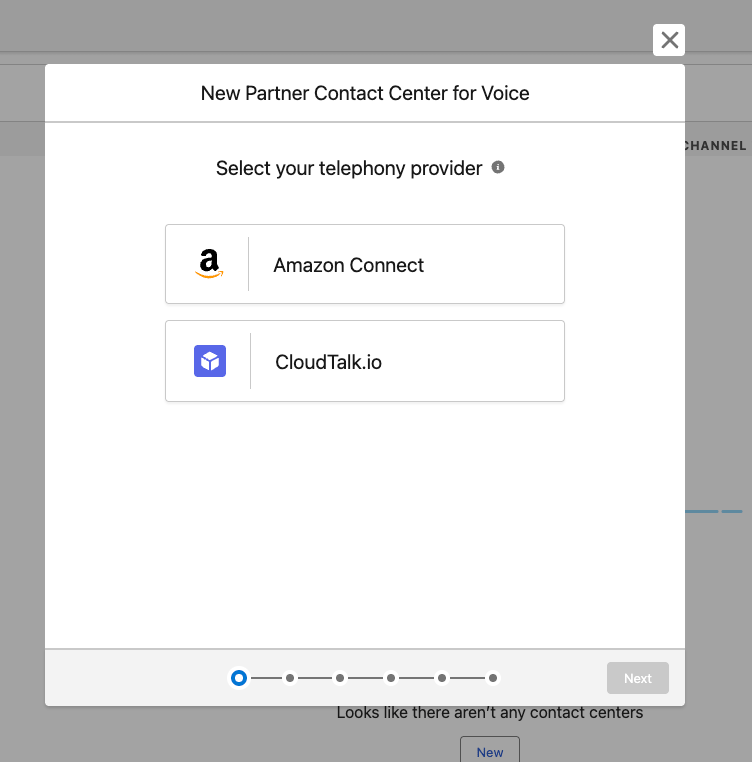 2\. Adicione o **certificado de chave pública fornecido pela CloudTalk**. Cole o bloco completo do certificado, incluindo as linhas `BEGIN`/`END`.
```
-----BEGIN CERTIFICATE-----[Paste the certificate CloudTalk provided during onboarding]-----END CERTIFICATE-----
```
2\. Adicione o **certificado de chave pública fornecido pela CloudTalk**. Cole o bloco completo do certificado, incluindo as linhas `BEGIN`/`END`.
```
-----BEGIN CERTIFICATE-----[Paste the certificate CloudTalk provided during onboarding]-----END CERTIFICATE-----
```
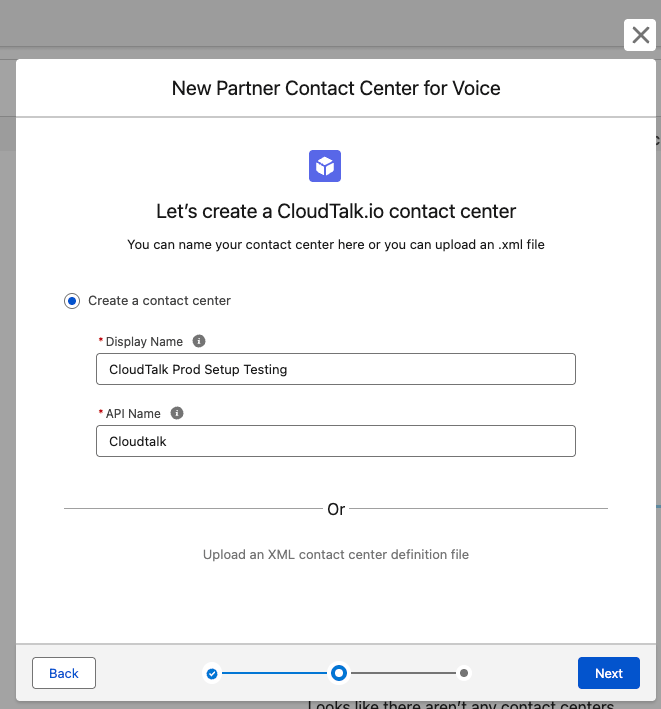 3\. Adicione os seus agentes como **utilizadores** do contact center.
Passo 5: configurar os Trusted URLs (CSP)
1. No Setup, abra **Security > Trusted URLs**.
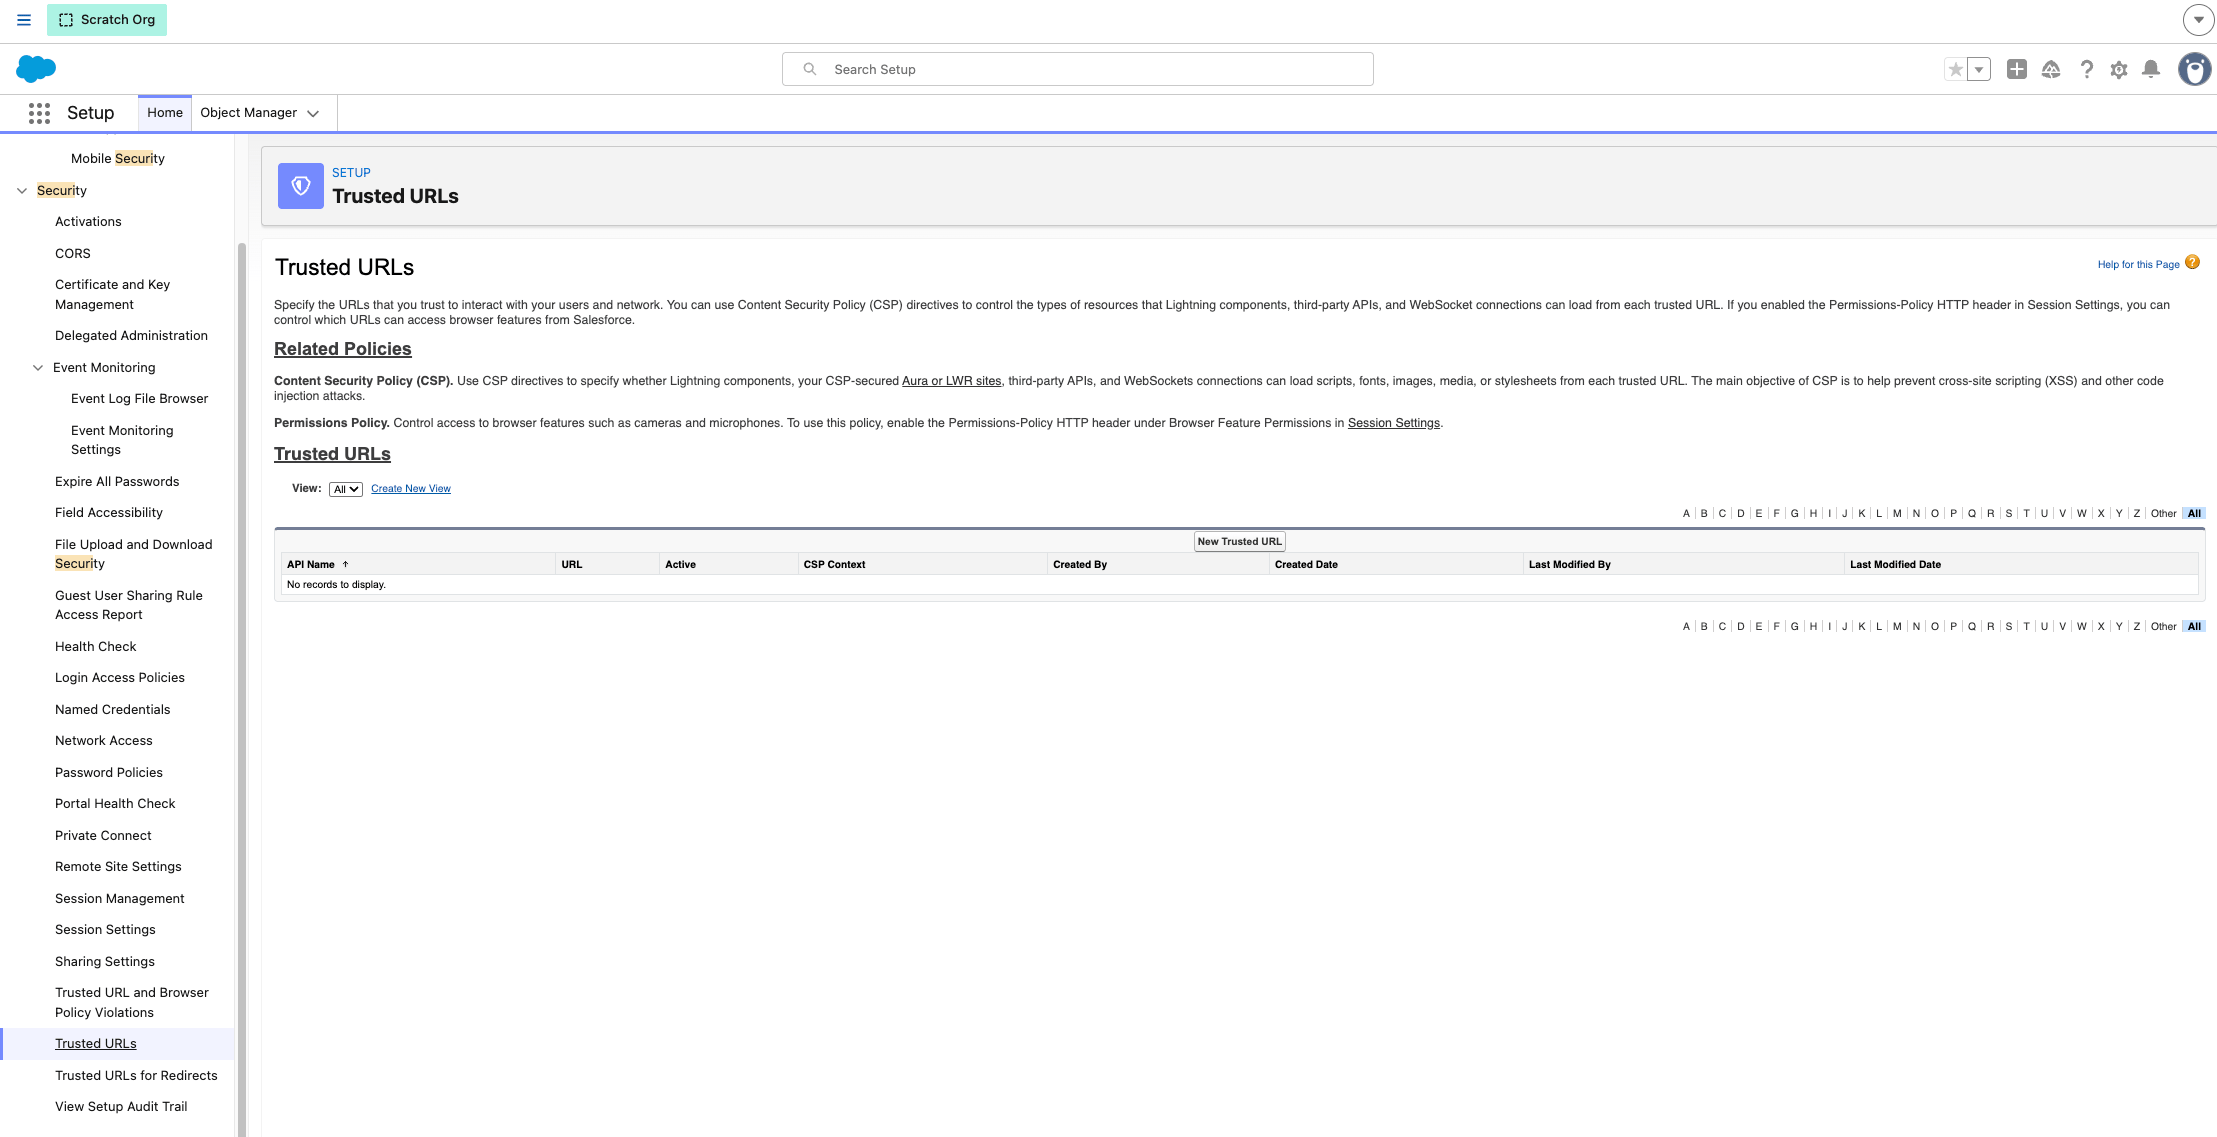 2. Adicione o URL do CDN da CloudTalk correspondente ao seu ambiente:
| **Ambiente** | **URL** |
| - | - |
| Produção | `https://cdn.cloudtalk.io` |
| Stage | `https://cdn.stage.cloudtalk.io` |
| Dev | `https://cdn.dev.cloudtalk.io` |
3\. Para esse URL, ative as diretivas CSP: **connect-src**, **frame-src** e **img-src**.
2. Adicione o URL do CDN da CloudTalk correspondente ao seu ambiente:
| **Ambiente** | **URL** |
| - | - |
| Produção | `https://cdn.cloudtalk.io` |
| Stage | `https://cdn.stage.cloudtalk.io` |
| Dev | `https://cdn.dev.cloudtalk.io` |
3\. Para esse URL, ative as diretivas CSP: **connect-src**, **frame-src** e **img-src**.
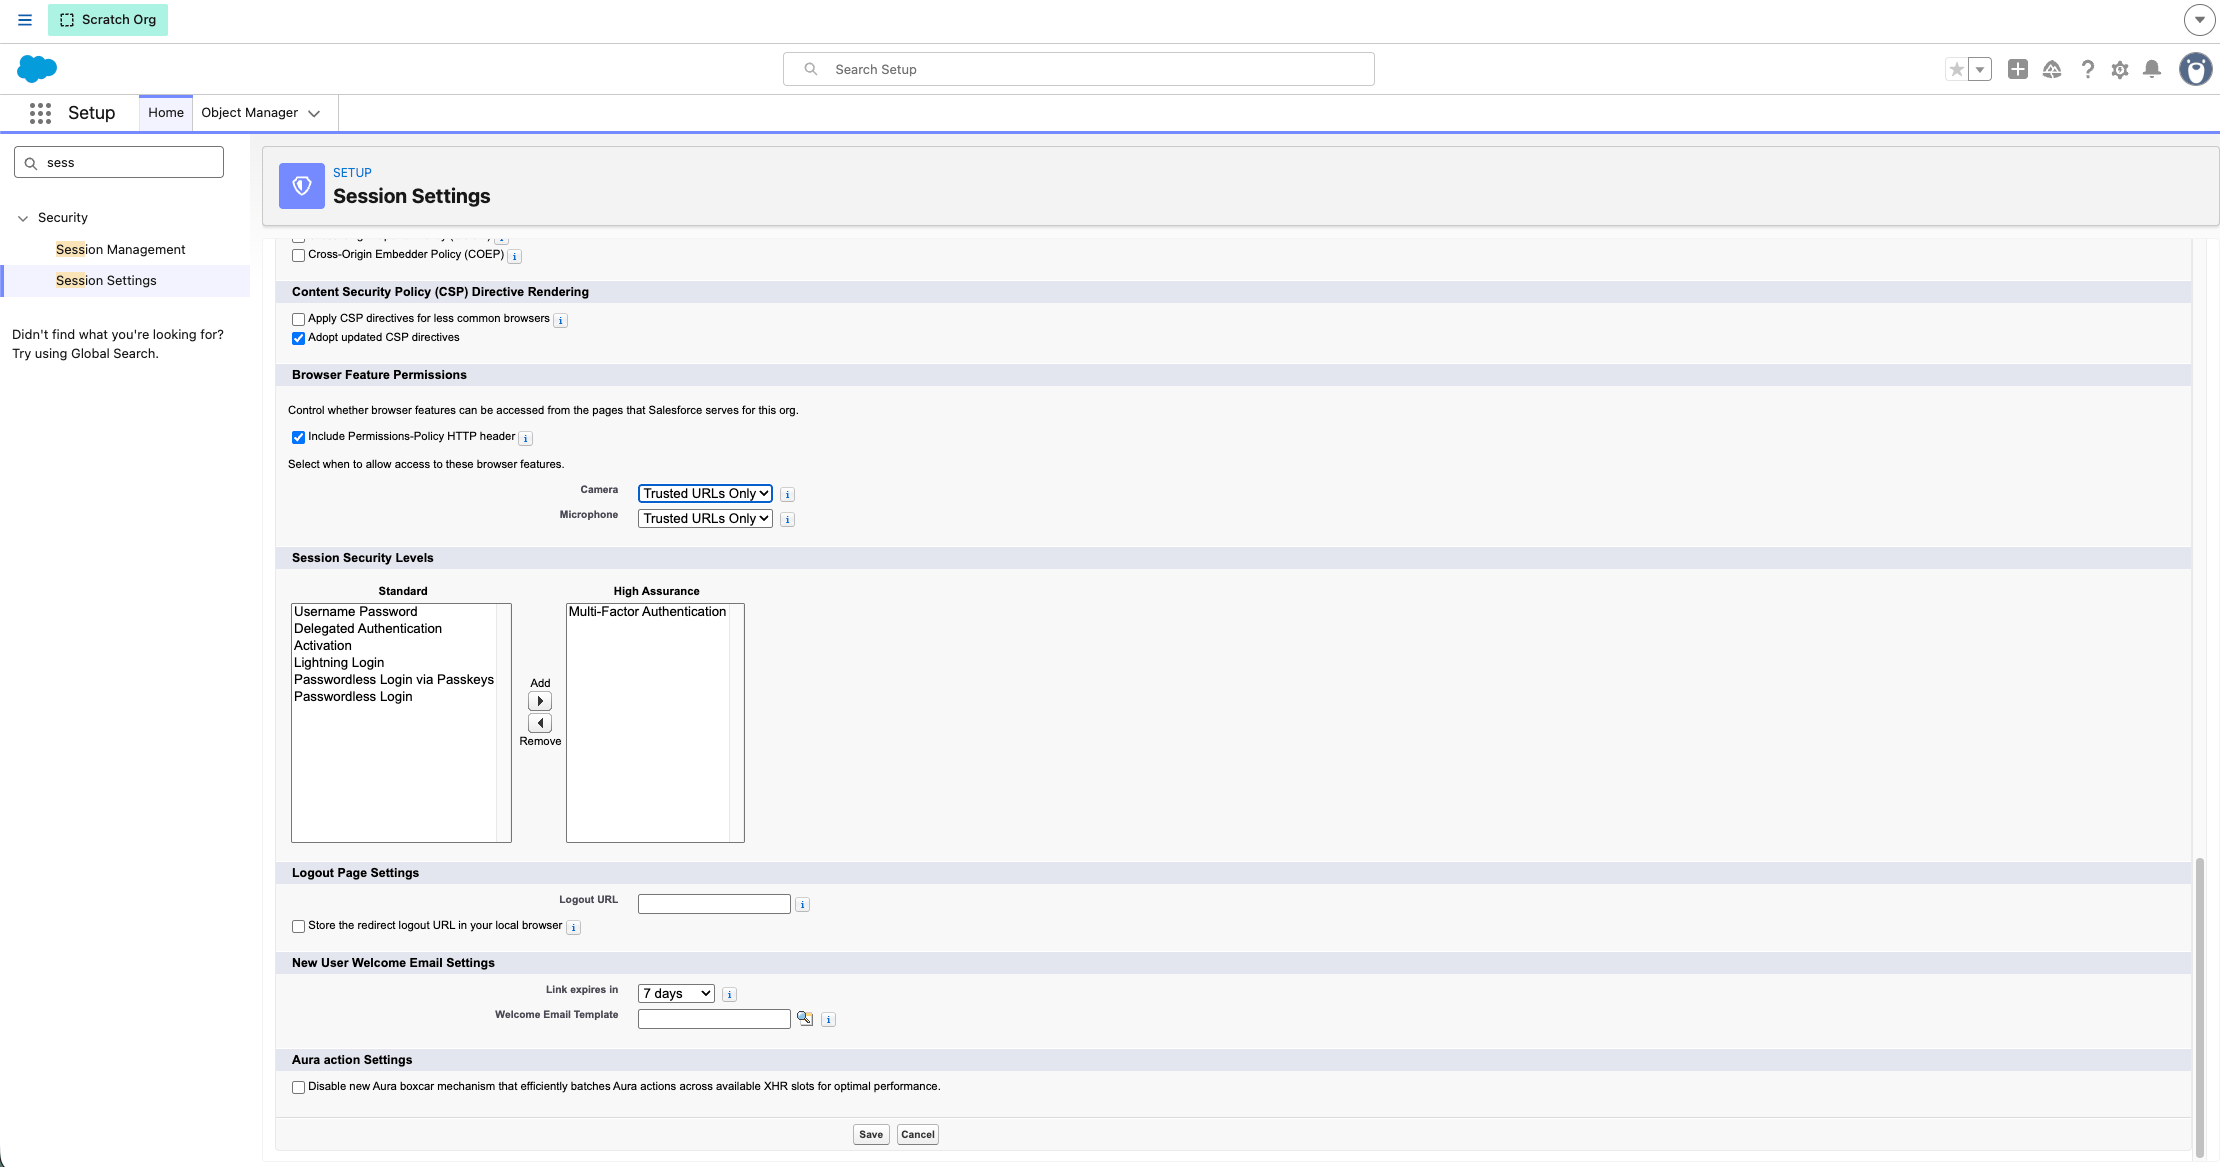
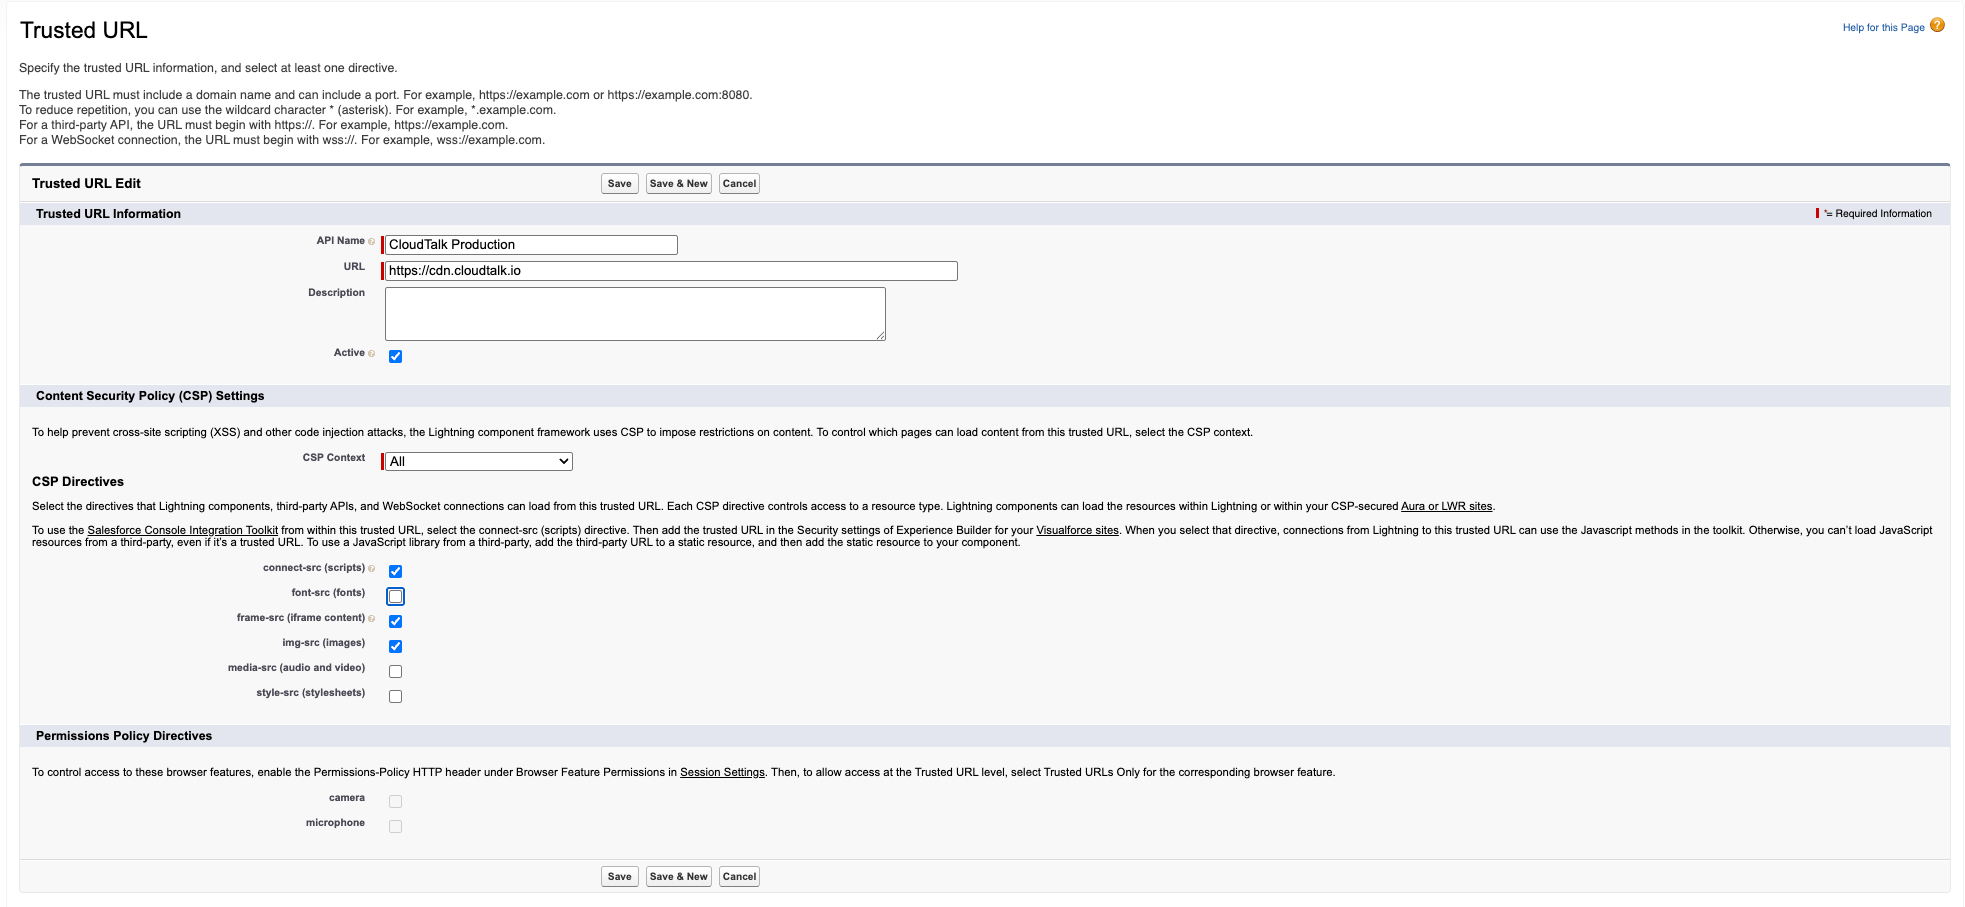 4\. Vá a **Setup > Session Settings > Browser Feature Permissions** e ative **Include Permission-Policy HTTP header**.
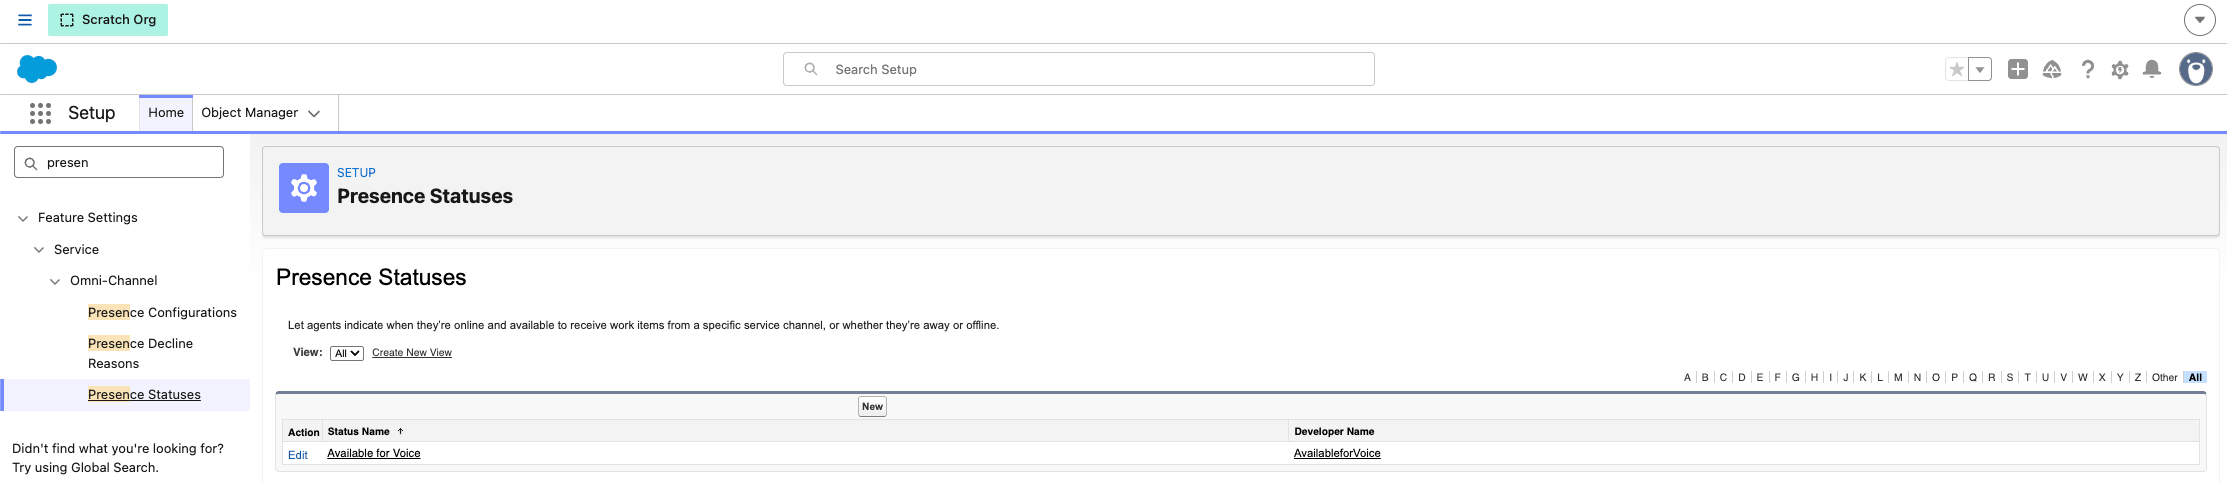
Passo 6: configurar a presença dos agentes e o Omni-Channel
Criar um estado de presença
1. No Setup, crie um estado de presença **Available**.
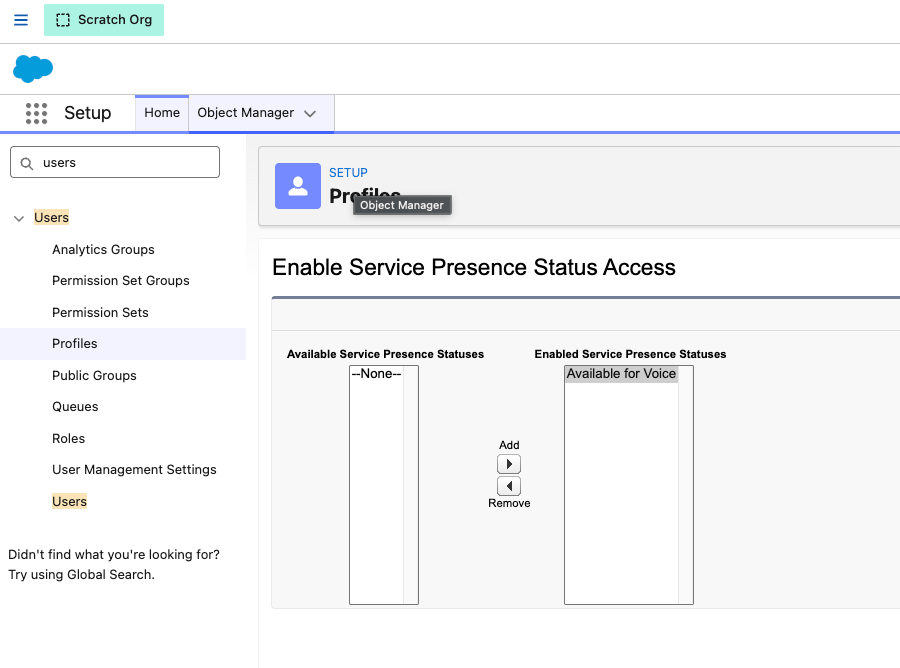
 2. Conceda-o através do perfil **System Administrator** (Setup > Profiles > enabled presence statuses).

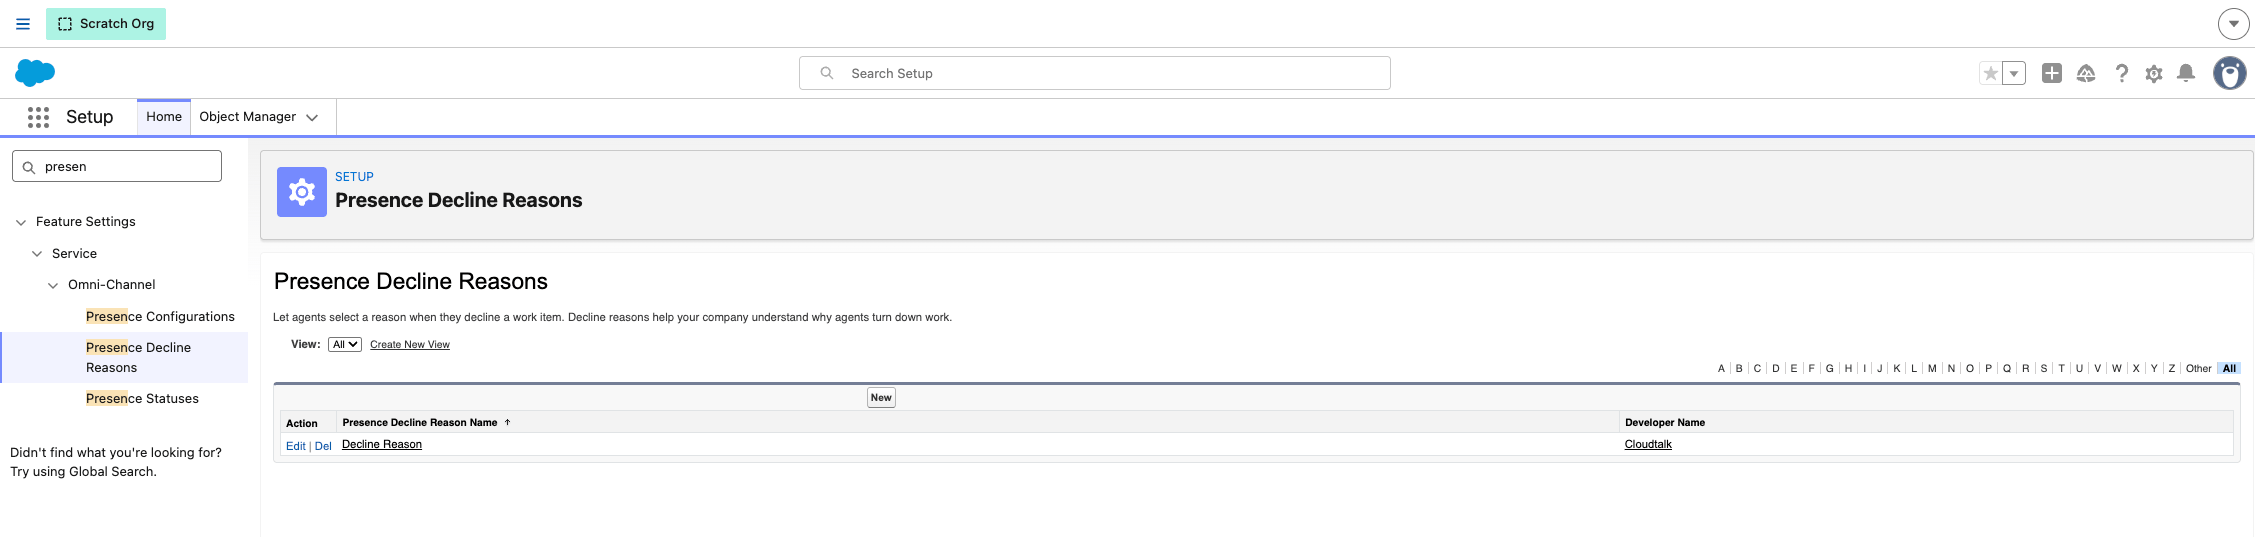
Permitir que os agentes recusem chamadas
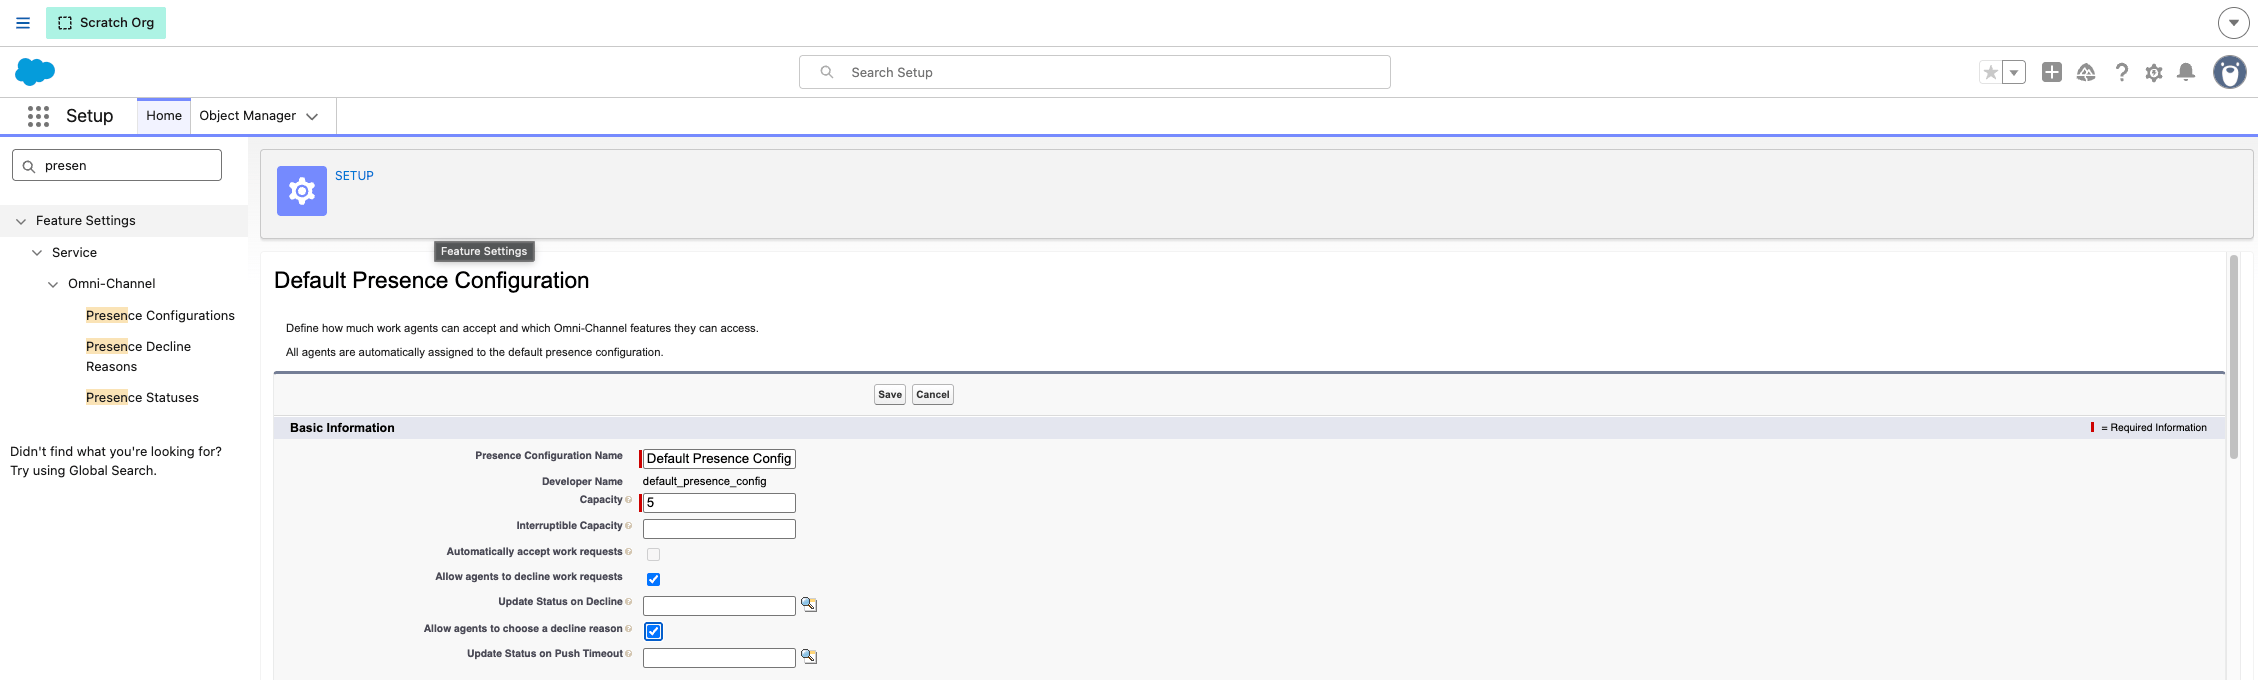
1. Abra **Setup > Presence Decline Reasons** e defina pelo menos um motivo de recusa.
 2. Abra **Setup > Presence Configurations** e ative:
* Allow agents to decline work requests
* Allow agents to choose a decline reason
2. Abra **Setup > Presence Configurations** e ative:
* Allow agents to decline work requests
* Allow agents to choose a decline reason
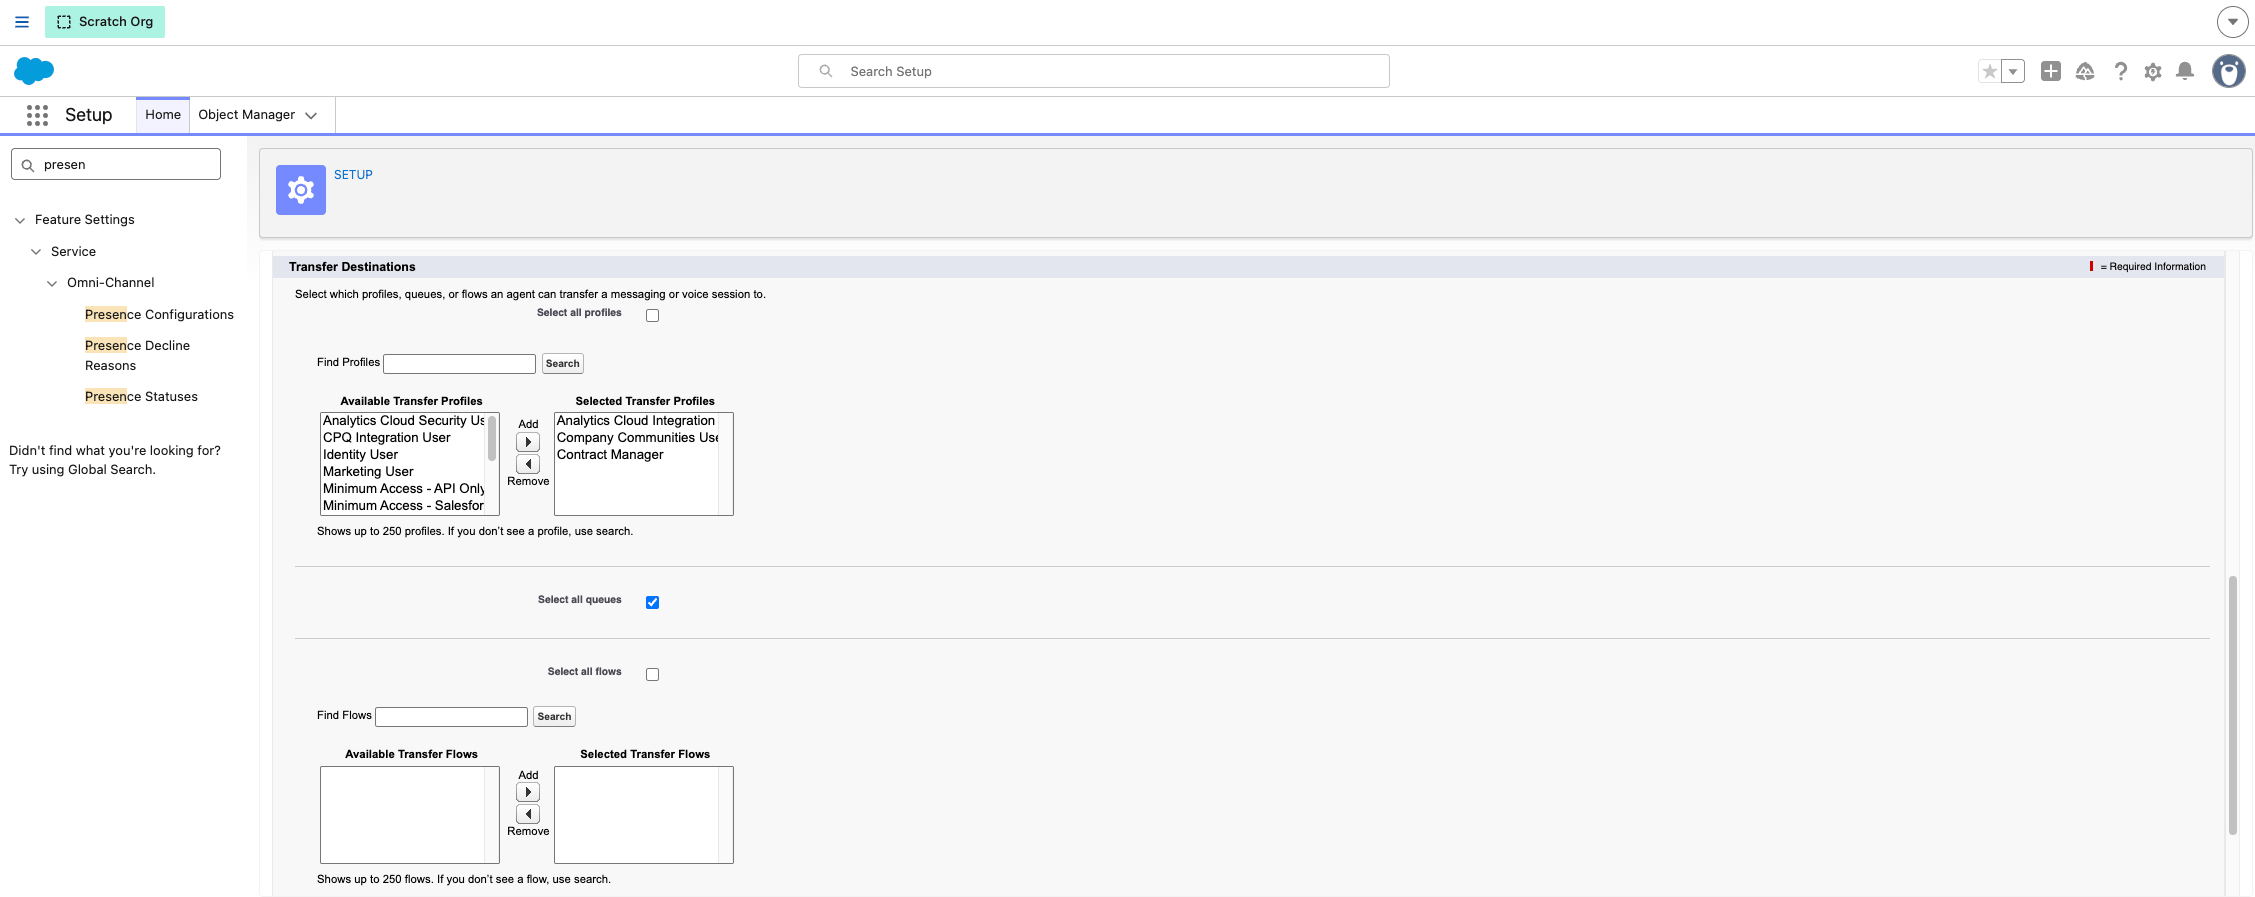
Configurar os destinos de transferência
Na configuração de presença/Omni-Channel, defina para que perfis e filas os agentes podem transferir chamadas. Selecione **todos os perfis** e **todas as filas** para obter a cobertura mais abrangente.
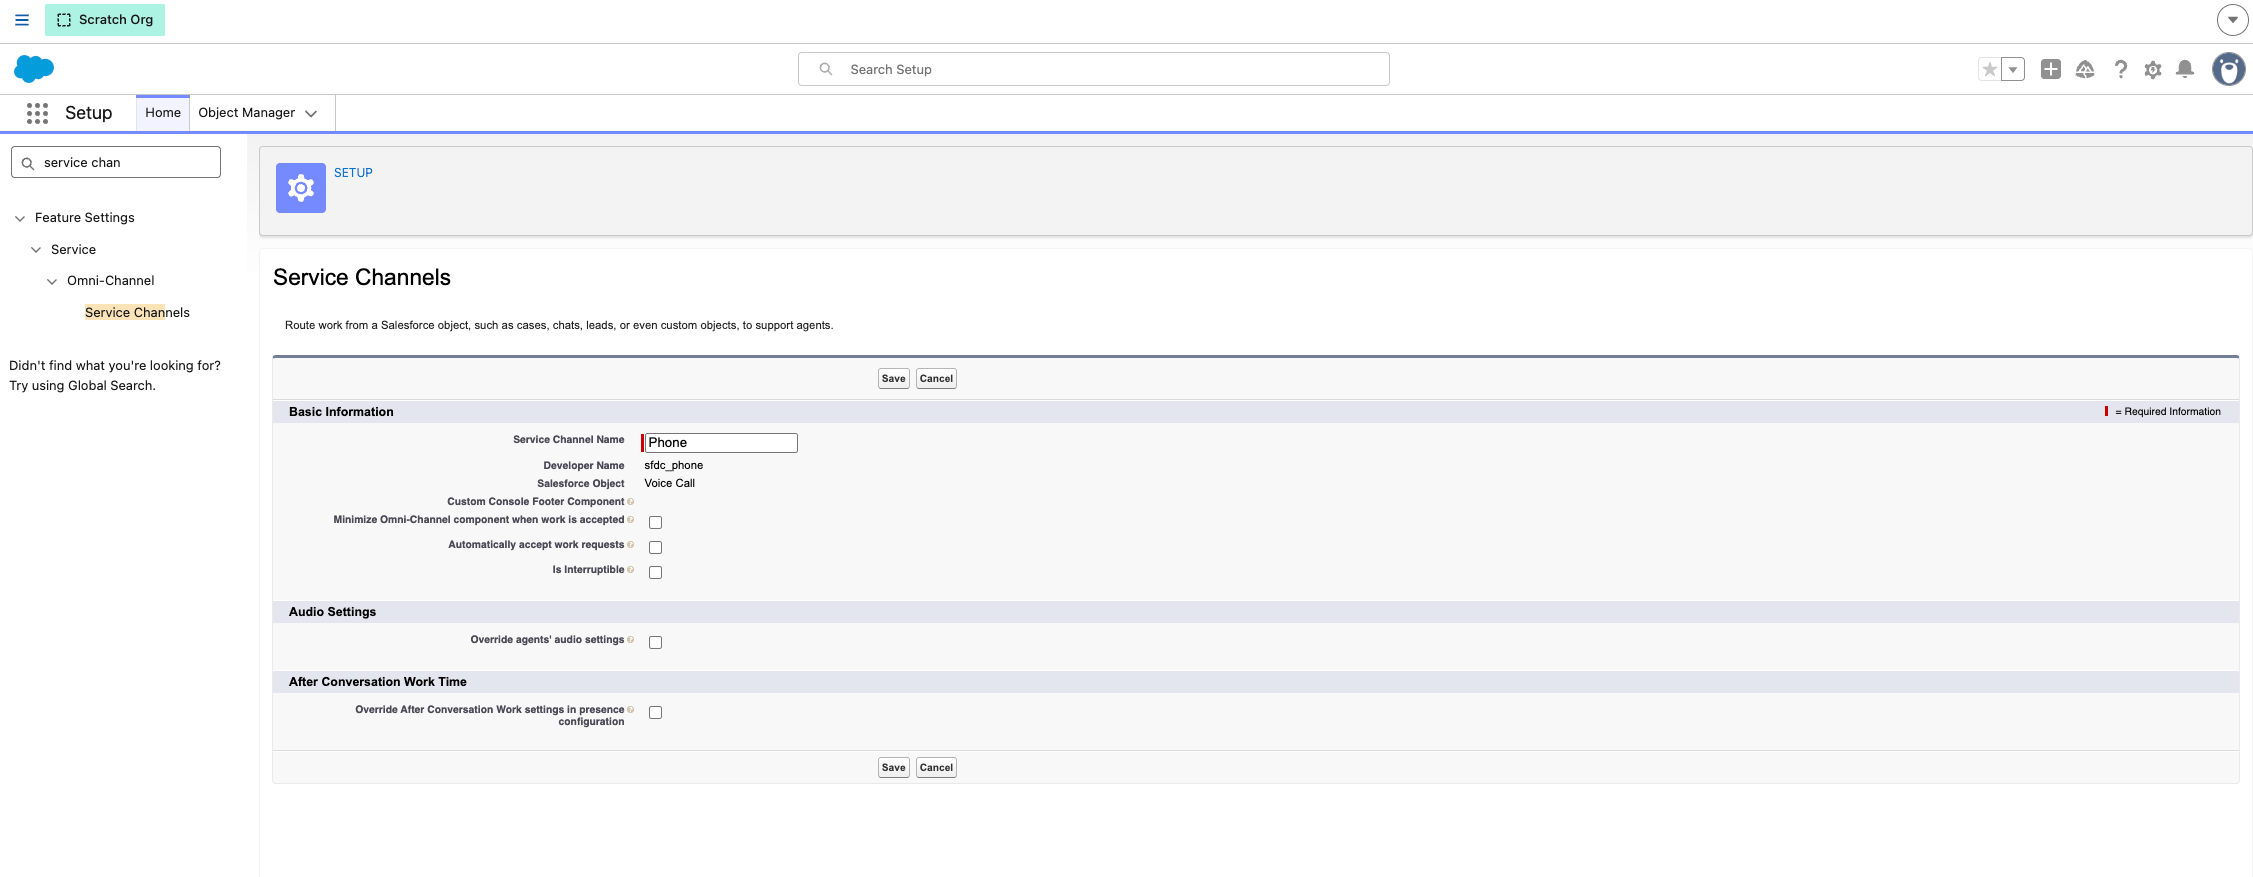
Manter o painel do Omni-Channel aberto durante as chamadas
1. No Setup, procure **Service Channels** e edite o canal de serviço **Phone**.
2. Desmarque **Minimize Omni-Channel component when work is accepted**.
Passo 7: personalizar a apresentação dos registos
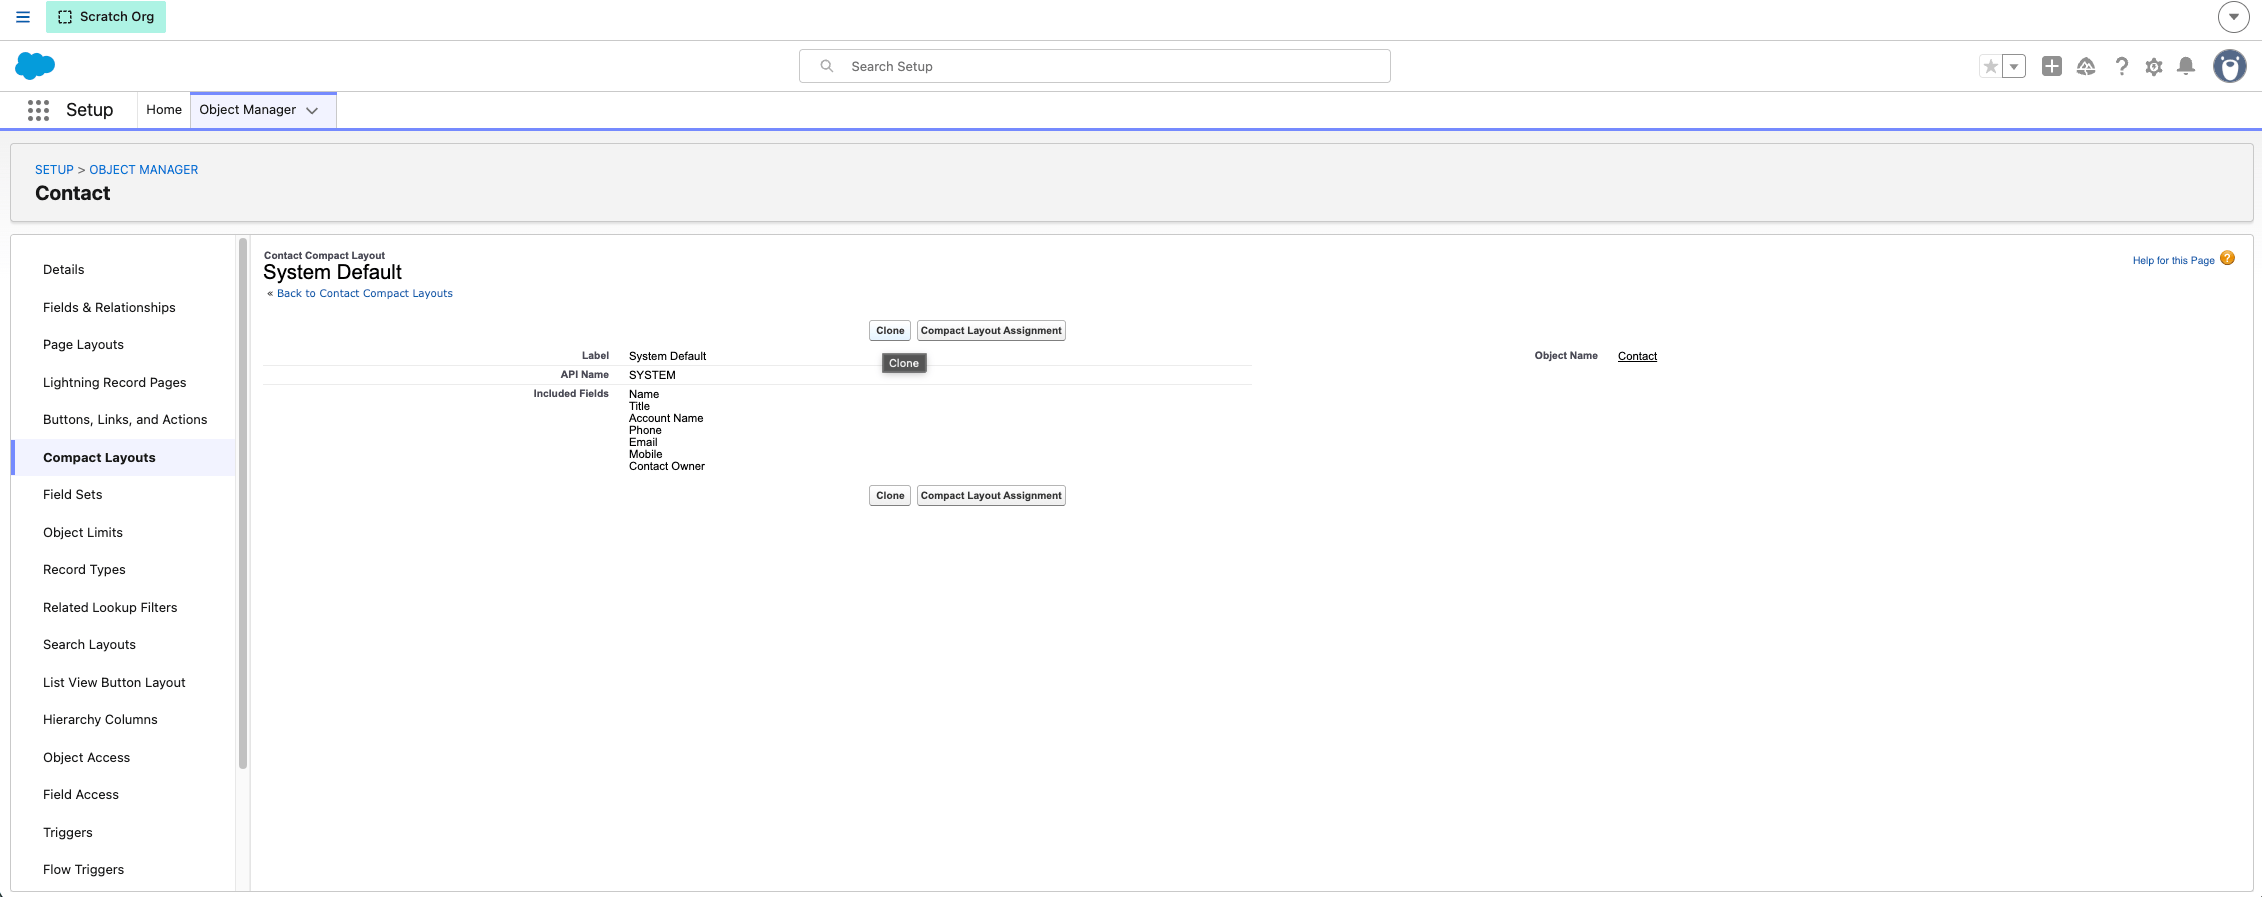
Mostrar a informação de contacto como cabeçalho
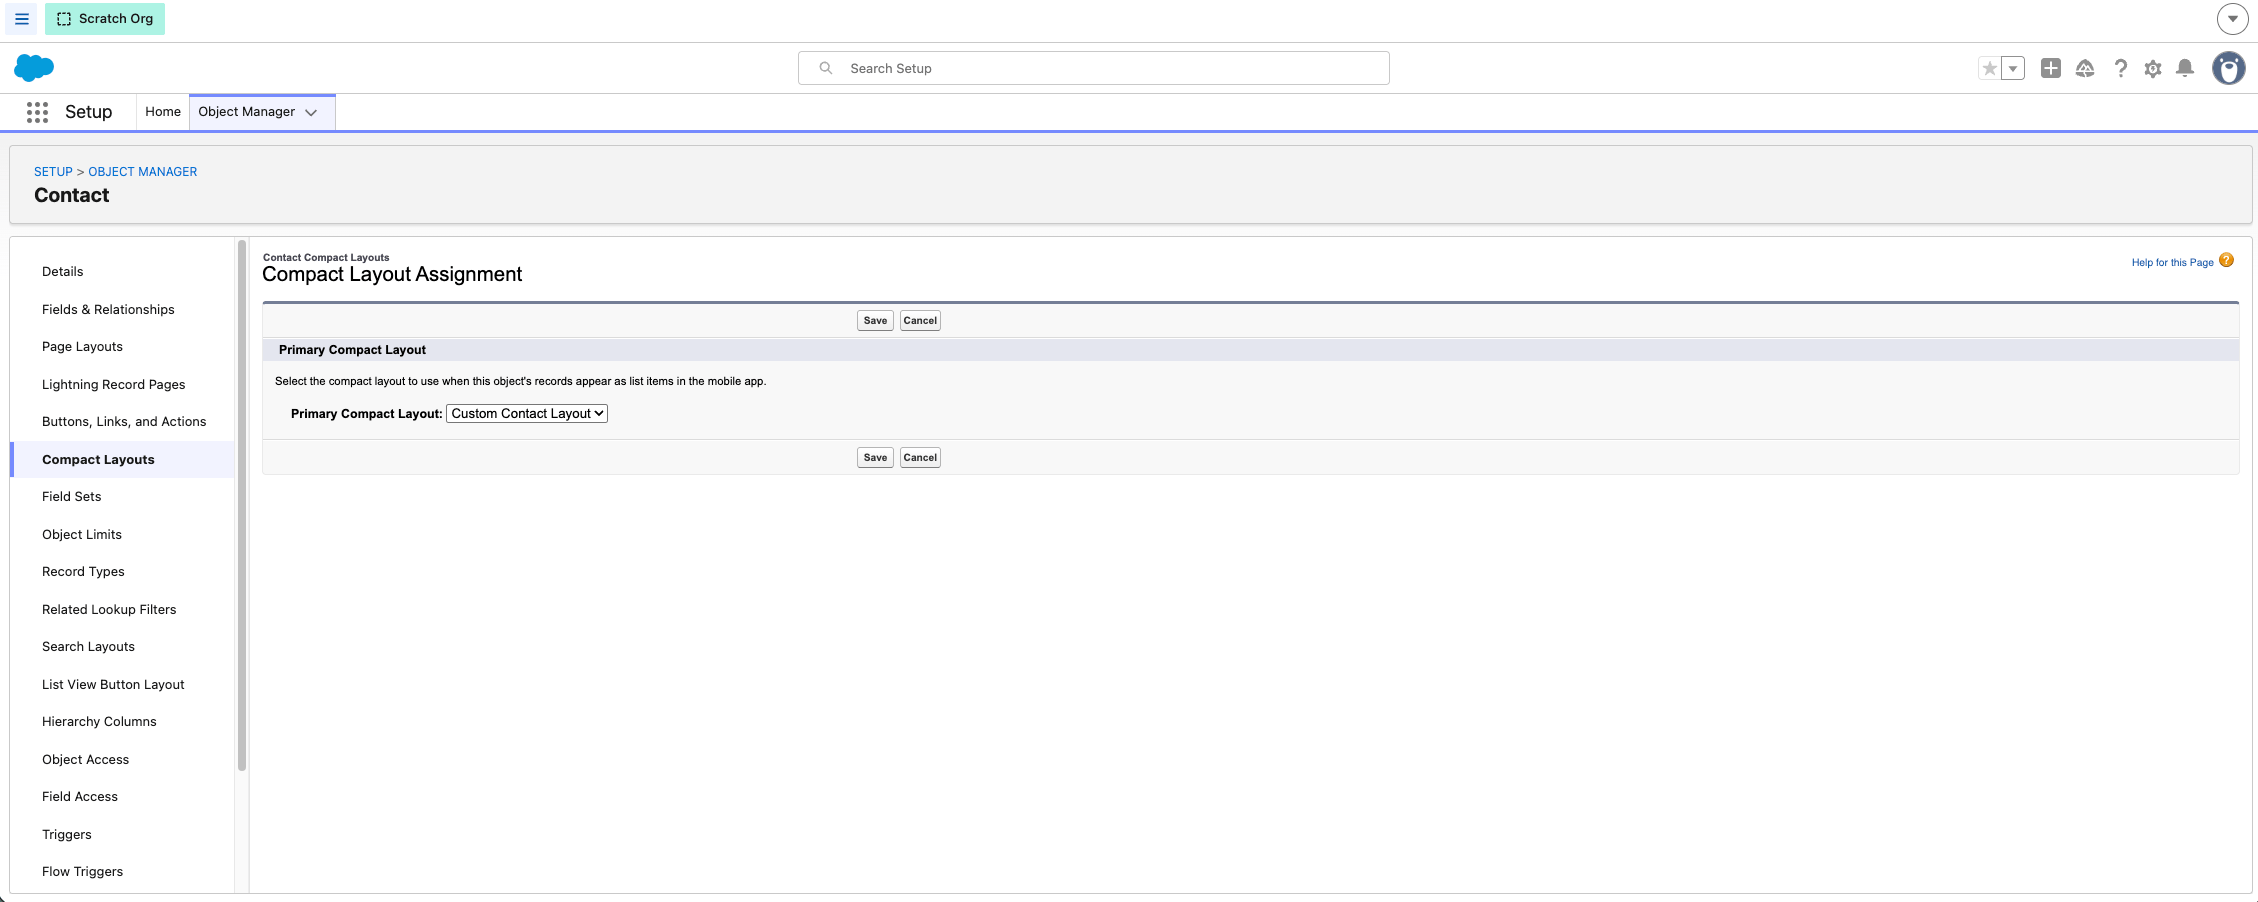
1. Abra **Object Manager > (objeto relevante) > Compact Layouts**.
2. Clone o **System Default** e dê-lhe um nome (por exemplo, «Custom»).
3. Mova **Recipient Contact Info** para os campos selecionados e coloque-o em primeiro lugar.
4. Guarde e, em seguida, abra **Compact Layout Assignment** e atribua o novo esquema.
Mostrar o histórico de chamadas no registo do contacto
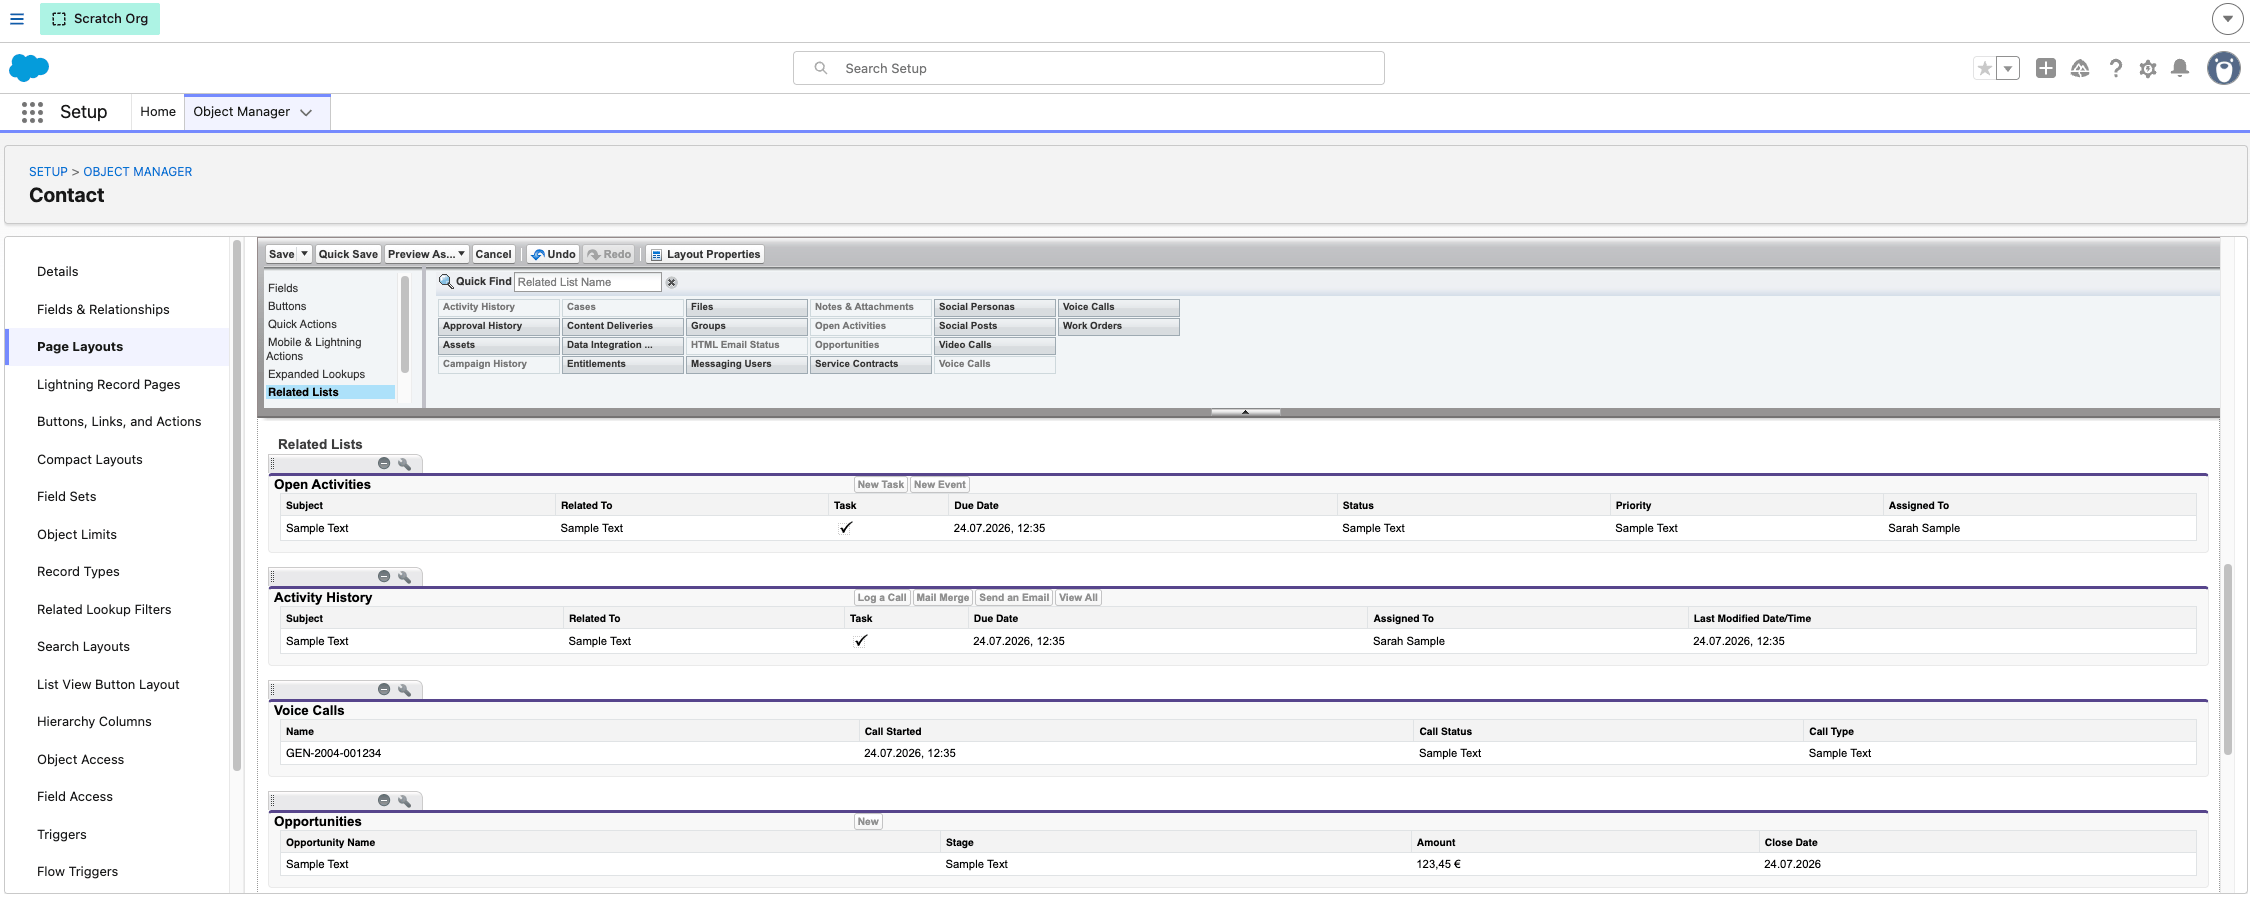
1. Abra **Object Manager > Contact > Page Layouts**.
2. Adicione a lista relacionada **Voice Calls** ao layout.
 **Está tudo pronto!**
Os agentes a quem foi atribuído o conjunto de permissões e que foram adicionados ao contact center já podem iniciar sessão no widget da CloudTalk no painel do Omni-Channel e começar a atender chamadas. Indique-lhes o [guia do Salesforce Service Cloud Voice](/pt/articles/14654473-salesforce-service-cloud-voice) para a utilização diária.
***
*Precisa de ajuda ou tem alguma questão?* Contacte-nos através do nosso [Portal de Suporte](https://support.cloudtalk.io/hc/en-us/requests/new?ticket_form_id=26305535257884) — estamos aqui para si.
## Related topics
- [Salesforce Service Cloud Voice](/pt/articles/14654473-salesforce-service-cloud-voice.md)
- [Configuração do Einstein Conversation Insights](/pt/articles/8290842-einstein-conversation-insights-setup.md)
- [Implementar a CloudTalk Phone numa frota de dispositivos](/pt/articles/16801942-deploying-cloudtalk-phone-across-a-fleet.md)
This documentation is built and hosted on [Mintlify](https://mintlify.com), a developer documentation platform.
**Está tudo pronto!**
Os agentes a quem foi atribuído o conjunto de permissões e que foram adicionados ao contact center já podem iniciar sessão no widget da CloudTalk no painel do Omni-Channel e começar a atender chamadas. Indique-lhes o [guia do Salesforce Service Cloud Voice](/pt/articles/14654473-salesforce-service-cloud-voice) para a utilização diária.
***
*Precisa de ajuda ou tem alguma questão?* Contacte-nos através do nosso [Portal de Suporte](https://support.cloudtalk.io/hc/en-us/requests/new?ticket_form_id=26305535257884) — estamos aqui para si.
## Related topics
- [Salesforce Service Cloud Voice](/pt/articles/14654473-salesforce-service-cloud-voice.md)
- [Configuração do Einstein Conversation Insights](/pt/articles/8290842-einstein-conversation-insights-setup.md)
- [Implementar a CloudTalk Phone numa frota de dispositivos](/pt/articles/16801942-deploying-cloudtalk-phone-across-a-fleet.md)
This documentation is built and hosted on [Mintlify](https://mintlify.com), a developer documentation platform.