> ## Documentation Index
> Fetch the complete documentation index at: https://help.cloudtalk.io/llms.txt
> Use this file to discover all available pages before exploring further.
# Salesforce Service Cloud Voice: installatiehandleiding voor beheerders
> Beheerdersinstallatie van CloudTalk in Salesforce Service Cloud Voice: Voice inschakelen, permission sets configureren, het contactcenter aanmaken, Trusted…
**Voor Salesforce-beheerders.** Voer deze stappen eenmalig uit om CloudTalk in Service Cloud Voice in te schakelen. Na de installatie kunnen agenten de [handleiding voor Salesforce Service Cloud Voice](/nl/articles/14654473-salesforce-service-cloud-voice) volgen om gesprekken te voeren, te ontvangen en door te verbinden.
**Gebruikersniveau**: Admin
***
Voordat u begint
U hebt het volgende nodig:
* Een Salesforce-org waarin **Service Cloud Voice** beschikbaar is
* **System Administrator**-toegang in Salesforce
* Het **contactcentercertificaat** dat CloudTalk u tijdens de onboarding verstrekt (haal dit nergens anders vandaan)
Stapsgewijze installatie
Stap 1: Service Cloud Voice inschakelen
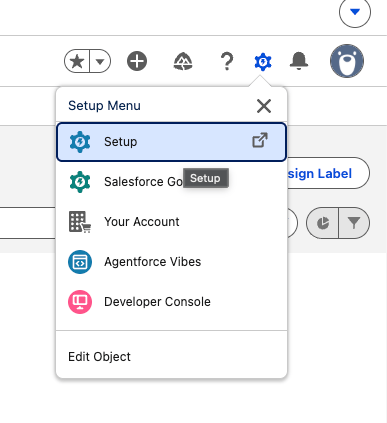
1. Open **Setup** en zoek naar **Voice**.
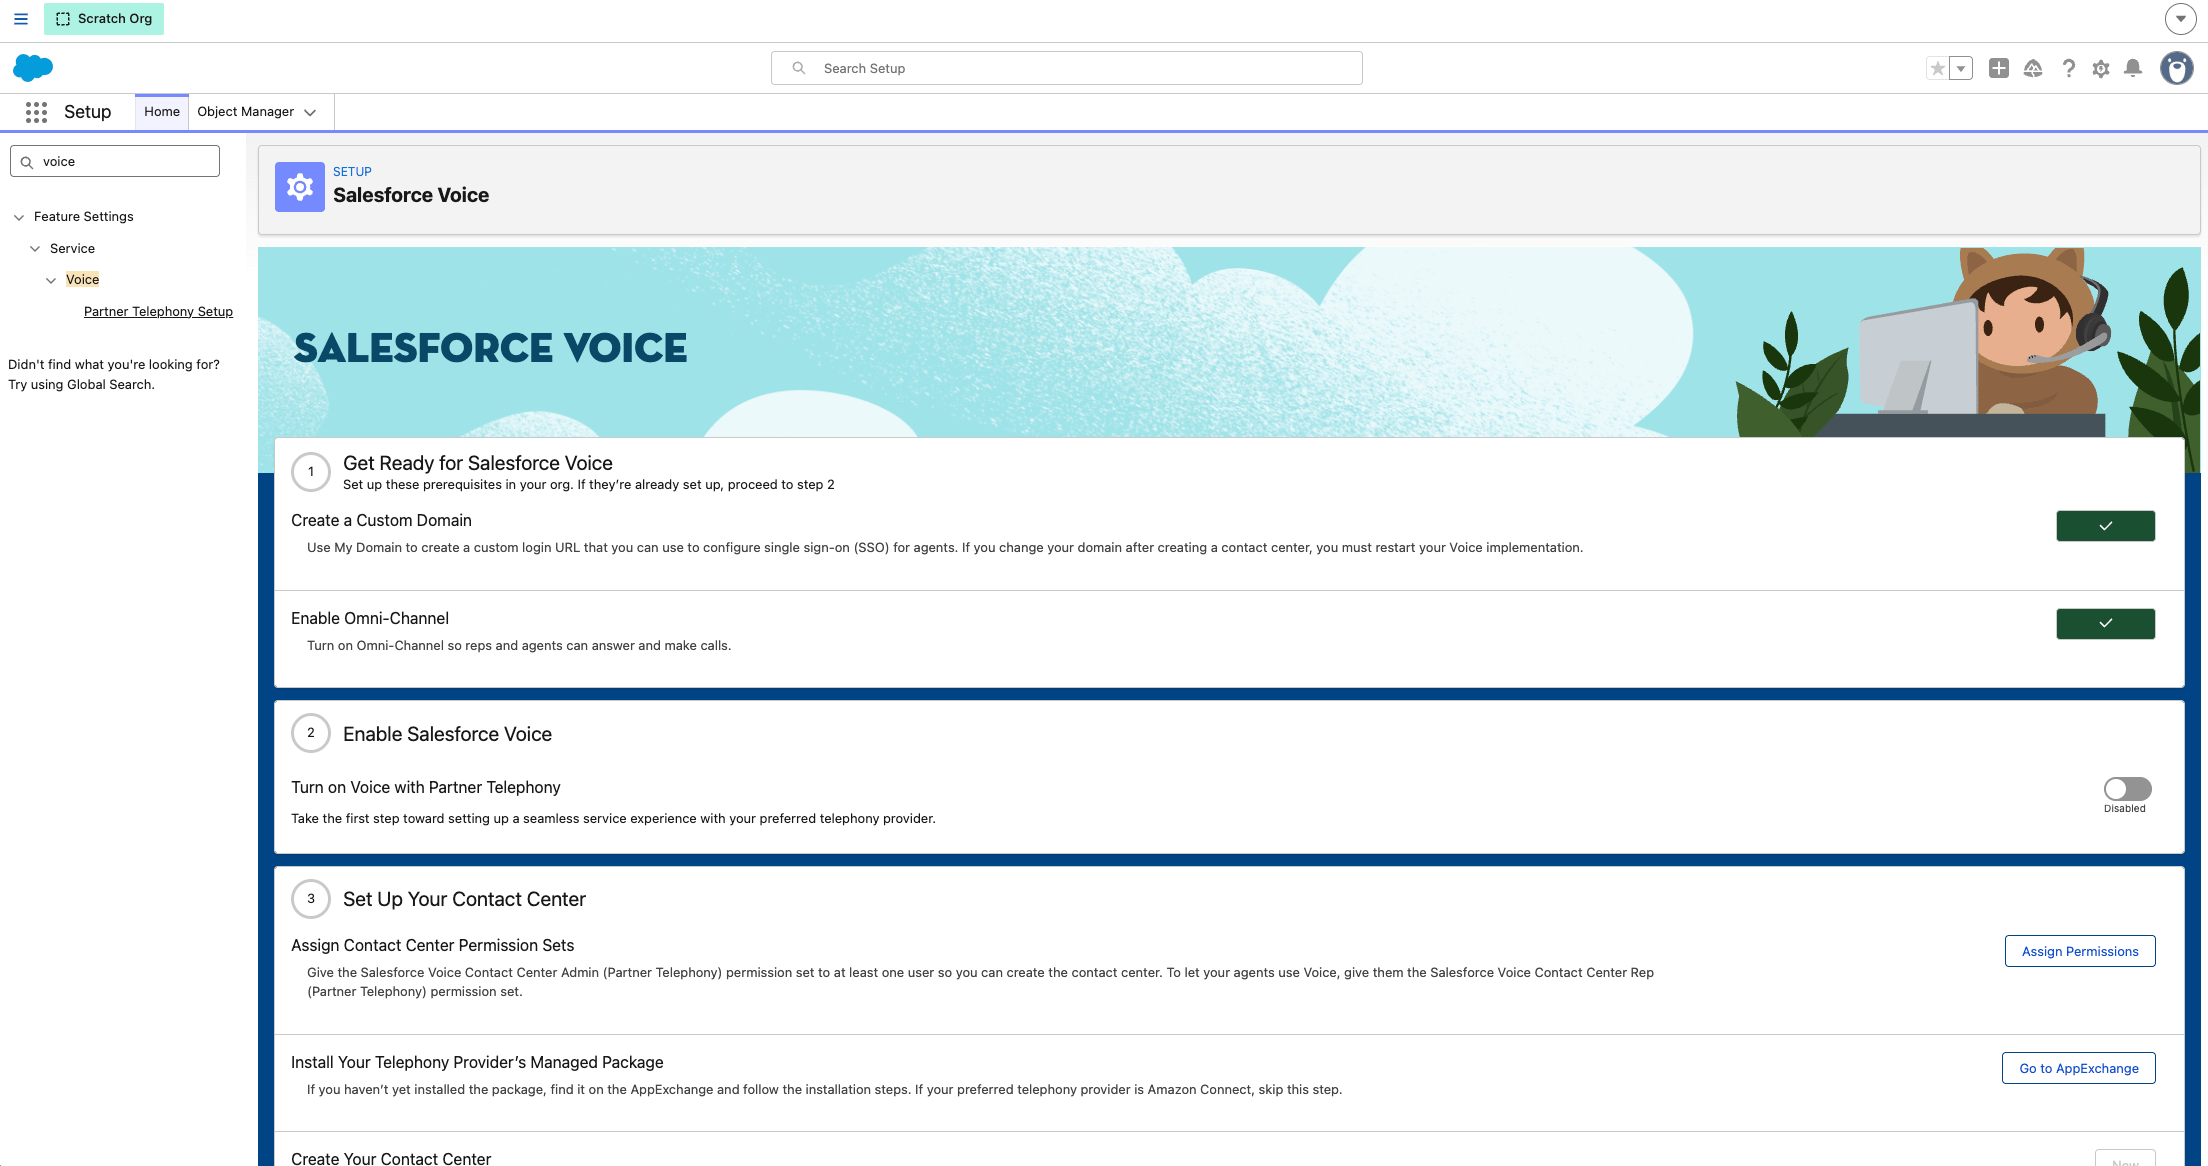 2. Schakel de functie in via **Feature Settings > Service > Voice**.

Stap 2: De Partner Telephony-permission set configureren
1. Ga in Setup naar **Permission Sets** en open **Partner Telephony Permission Set**.
2. Open **App Permissions > Edit** en schakel het volgende in:
* Control Call Recording
* Salesforce Voice Contact Center Admin (Partner Telephony)
* Salesforce Voice Contact Center Rep (Partner Telephony)
* Salesforce Voice Contact Center Supervisor
3. **Save**.
Stap 3: De permission set aan gebruikers toewijzen
1. Ga naar **Setup > Users > Permission Set Assignments**.
 2. Wijs **Partner Telephony Permission Set** toe aan elke agent en aan minstens één admin die het contactcenter gaat beheren.
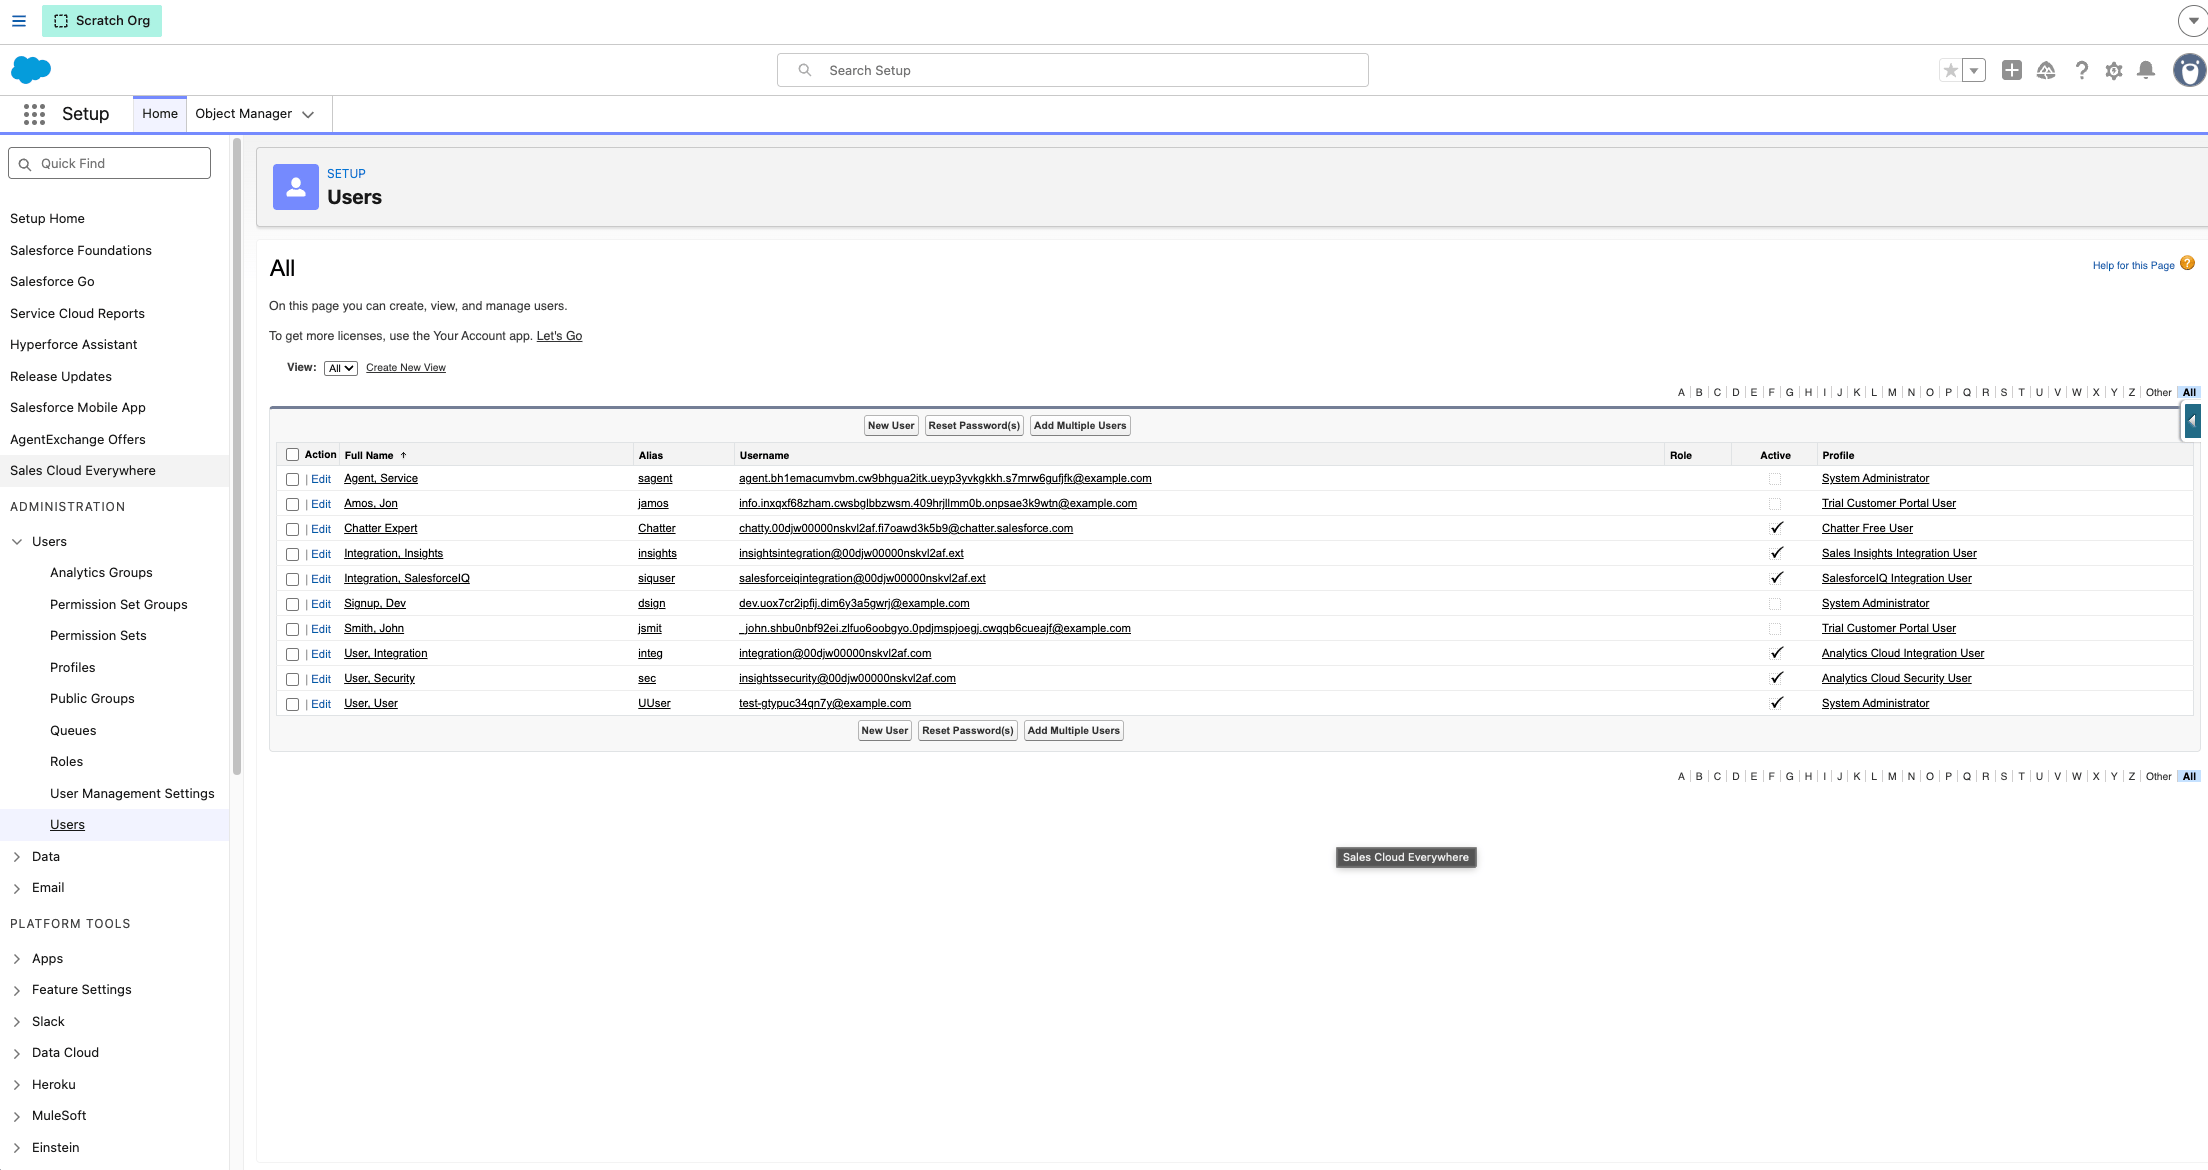 Het Contact Center-**admin**-recht is vereist om in de volgende stap het contactcentercertificaat te installeren of bij te werken.
Stap 4: Het contactcenter aanmaken
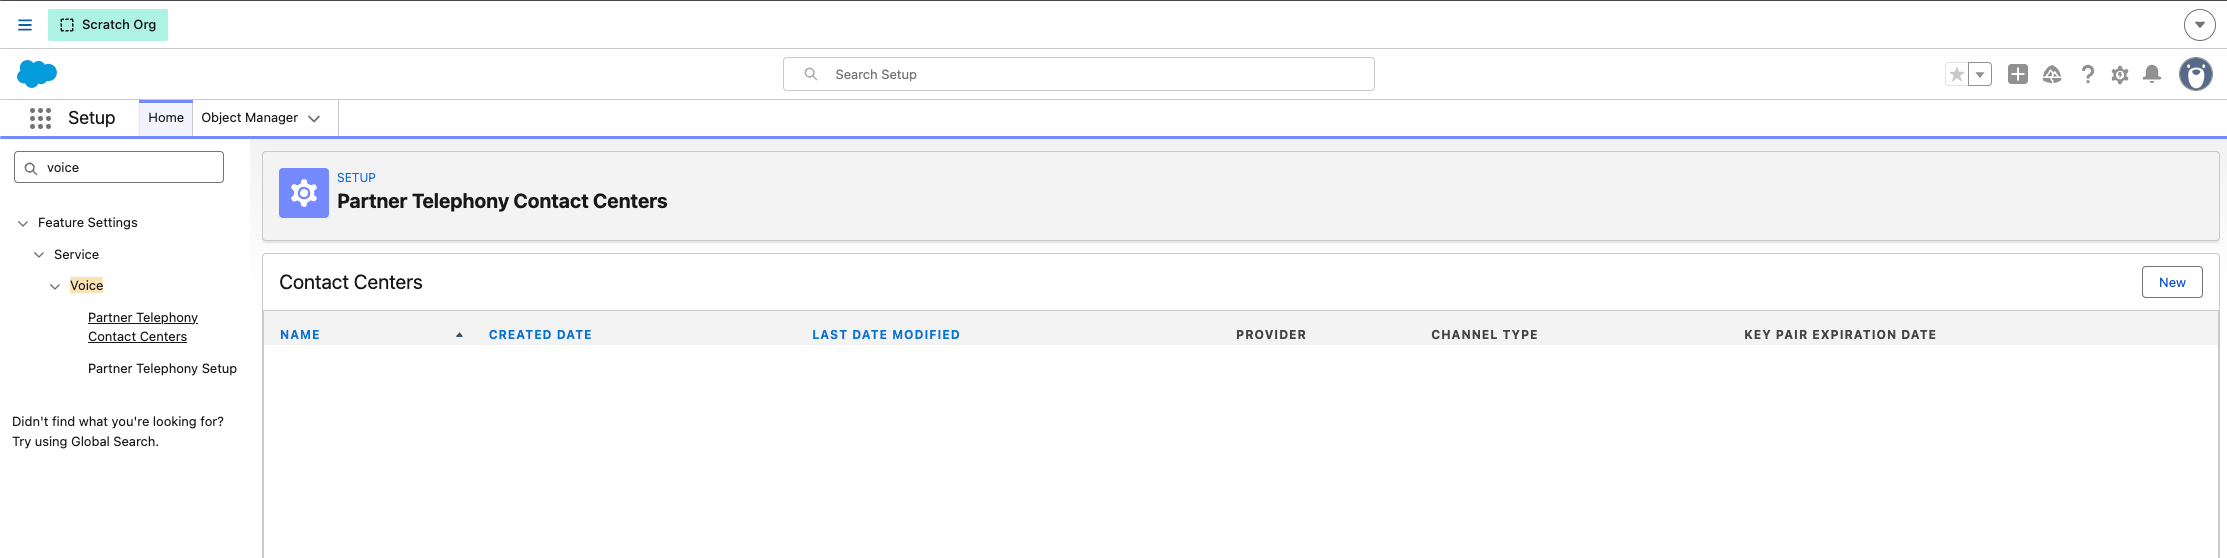
1. Open in Setup **Voice > Partner Telephony Contact Centers** en maak een nieuw contactcenter aan.
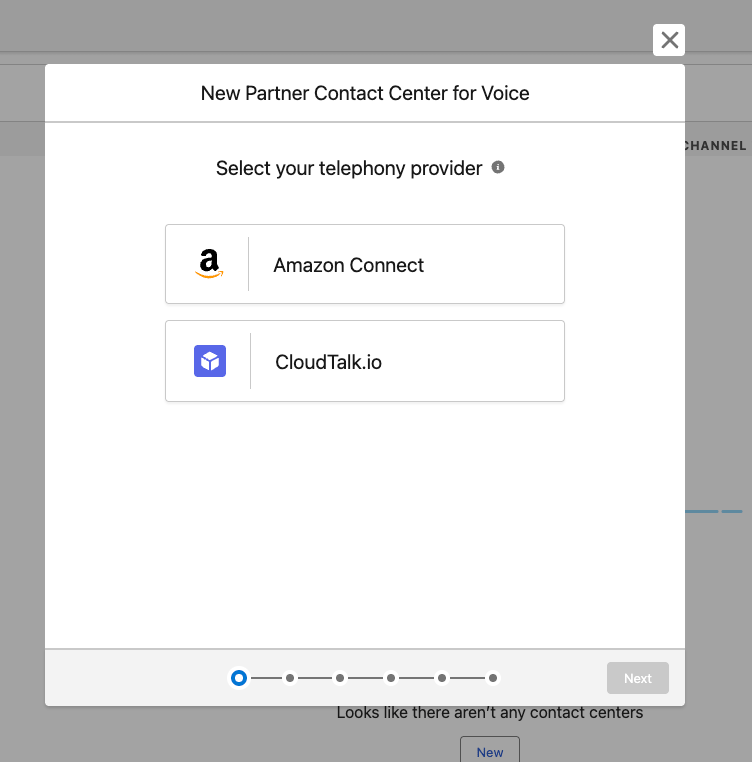 2\. Voeg het **openbare-sleutelcertificaat van CloudTalk** toe. Plak het volledige certificaatblok, inclusief de regels `BEGIN`/`END`.
```
-----BEGIN CERTIFICATE-----[Paste the certificate CloudTalk provided during onboarding]-----END CERTIFICATE-----
```
2\. Voeg het **openbare-sleutelcertificaat van CloudTalk** toe. Plak het volledige certificaatblok, inclusief de regels `BEGIN`/`END`.
```
-----BEGIN CERTIFICATE-----[Paste the certificate CloudTalk provided during onboarding]-----END CERTIFICATE-----
```
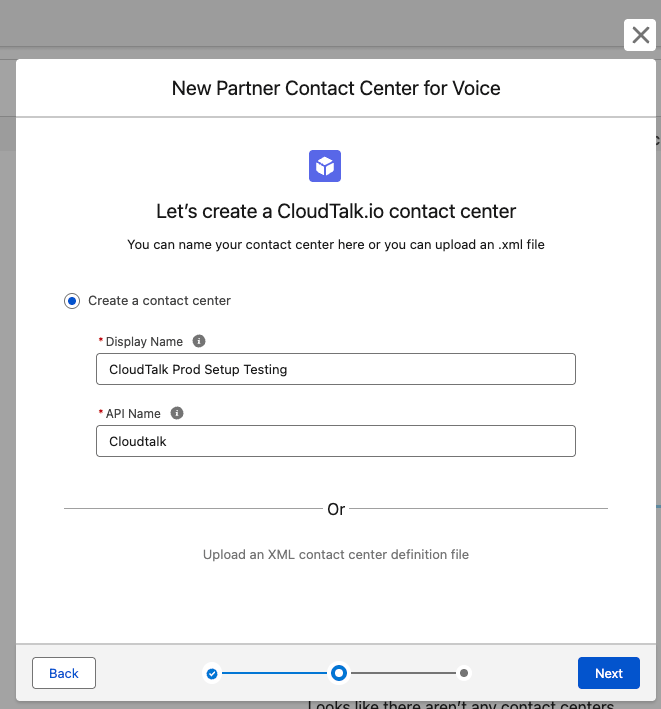 3\. Voeg uw agenten toe als **gebruikers** van het contactcenter.
Stap 5: Trusted URLs (CSP) configureren
1. Open in Setup **Security > Trusted URLs**.
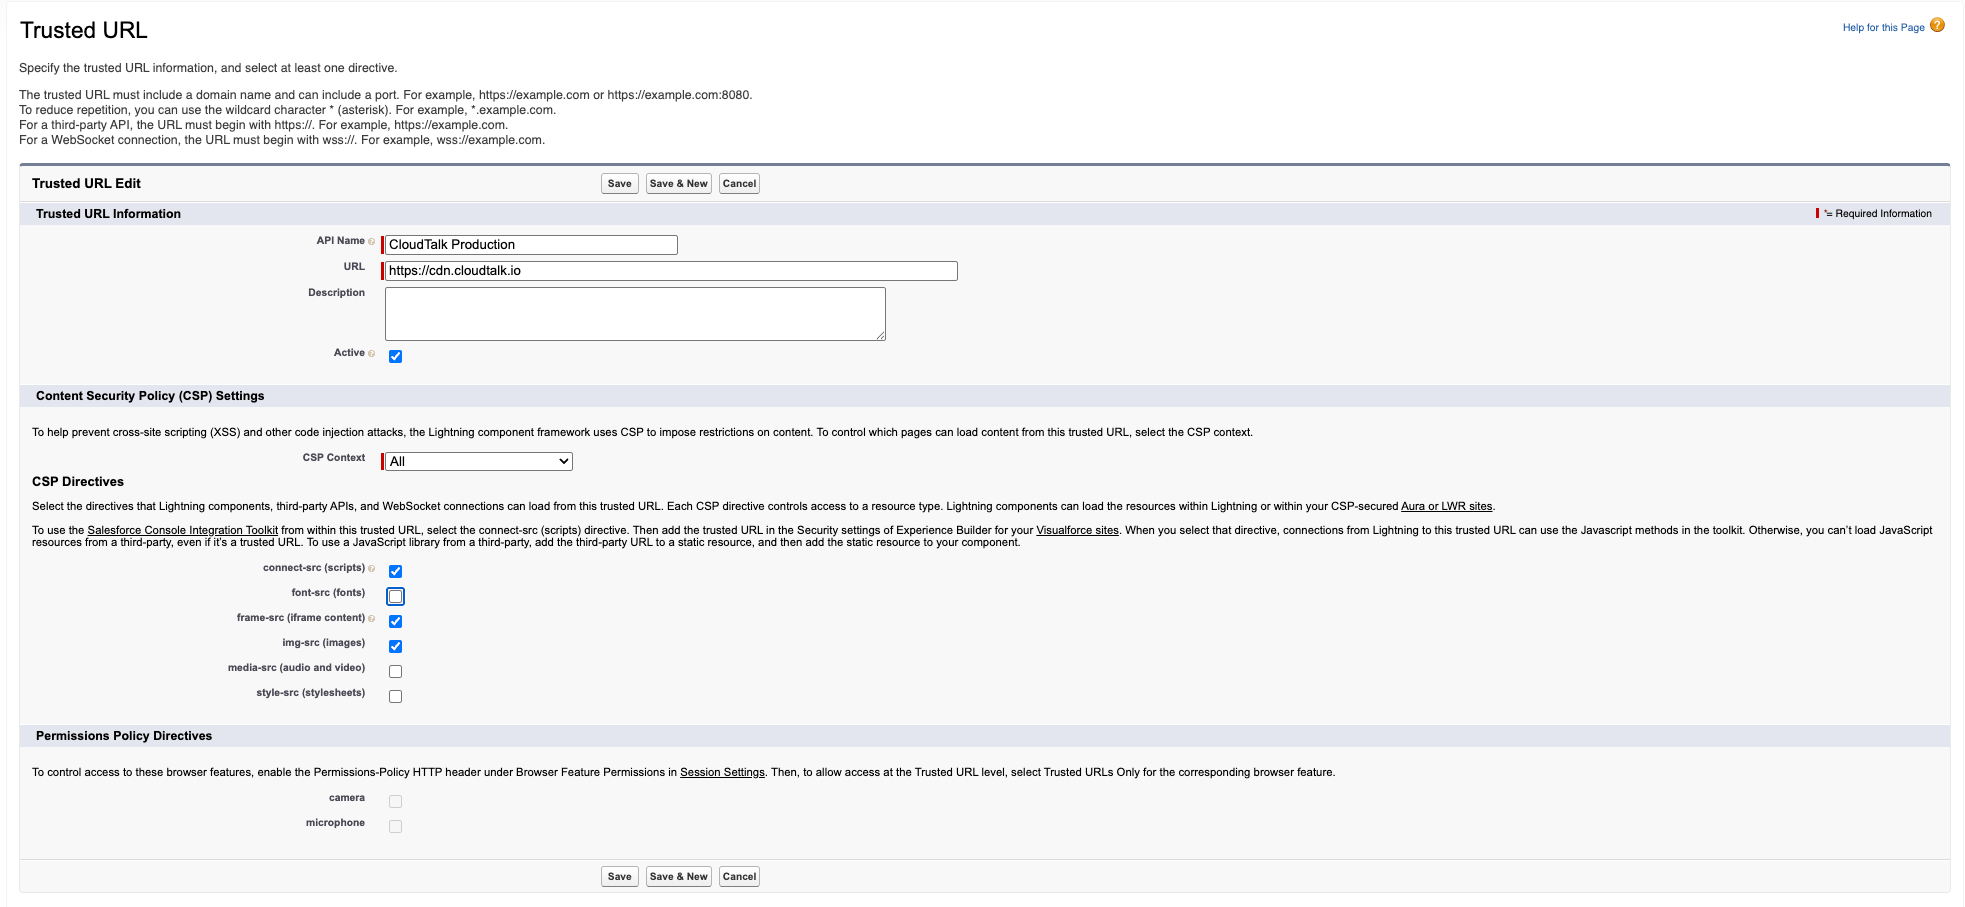
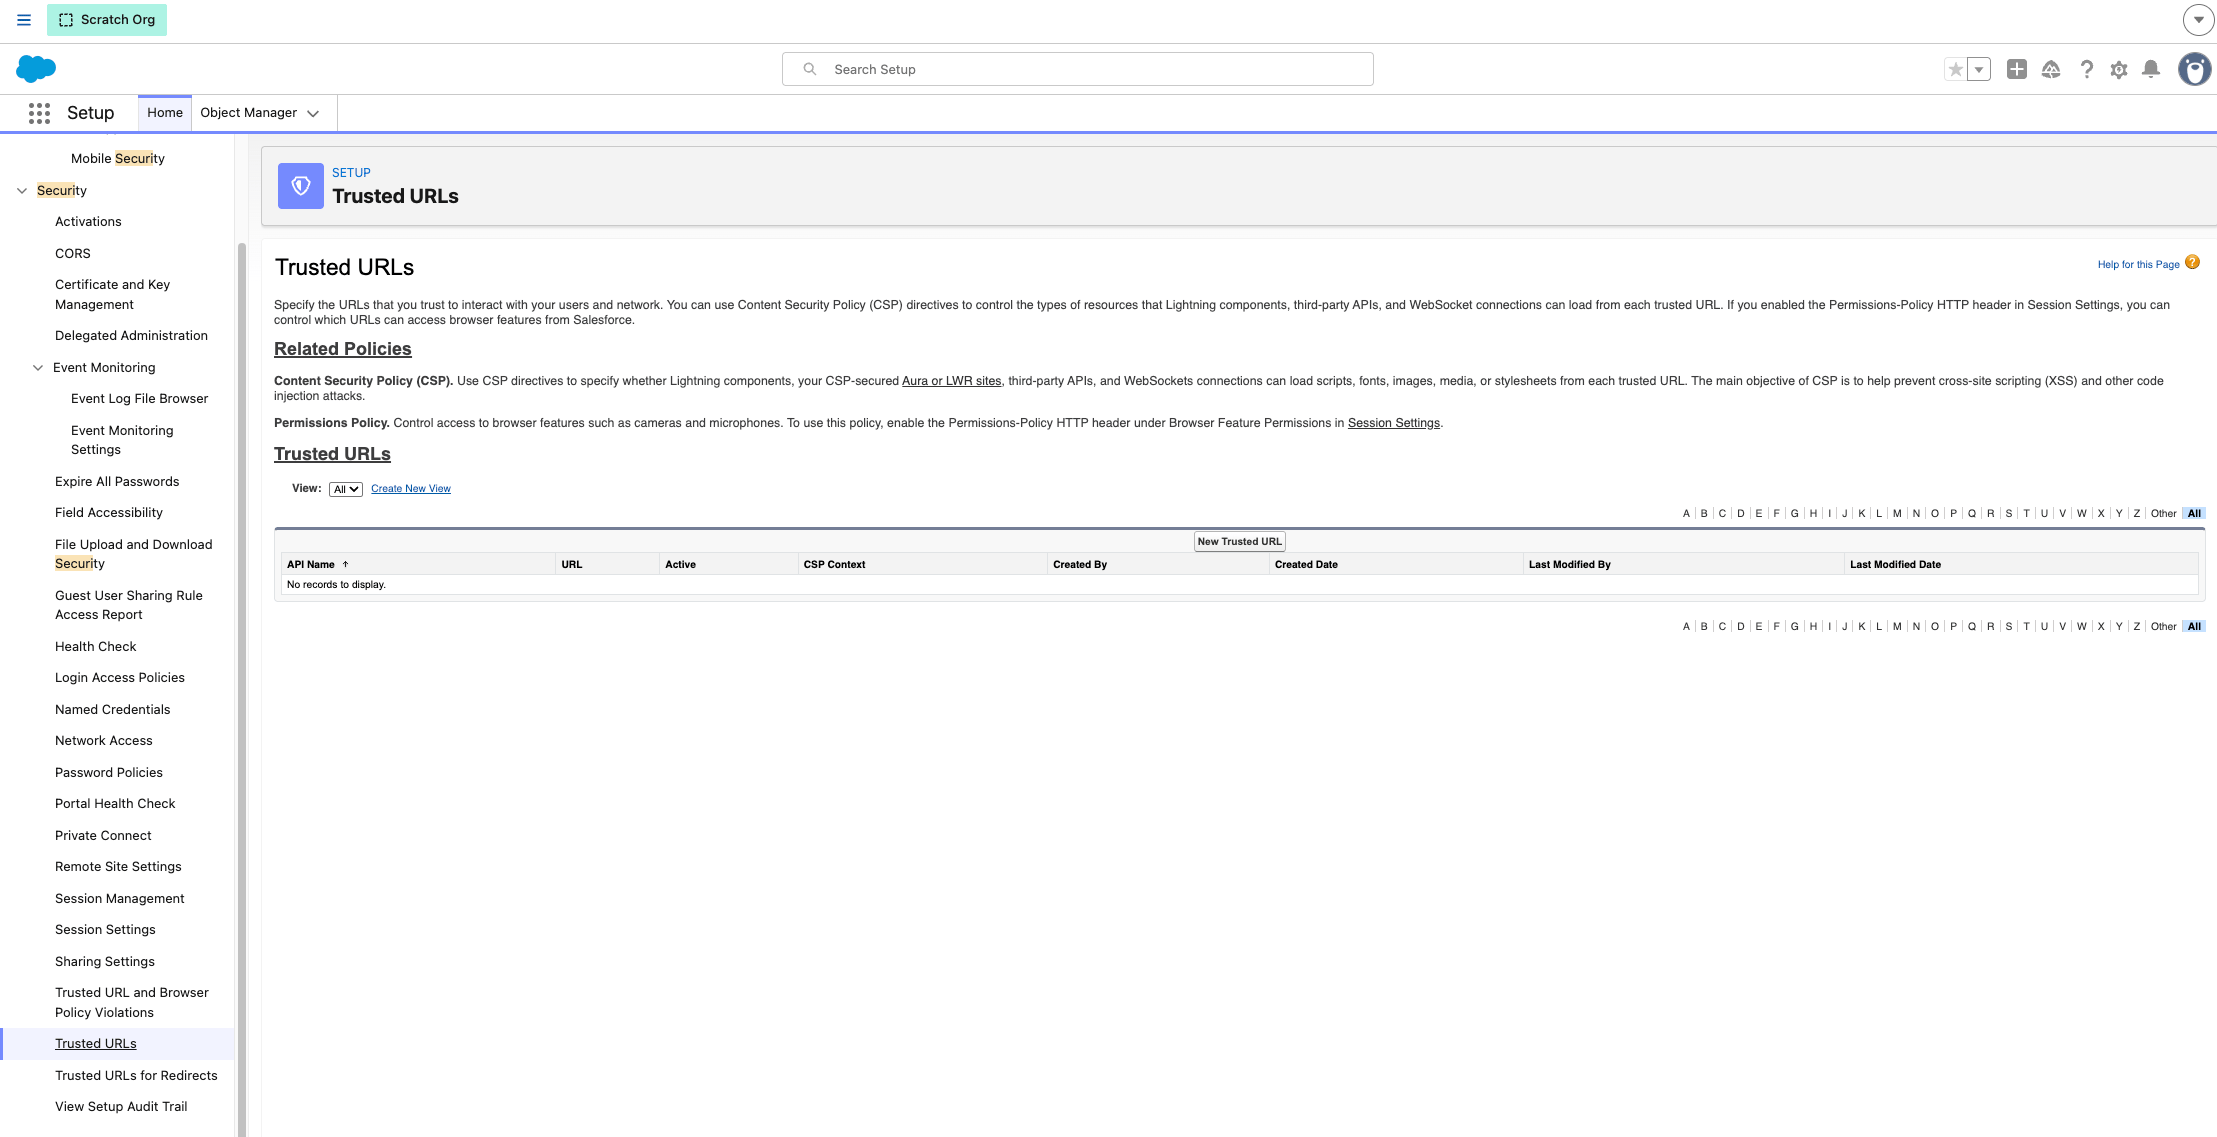 2. Voeg de CloudTalk-CDN-URL voor uw omgeving toe:
| **Omgeving** | **URL** |
| - | - |
| Productie | `https://cdn.cloudtalk.io` |
| Stage | `https://cdn.stage.cloudtalk.io` |
| Dev | `https://cdn.dev.cloudtalk.io` |
3\. Schakel voor die URL de CSP-directives **connect-src**, **frame-src** en **img-src** in.
2. Voeg de CloudTalk-CDN-URL voor uw omgeving toe:
| **Omgeving** | **URL** |
| - | - |
| Productie | `https://cdn.cloudtalk.io` |
| Stage | `https://cdn.stage.cloudtalk.io` |
| Dev | `https://cdn.dev.cloudtalk.io` |
3\. Schakel voor die URL de CSP-directives **connect-src**, **frame-src** en **img-src** in.
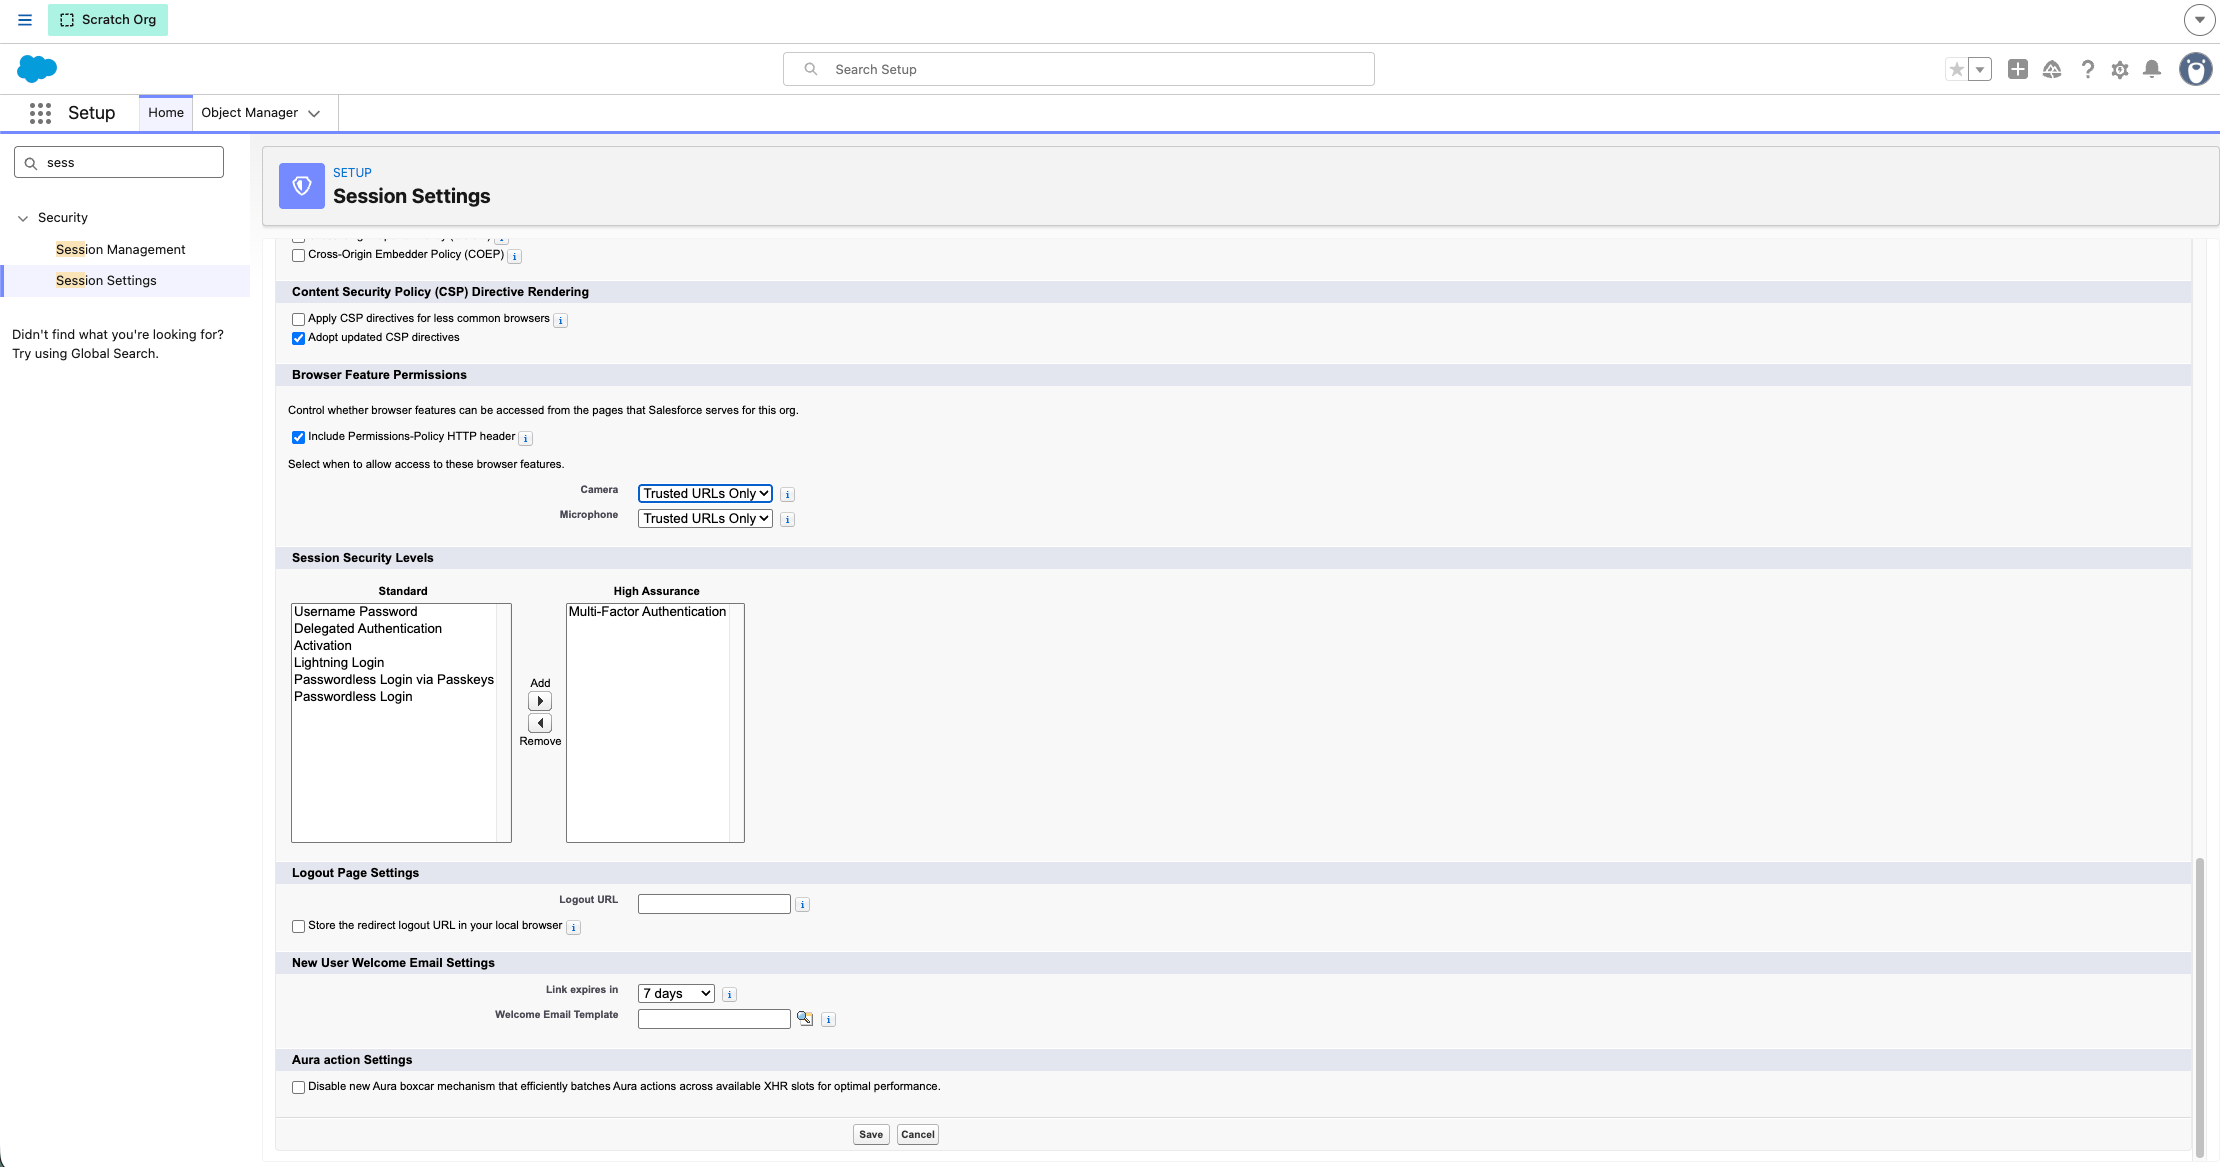
 4\. Ga naar **Setup > Session Settings > Browser Feature Permissions** en schakel **Include Permission-Policy HTTP header** in.
Stap 6: Agentaanwezigheid en Omni-Channel instellen
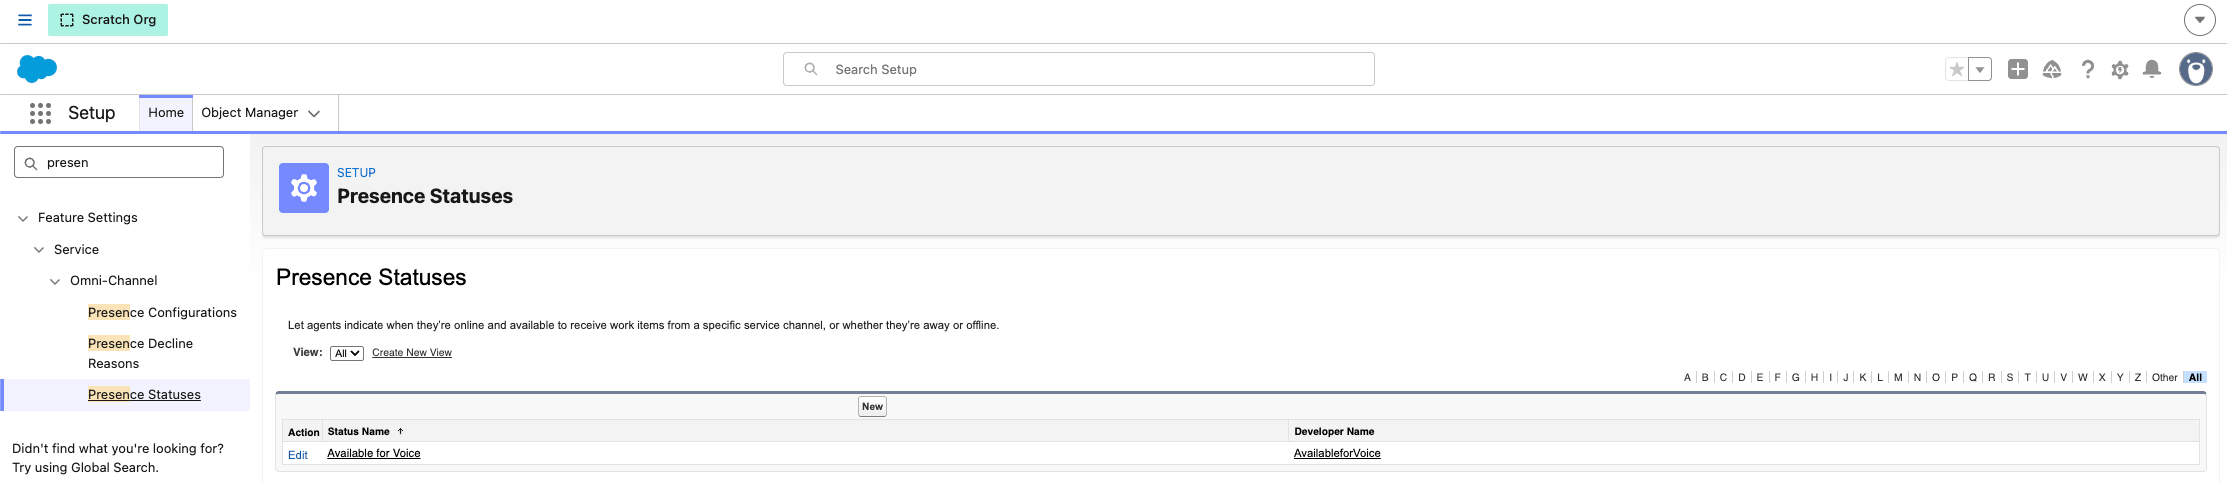
Een presence-status aanmaken
1. Maak in Setup een presence-status **Available** aan.
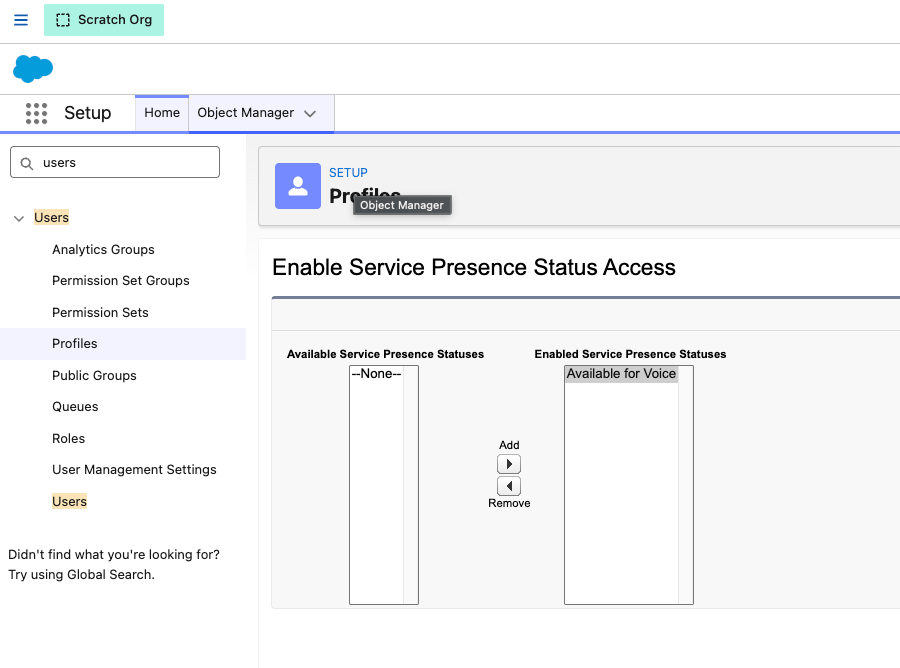
 2. Ken deze toe via het profiel **System Administrator** (Setup > Profiles > enabled presence statuses).

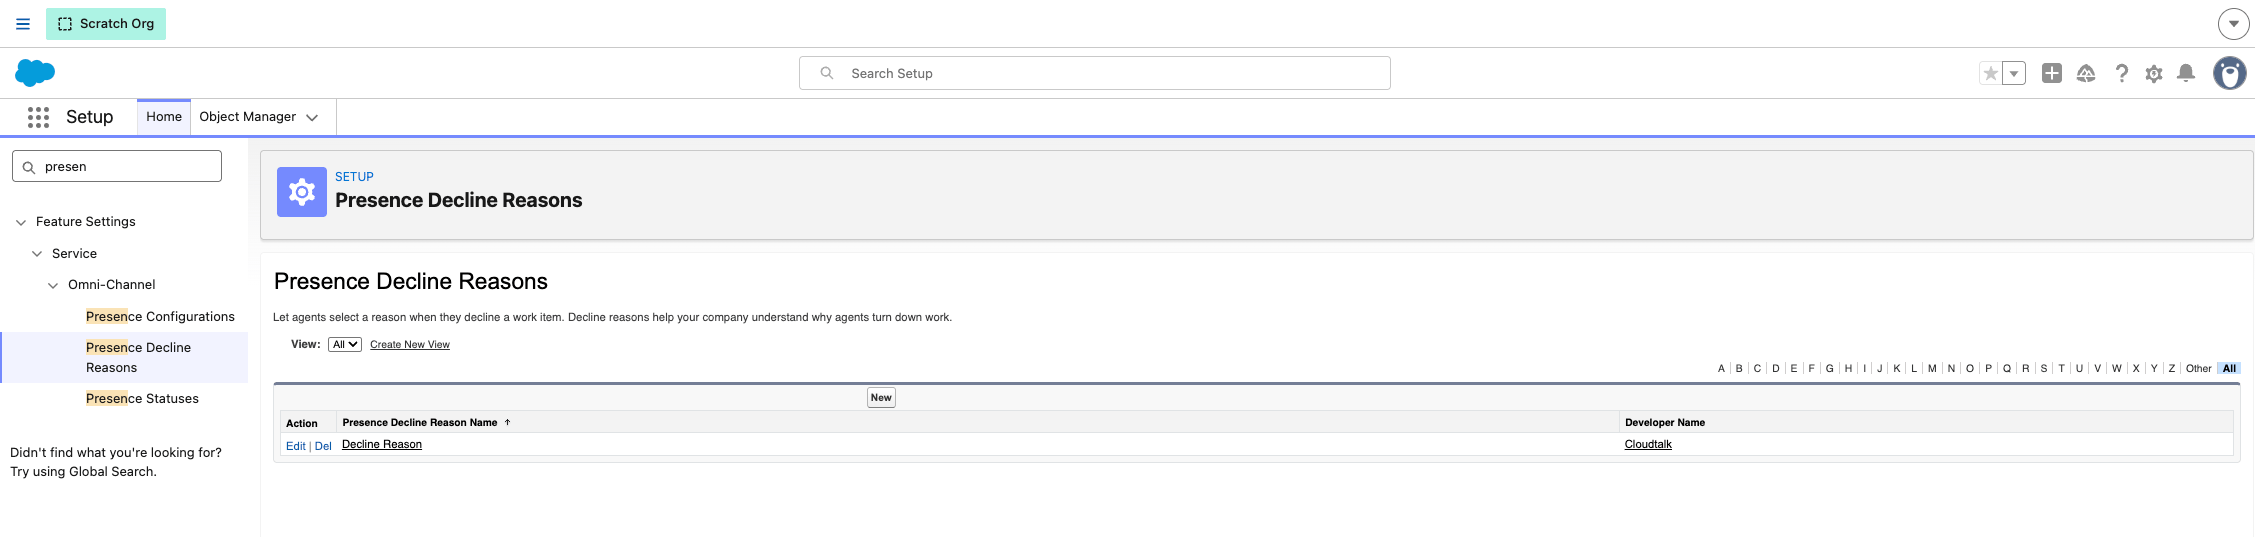
Agenten toestaan oproepen te weigeren
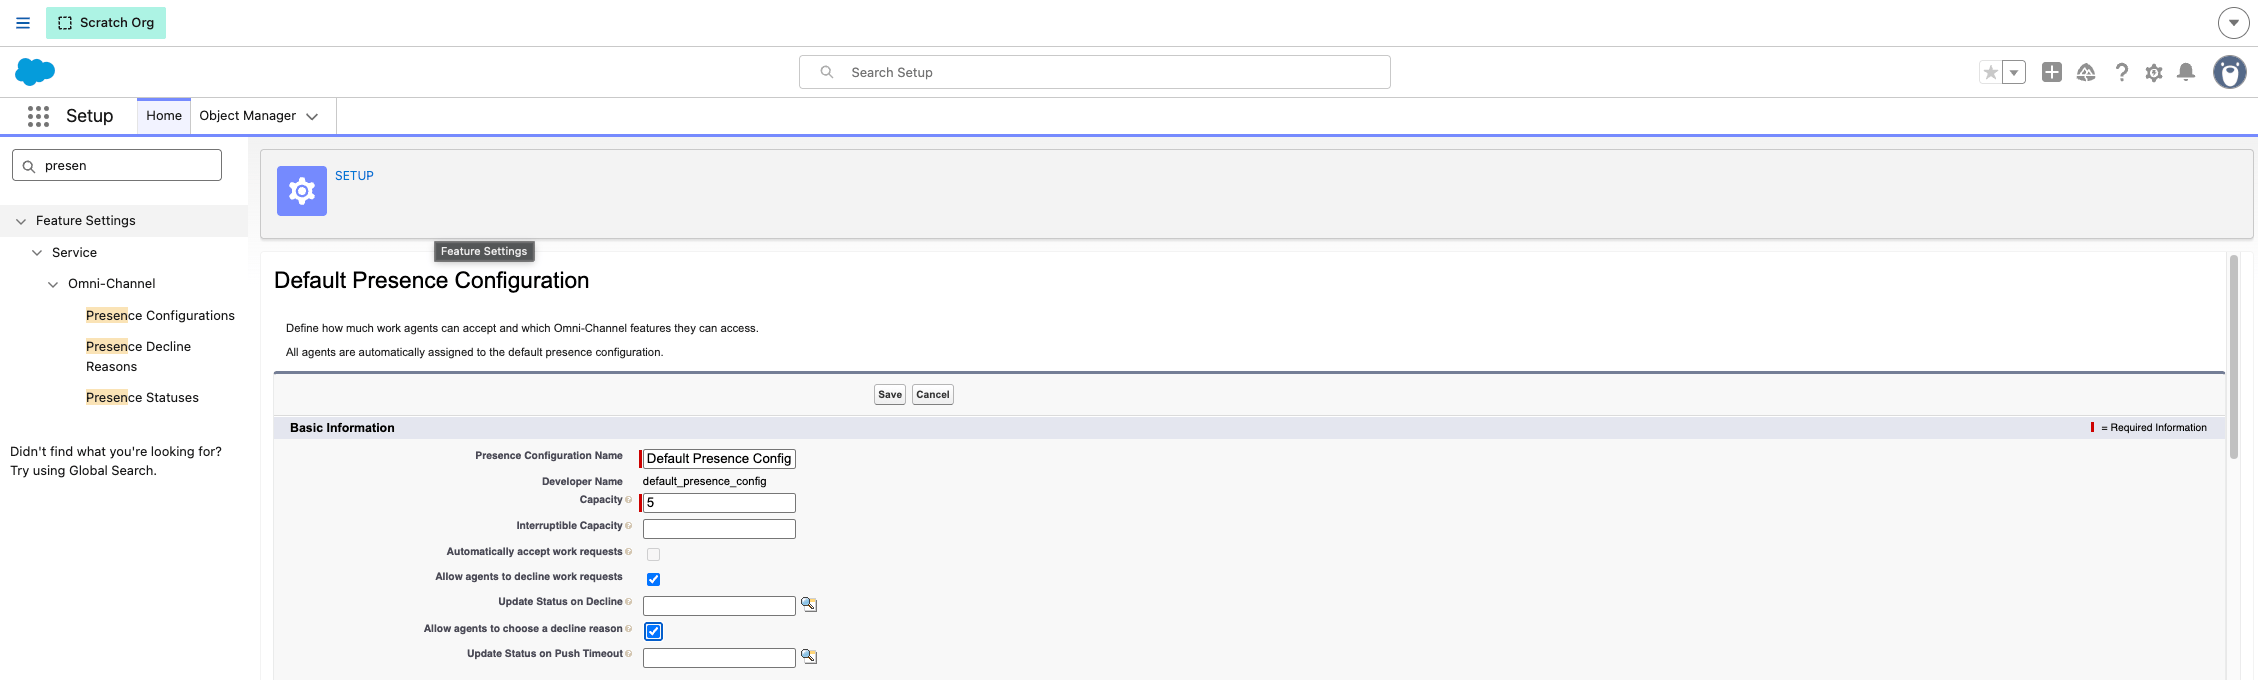
1. Open **Setup > Presence Decline Reasons** en definieer minstens één weigeringsreden.
 2. Open **Setup > Presence Configurations** en schakel het volgende in:
* Allow agents to decline work requests
* Allow agents to choose a decline reason
2. Open **Setup > Presence Configurations** en schakel het volgende in:
* Allow agents to decline work requests
* Allow agents to choose a decline reason
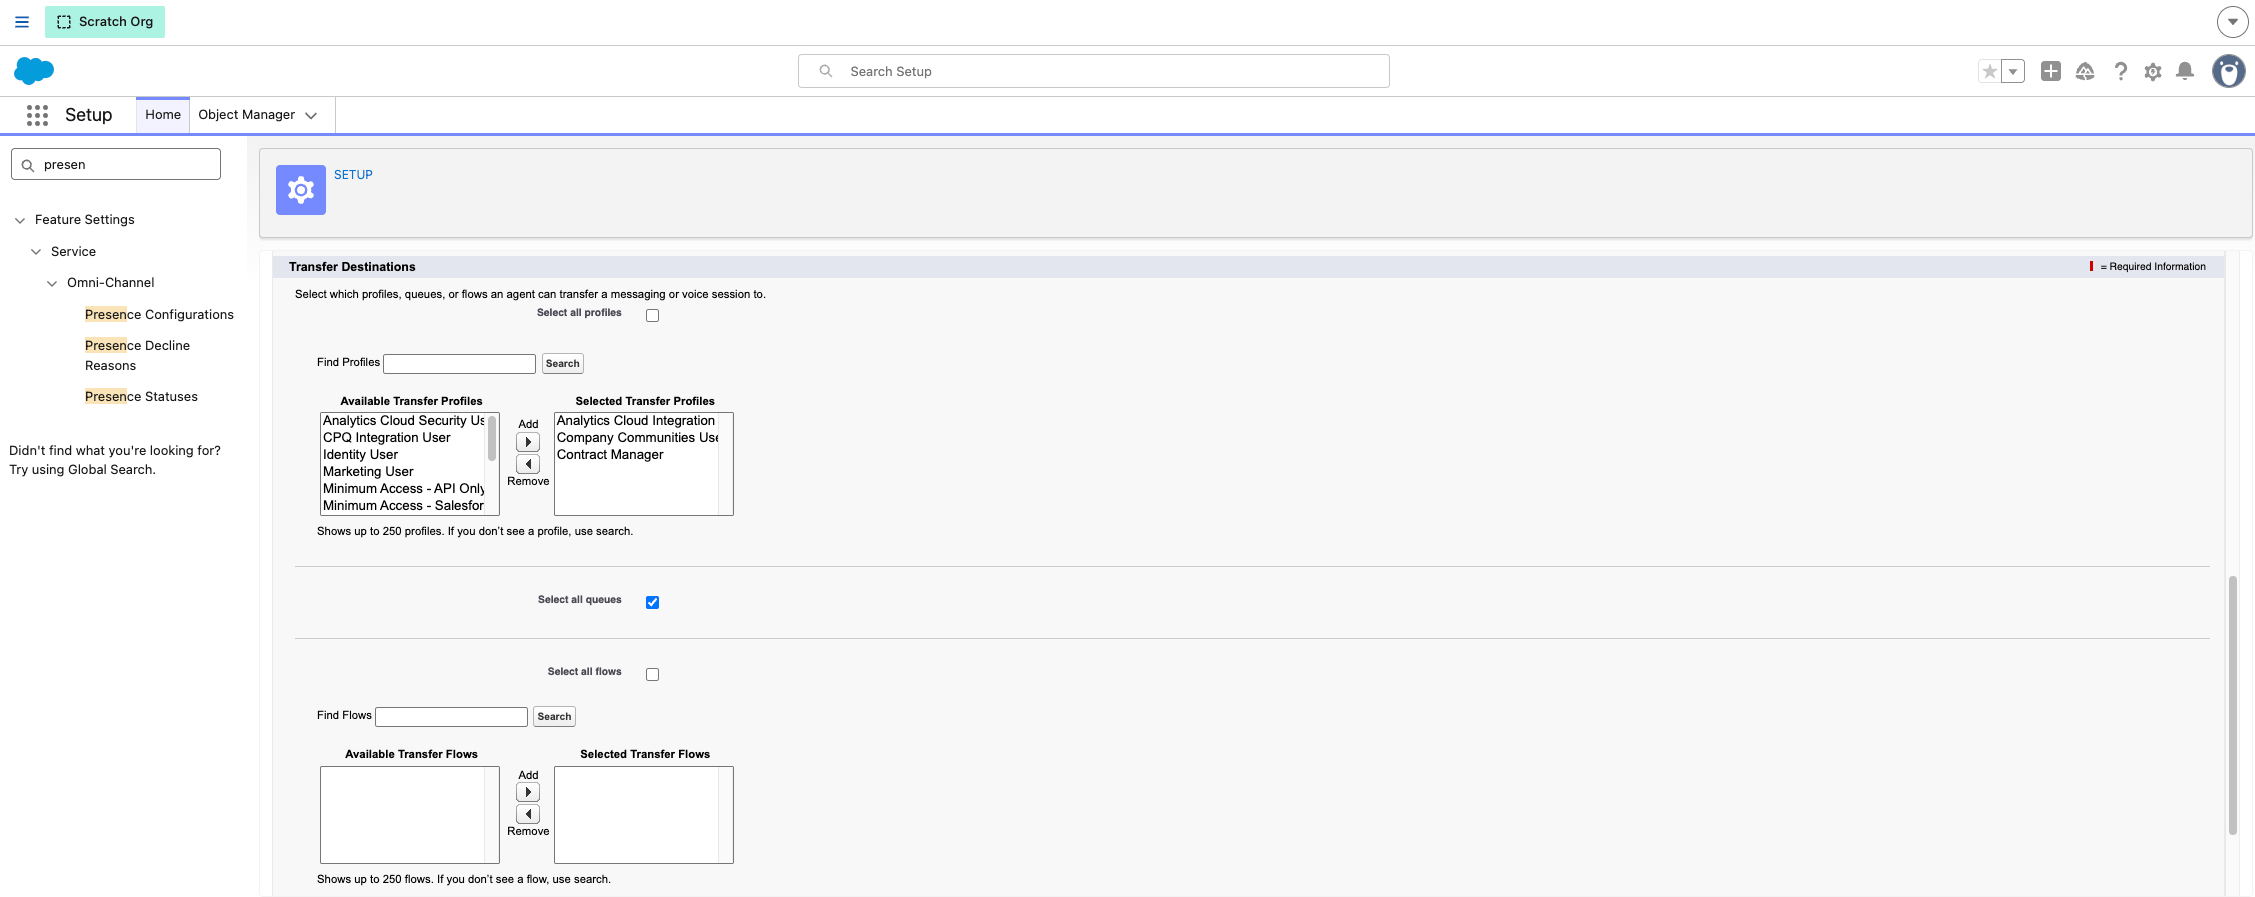
Doorverbindbestemmingen configureren
Stel in de presence-/Omni-Channel-configuratie in naar welke profielen en wachtrijen agenten kunnen doorverbinden. Selecteer **alle profielen** en **alle wachtrijen** voor de breedste dekking.
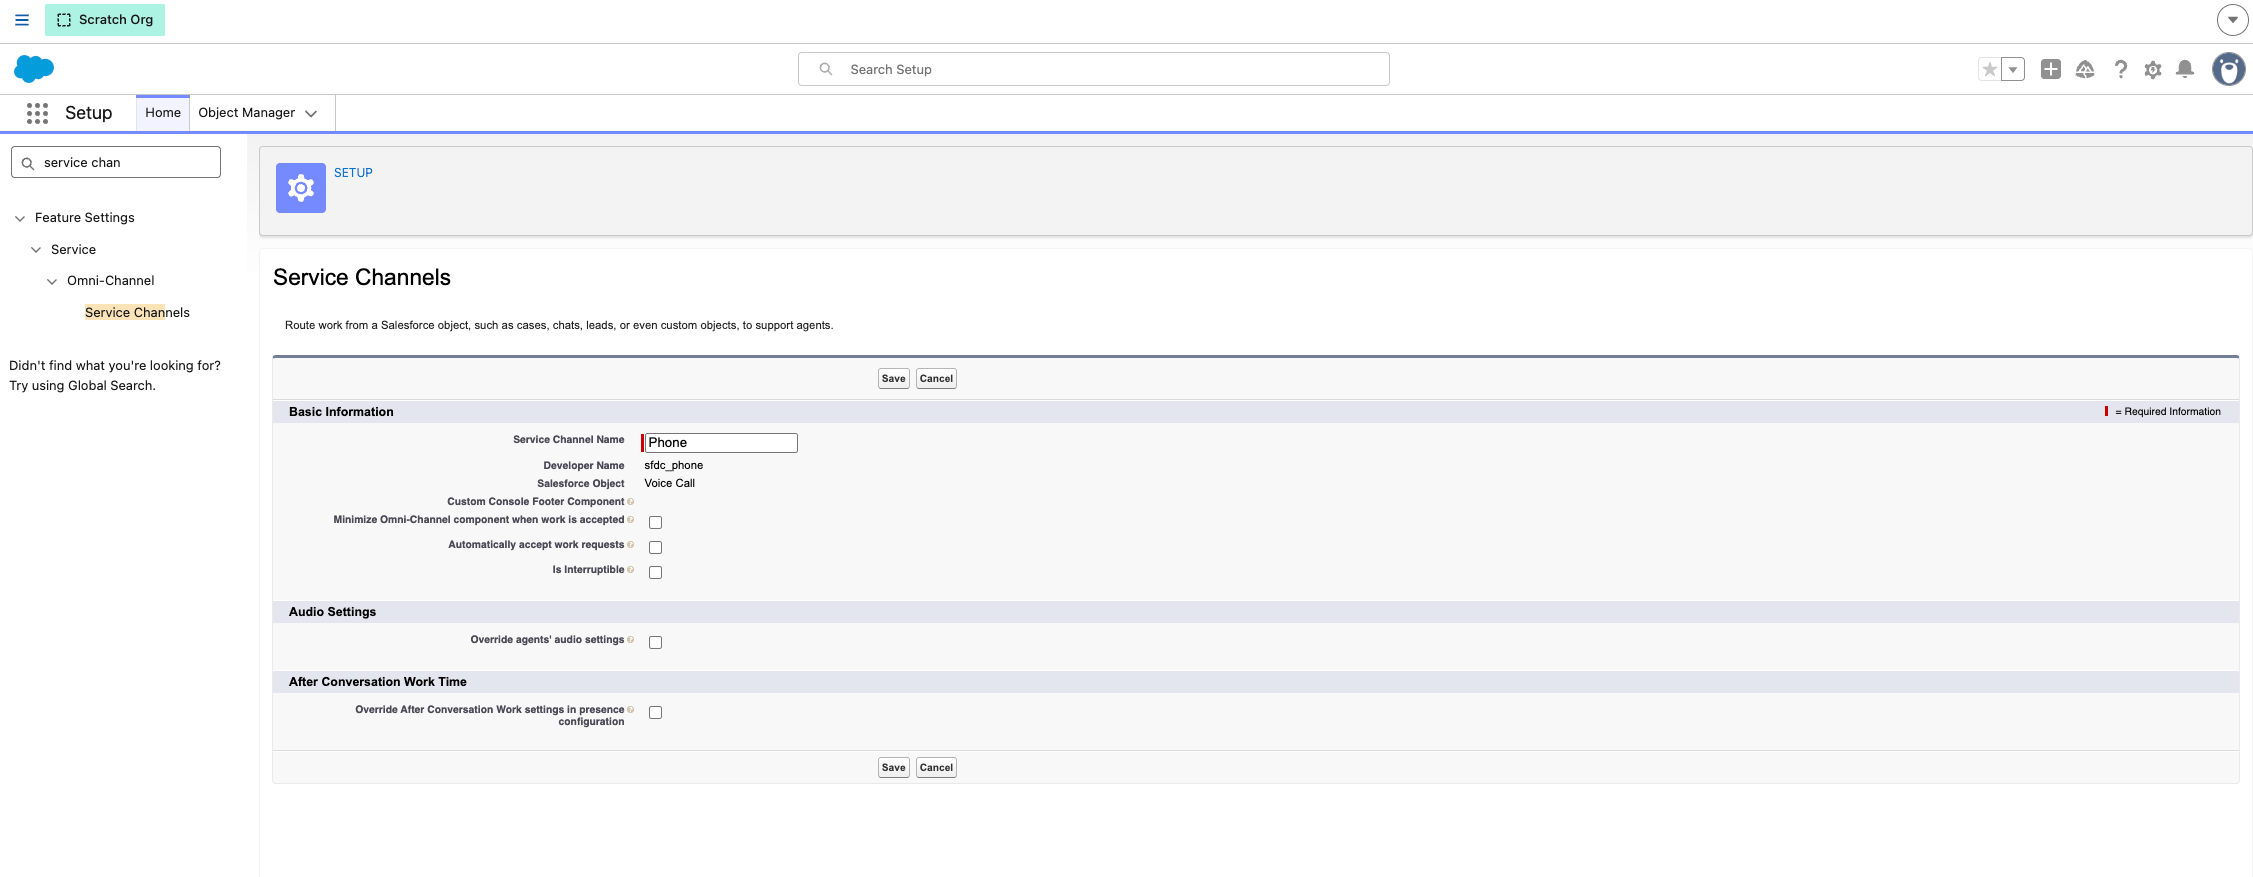
Het Omni-Channel-paneel tijdens gesprekken open houden
1. Zoek in Setup naar **Service Channels** en bewerk het servicekanaal **Phone**.
2. Vink **Minimize Omni-Channel component when work is accepted** uit.
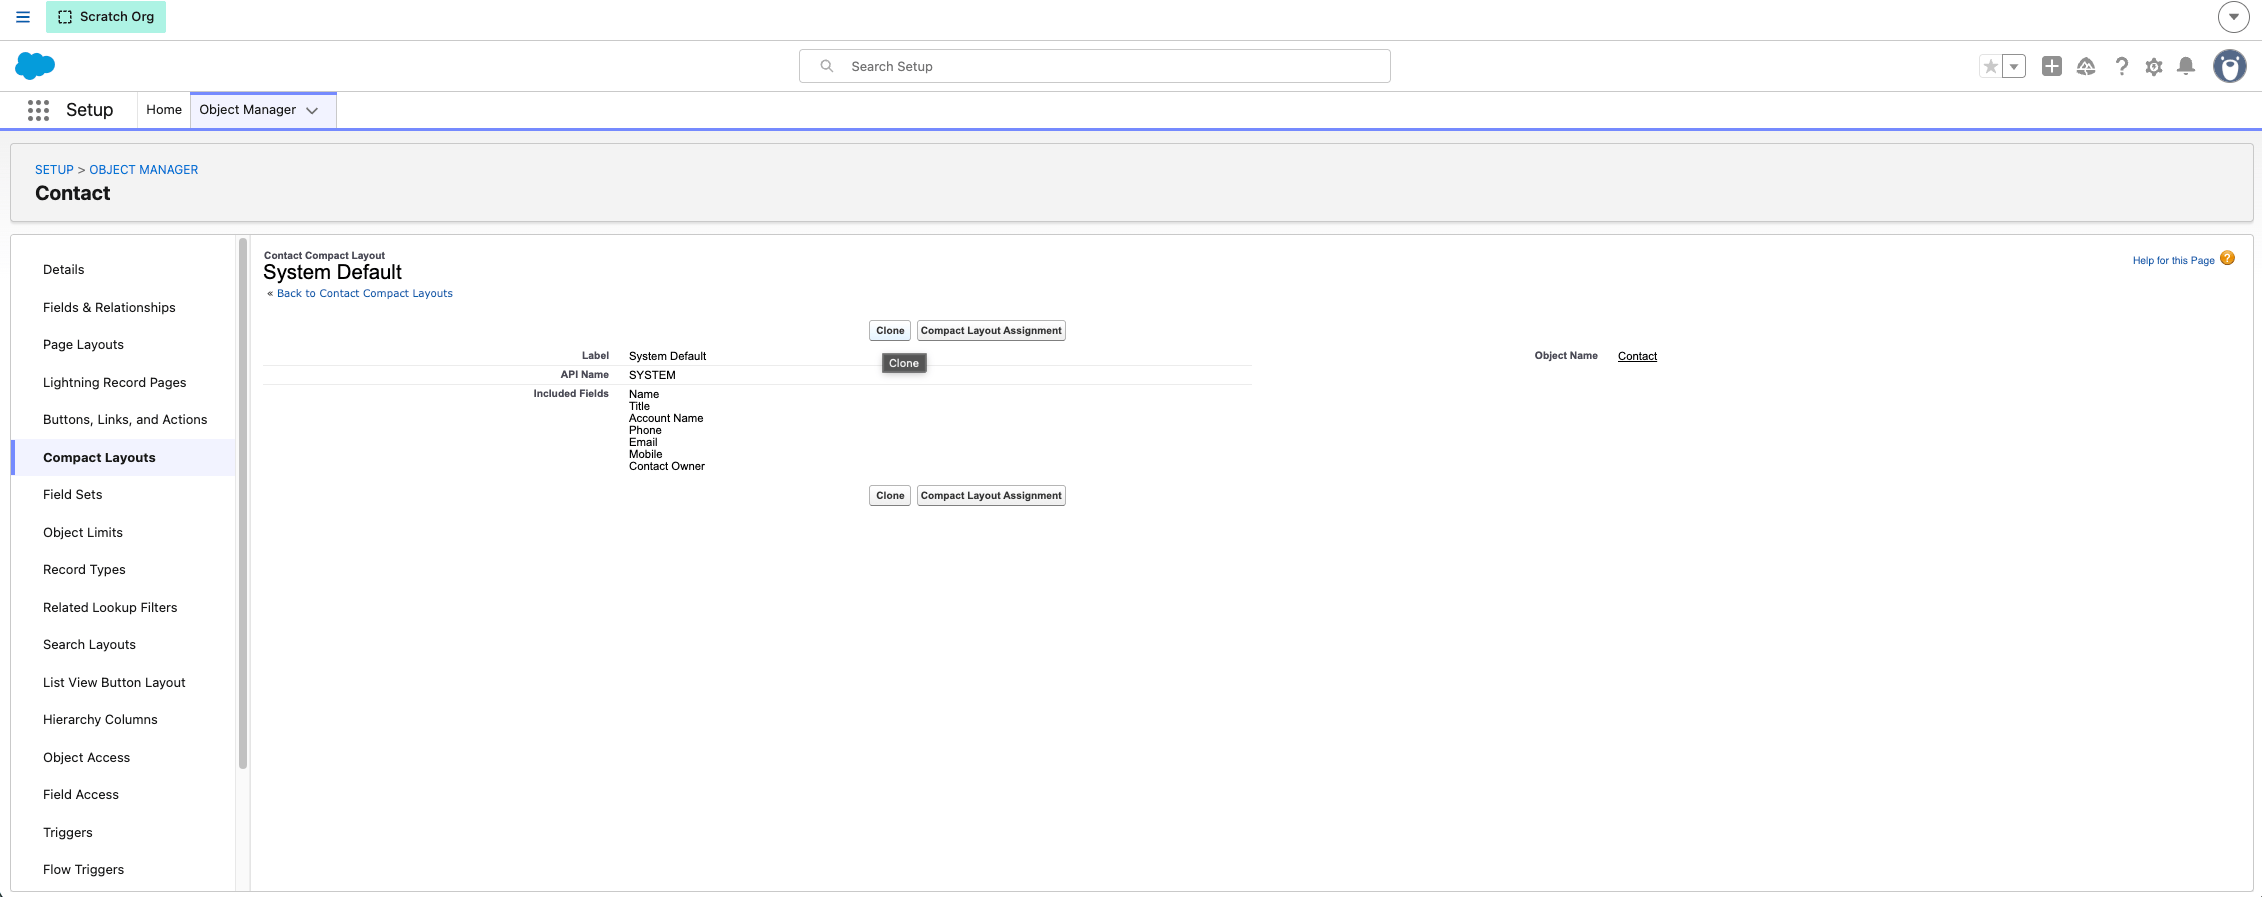
Stap 7: De recordweergave aanpassen
Contactgegevens als koptekst weergeven
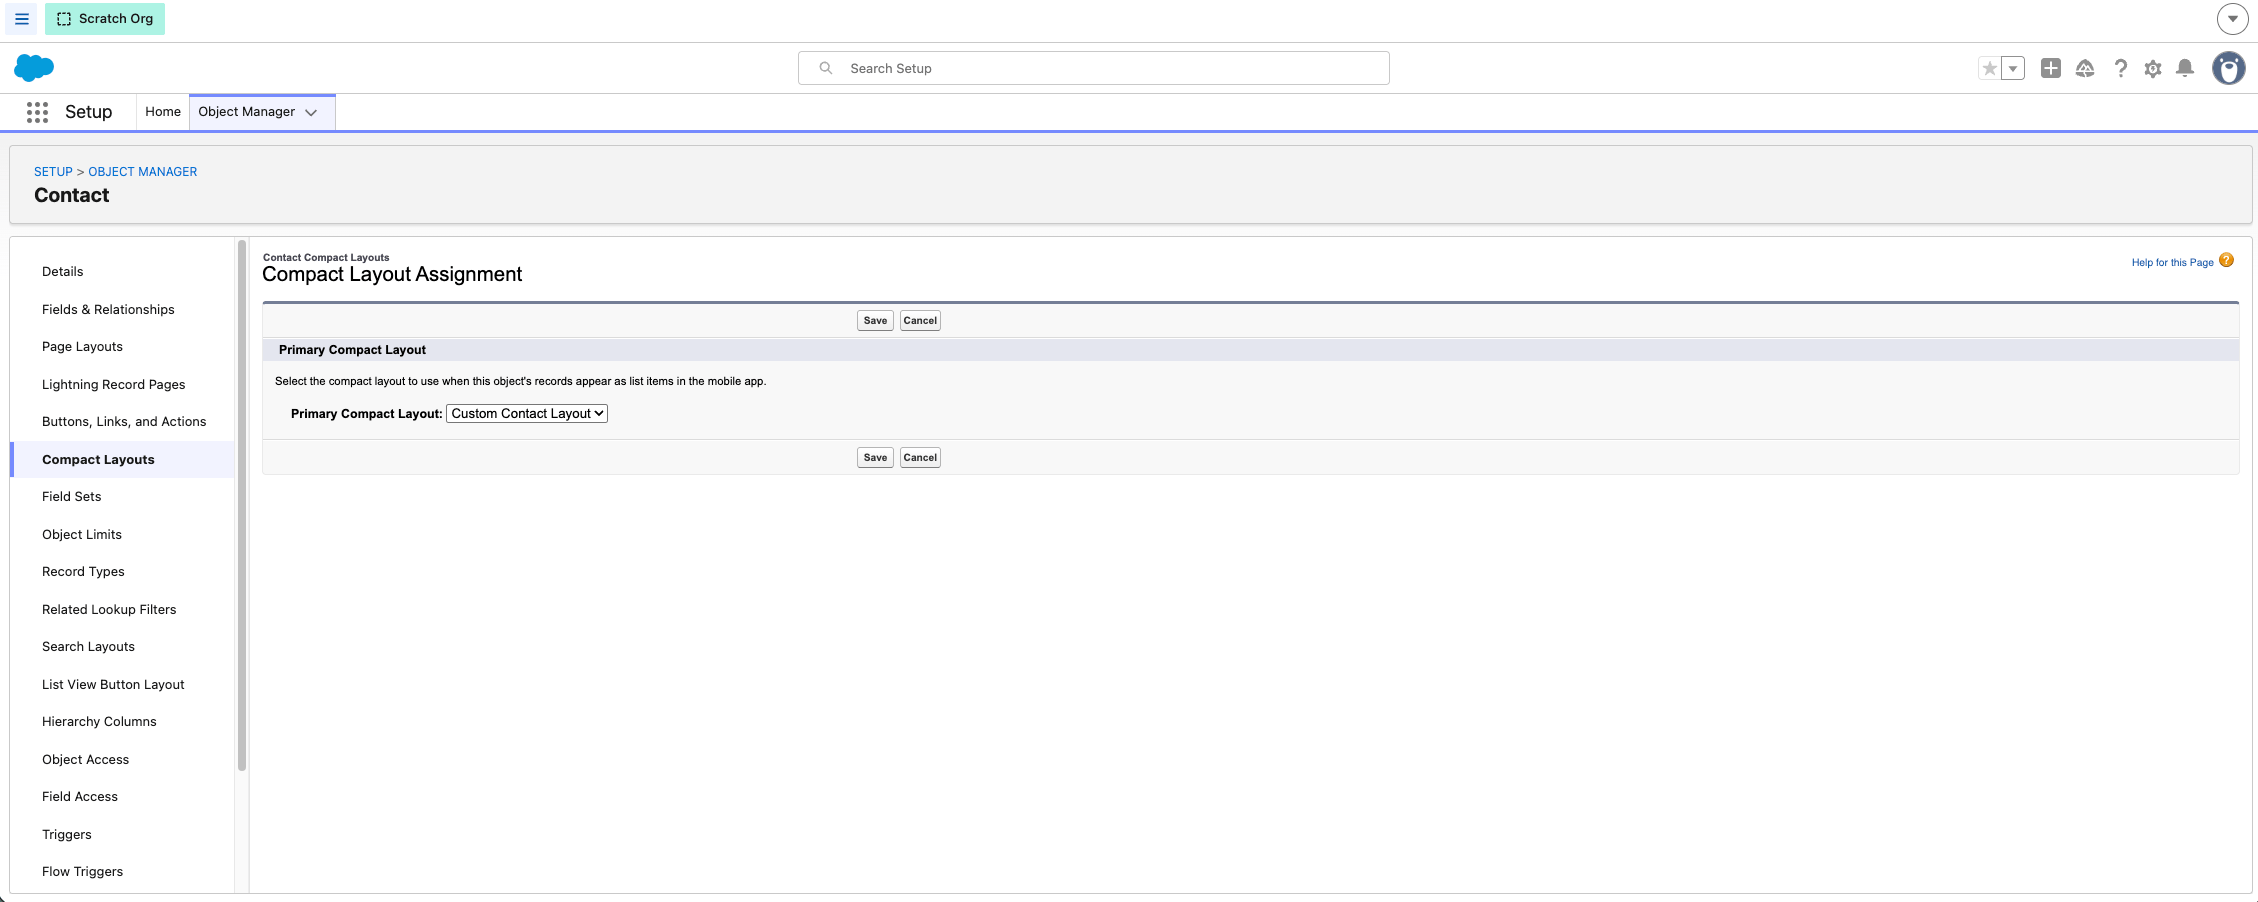
1. Open **Object Manager > (betreffend object) > Compact Layouts**.
2. Kloon **System Default** en geef het een naam (bijvoorbeeld "Custom").
3. Verplaats **Recipient Contact Info** naar de geselecteerde velden en zet het op de eerste plaats.
4. Sla op, open vervolgens **Compact Layout Assignment** en wijs uw nieuwe layout toe.
Gespreksgeschiedenis op het contactrecord tonen
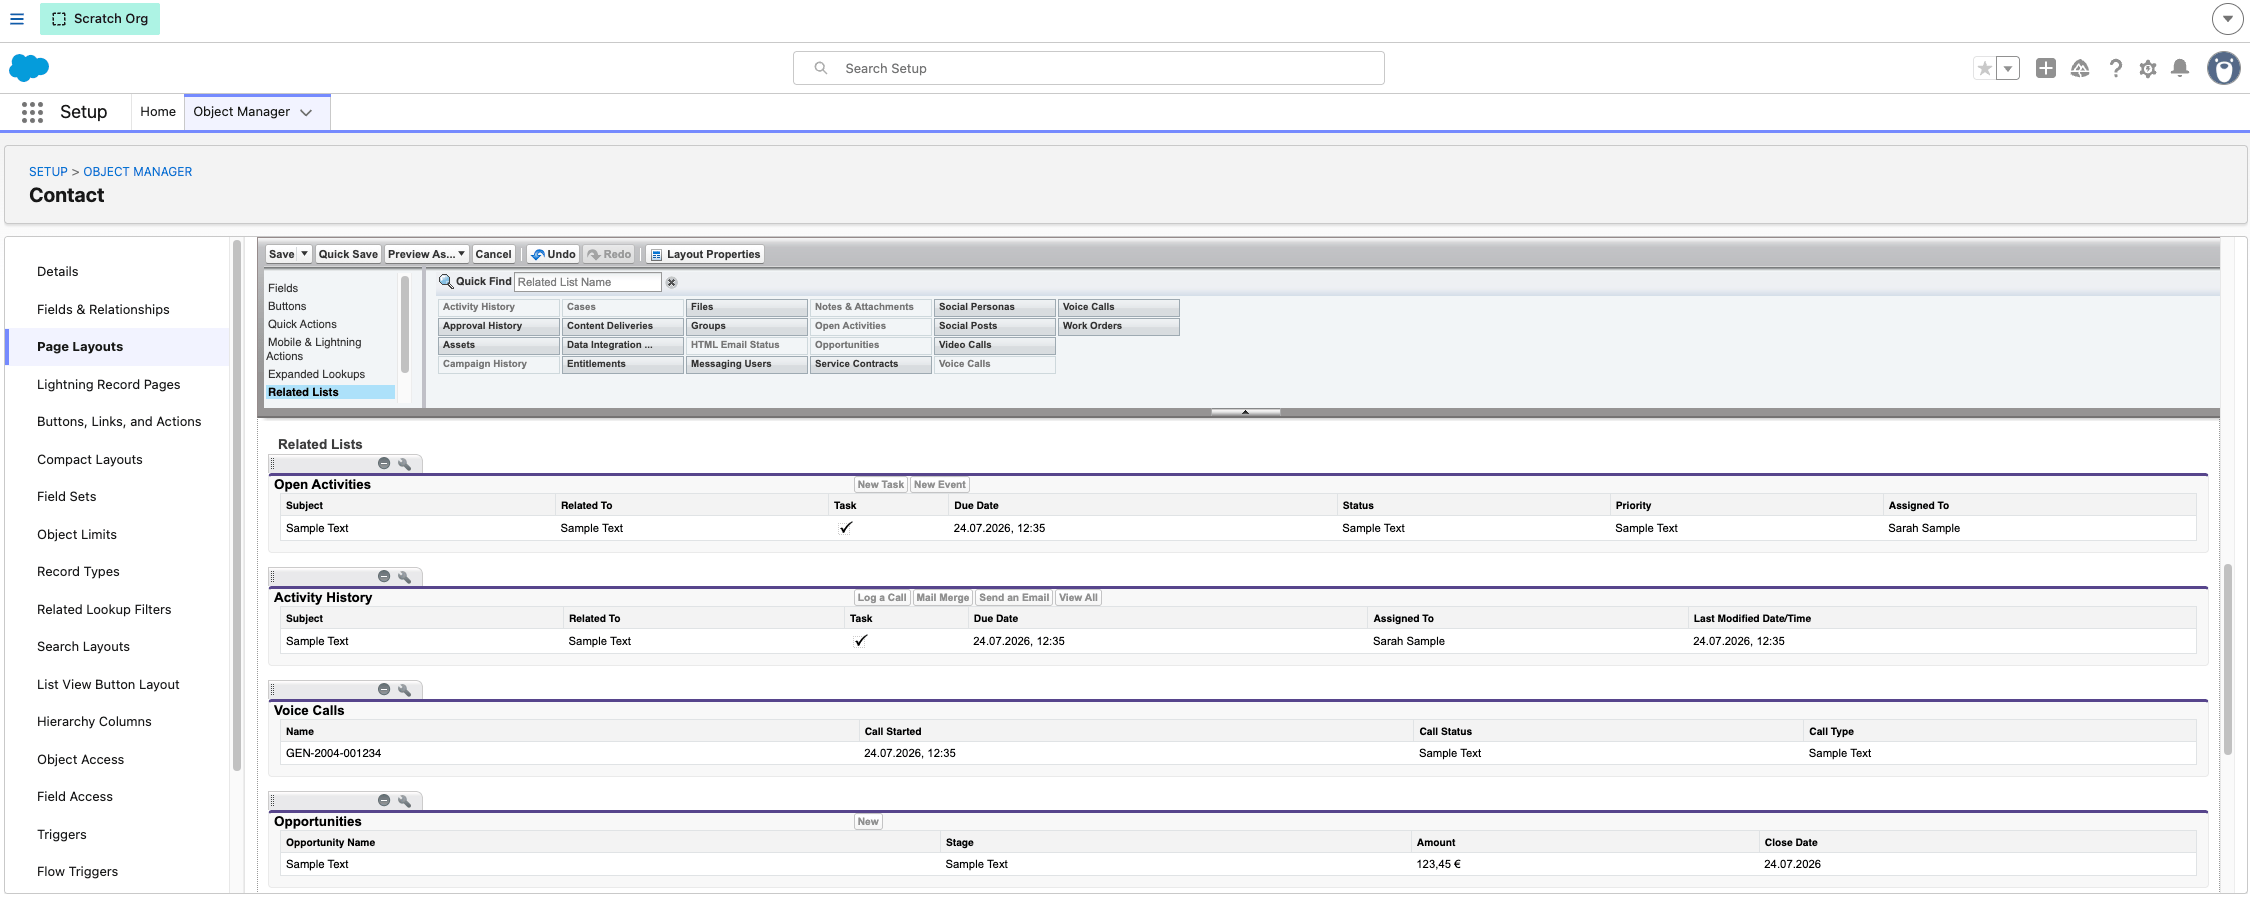
1. Open **Object Manager > Contact > Page Layouts**.
2. Voeg de gerelateerde lijst **Voice Calls** toe aan de layout.
 **Klaar!**
Agenten die de permission set hebben gekregen en aan het contactcenter zijn toegevoegd, kunnen nu inloggen op de CloudTalk-widget in het Omni-Channel-paneel en gesprekken gaan afhandelen. Verwijs hen voor het dagelijks gebruik naar de [handleiding voor Salesforce Service Cloud Voice](/nl/articles/14654473-salesforce-service-cloud-voice).
***
*Hulp nodig of hebt u een vraag?* Neem gerust contact met ons op via ons [Supportportaal](https://support.cloudtalk.io/hc/en-us/requests/new?ticket_form_id=26305535257884) — we staan voor u klaar.
## Related topics
- [Salesforce Service Cloud Voice](/nl/articles/14654473-salesforce-service-cloud-voice.md)
- [Salesforce-contactlijsten in campagnes](/nl/articles/9170735-salesforce-contact-lists-in-campaigns.md)
- [Salesforce configureren](/nl/articles/3368501-configure-salesforce.md)
This documentation is built and hosted on [Mintlify](https://mintlify.com), a developer documentation platform.
**Klaar!**
Agenten die de permission set hebben gekregen en aan het contactcenter zijn toegevoegd, kunnen nu inloggen op de CloudTalk-widget in het Omni-Channel-paneel en gesprekken gaan afhandelen. Verwijs hen voor het dagelijks gebruik naar de [handleiding voor Salesforce Service Cloud Voice](/nl/articles/14654473-salesforce-service-cloud-voice).
***
*Hulp nodig of hebt u een vraag?* Neem gerust contact met ons op via ons [Supportportaal](https://support.cloudtalk.io/hc/en-us/requests/new?ticket_form_id=26305535257884) — we staan voor u klaar.
## Related topics
- [Salesforce Service Cloud Voice](/nl/articles/14654473-salesforce-service-cloud-voice.md)
- [Salesforce-contactlijsten in campagnes](/nl/articles/9170735-salesforce-contact-lists-in-campaigns.md)
- [Salesforce configureren](/nl/articles/3368501-configure-salesforce.md)
This documentation is built and hosted on [Mintlify](https://mintlify.com), a developer documentation platform.