> ## Documentation Index
> Fetch the complete documentation index at: https://help.cloudtalk.io/llms.txt
> Use this file to discover all available pages before exploring further.
# Salesforce Service Cloud Voice: guía de configuración para administradores
> Configuración de administrador de CloudTalk en Salesforce Service Cloud Voice: activa Voice, configura los conjuntos de permisos, crea el centro de contacto…
**Para administradores de Salesforce.** Completa estos pasos una sola vez para activar CloudTalk dentro de Service Cloud Voice. Cuando termines la configuración, los agentes pueden seguir la [guía de Salesforce Service Cloud Voice](/es/articles/14654473-salesforce-service-cloud-voice) para hacer, recibir y transferir llamadas.
**Nivel de usuario**: Administrador
***
Antes de empezar
Necesitarás:
* Una organización de Salesforce con **Service Cloud Voice** disponible
* Acceso de **System Administrator** en Salesforce
* El **certificado del centro de contacto** que CloudTalk te proporciona durante el proceso de incorporación (no lo obtengas de ninguna otra fuente)
Configuración paso a paso
Paso 1: activa Service Cloud Voice
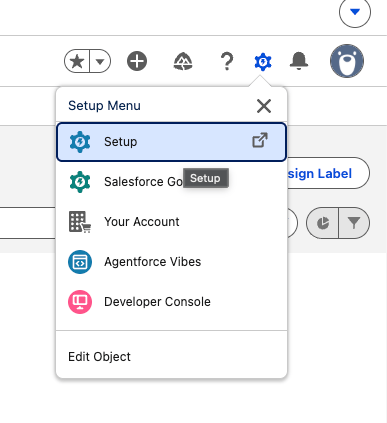
1. Abre **Setup** y busca **Voice**.
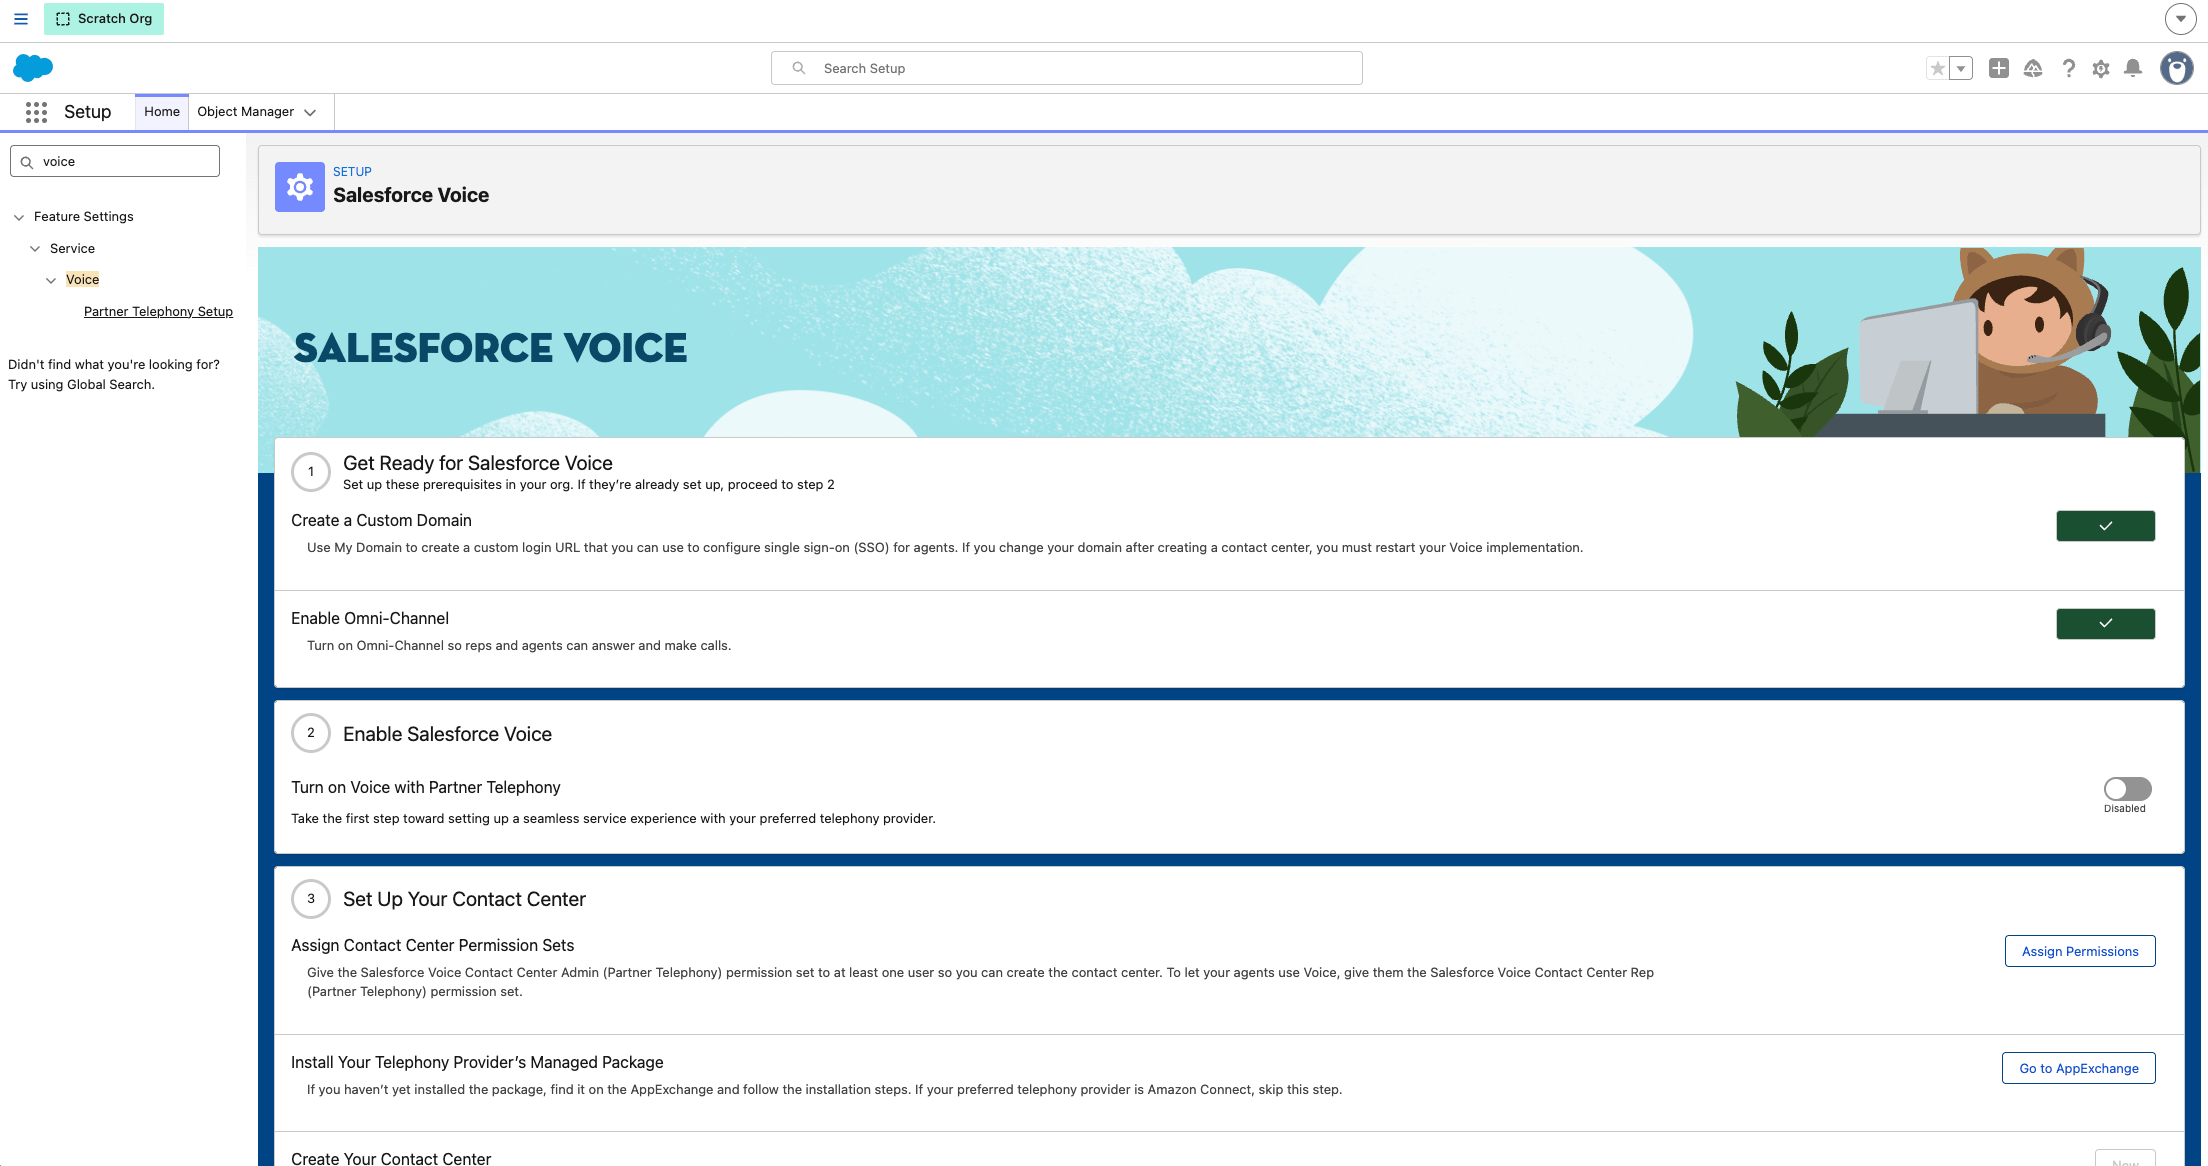 2. Activa la función en **Feature Settings > Service > Voice**.

Paso 2: configura el conjunto de permisos Partner Telephony
1. En Setup, ve a **Permission Sets** y abre **Partner Telephony Permission Set**.
2. Abre **App Permissions > Edit** y activa:
* Control Call Recording
* Salesforce Voice Contact Center Admin (Partner Telephony)
* Salesforce Voice Contact Center Rep (Partner Telephony)
* Salesforce Voice Contact Center Supervisor
3. Pulsa **Save**.
Paso 3: asigna el conjunto de permisos a los usuarios
1. Ve a **Setup > Users > Permission Set Assignments**.
 2. Asigna **Partner Telephony Permission Set** a cada agente y, al menos, a un administrador que vaya a gestionar el centro de contacto.
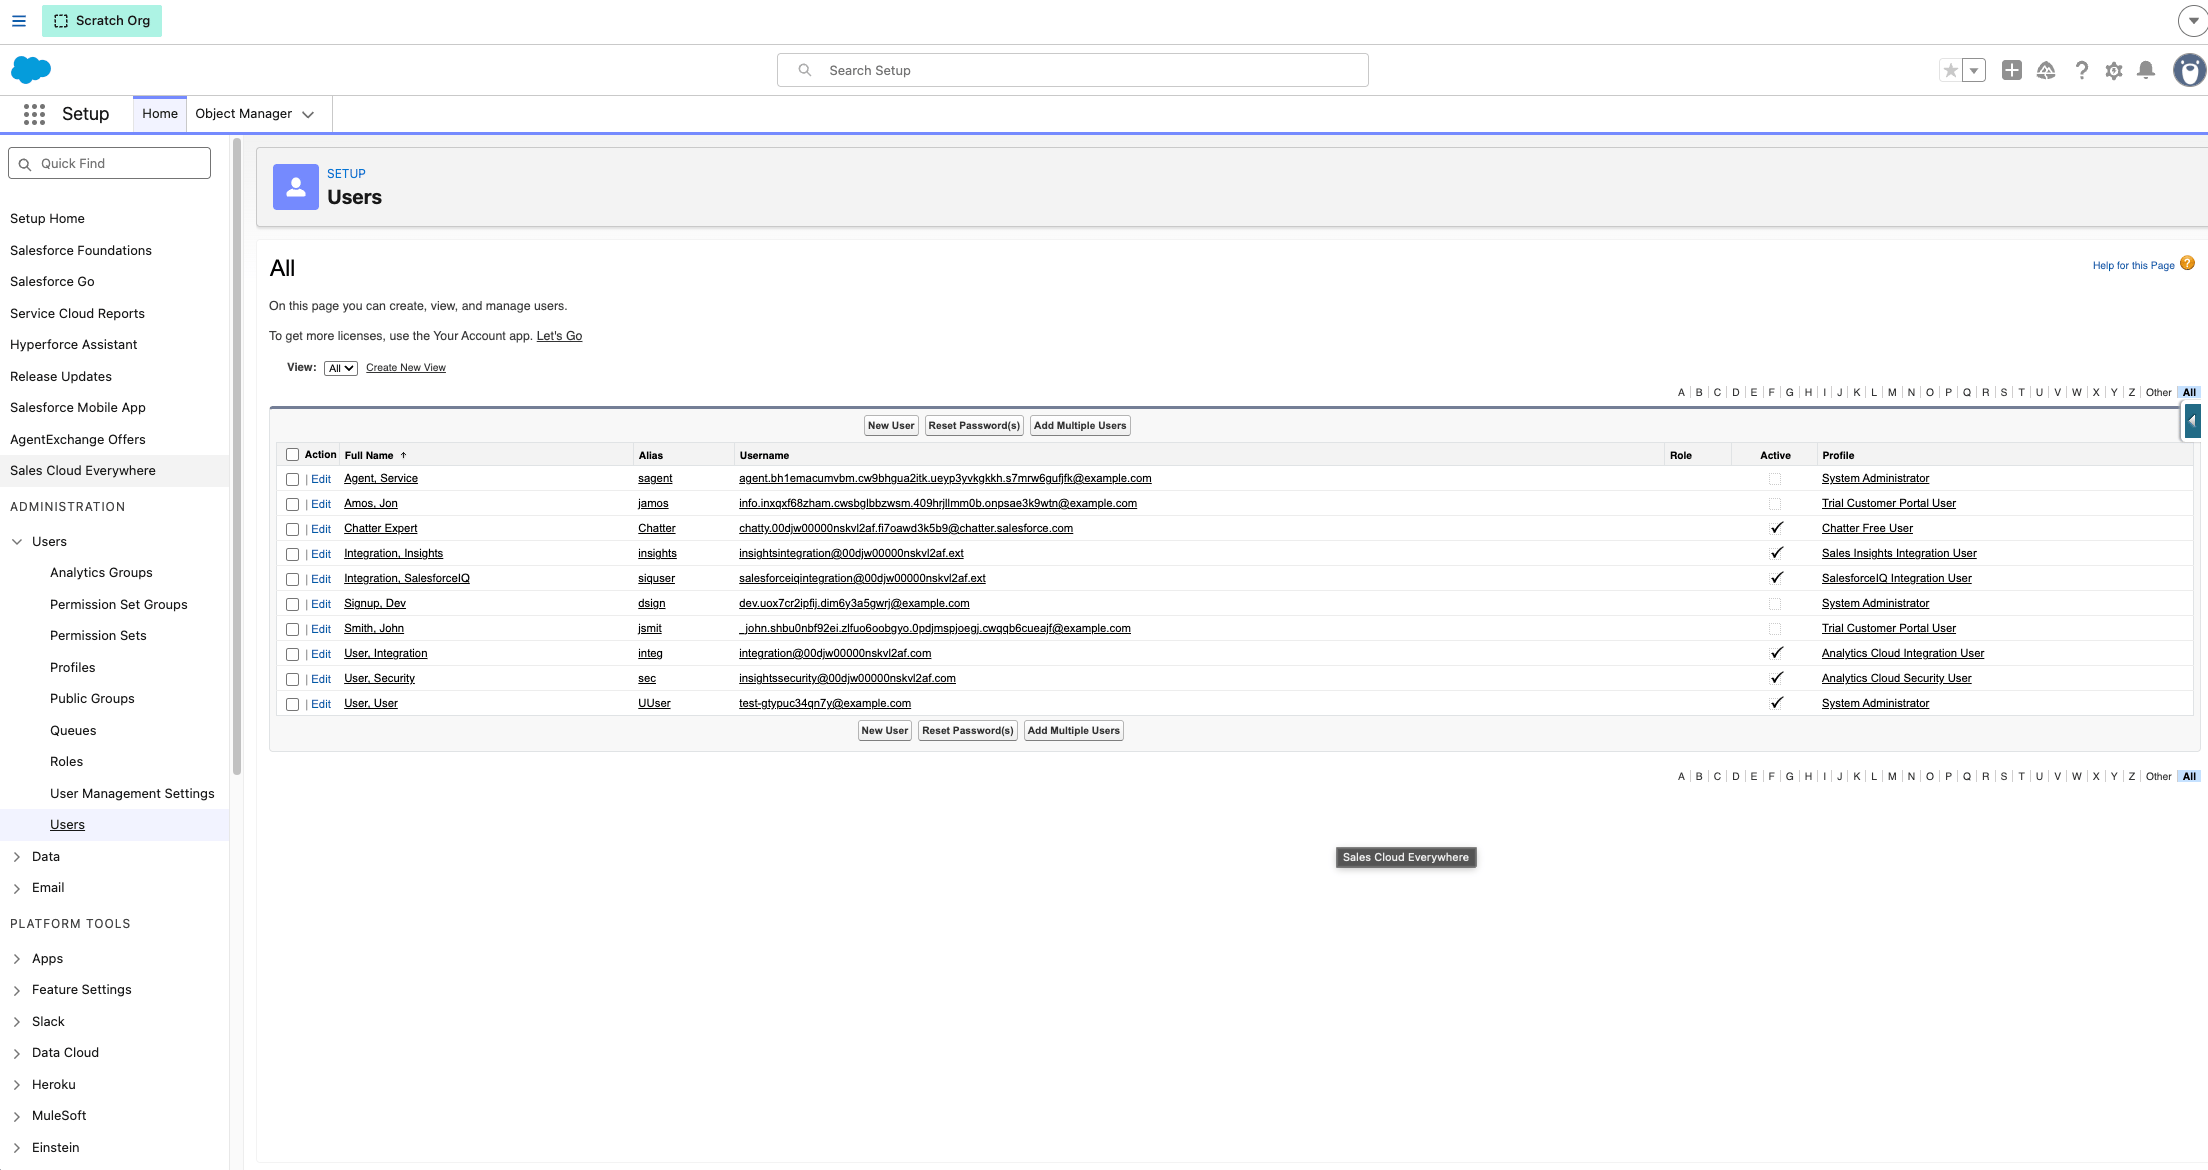 El permiso de **admin** del centro de contacto es necesario para instalar o actualizar el certificado del centro de contacto en el paso siguiente.
Paso 4: crea el centro de contacto
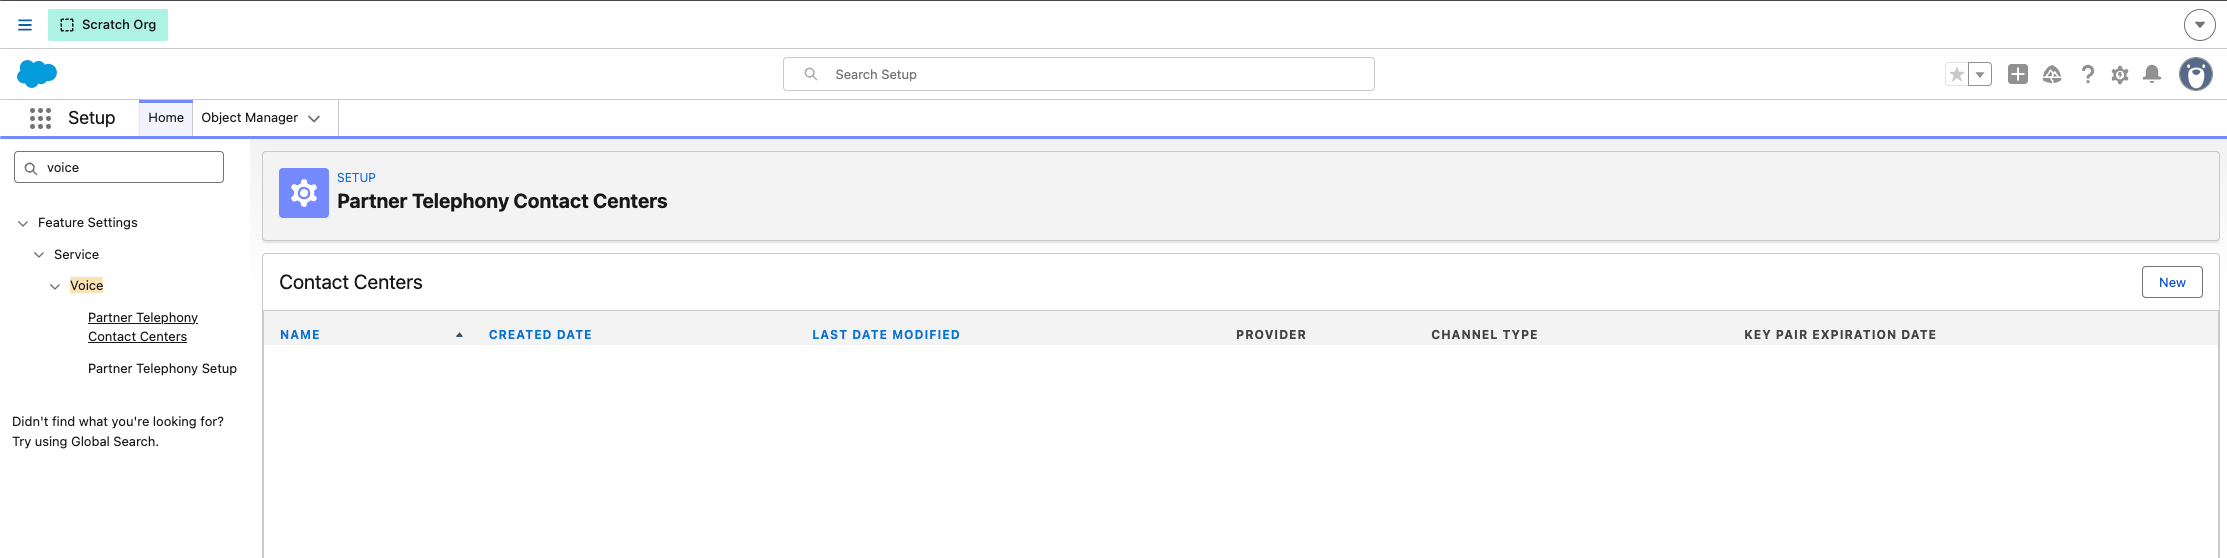
1. En Setup, abre **Voice > Partner Telephony Contact Centers** y crea un centro de contacto nuevo.
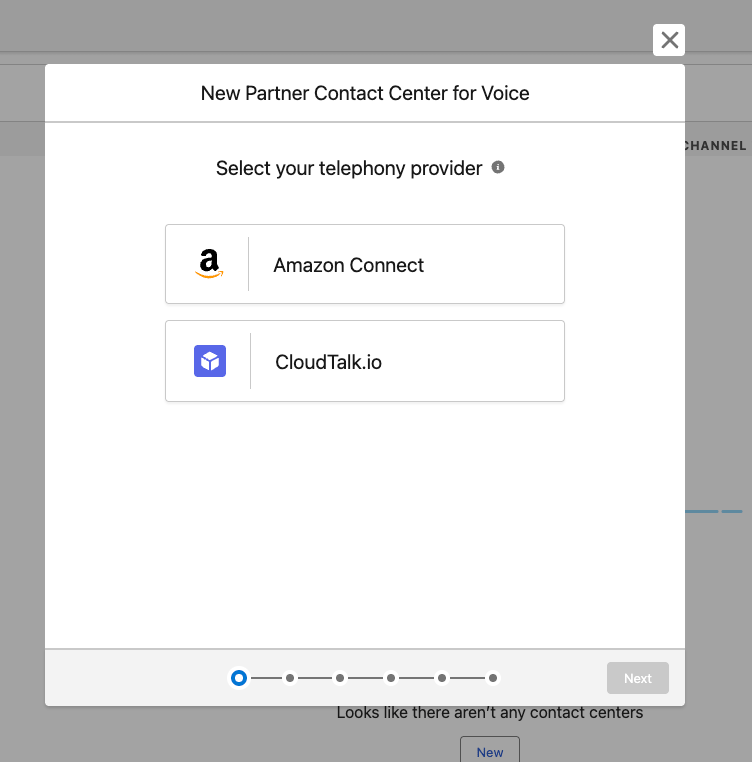 2\. Añade el **certificado de clave pública que proporciona CloudTalk**. Pega el bloque completo del certificado, incluidas las líneas `BEGIN`/`END`.
```
-----BEGIN CERTIFICATE-----[Paste the certificate CloudTalk provided during onboarding]-----END CERTIFICATE-----
```
2\. Añade el **certificado de clave pública que proporciona CloudTalk**. Pega el bloque completo del certificado, incluidas las líneas `BEGIN`/`END`.
```
-----BEGIN CERTIFICATE-----[Paste the certificate CloudTalk provided during onboarding]-----END CERTIFICATE-----
```
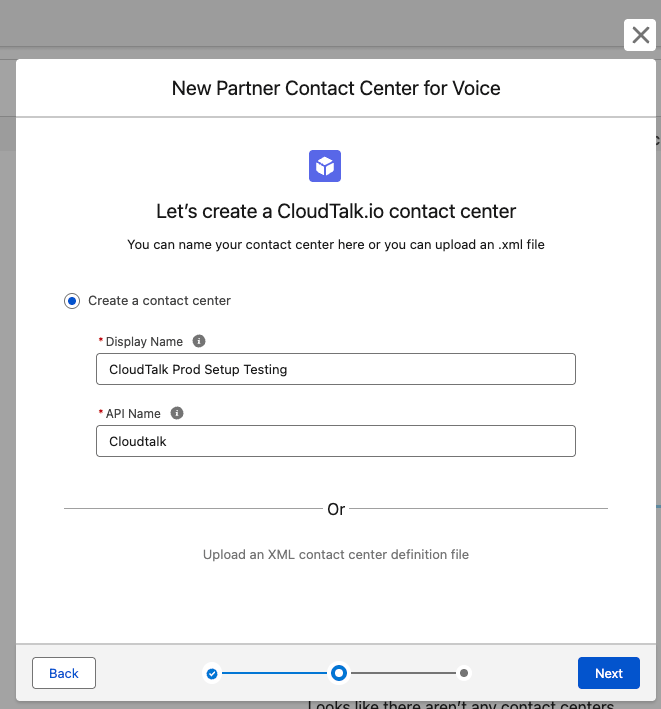 3\. Añade a tus agentes como **usuarios** del centro de contacto.
Paso 5: configura las Trusted URLs (CSP)
1. En Setup, abre **Security > Trusted URLs**.
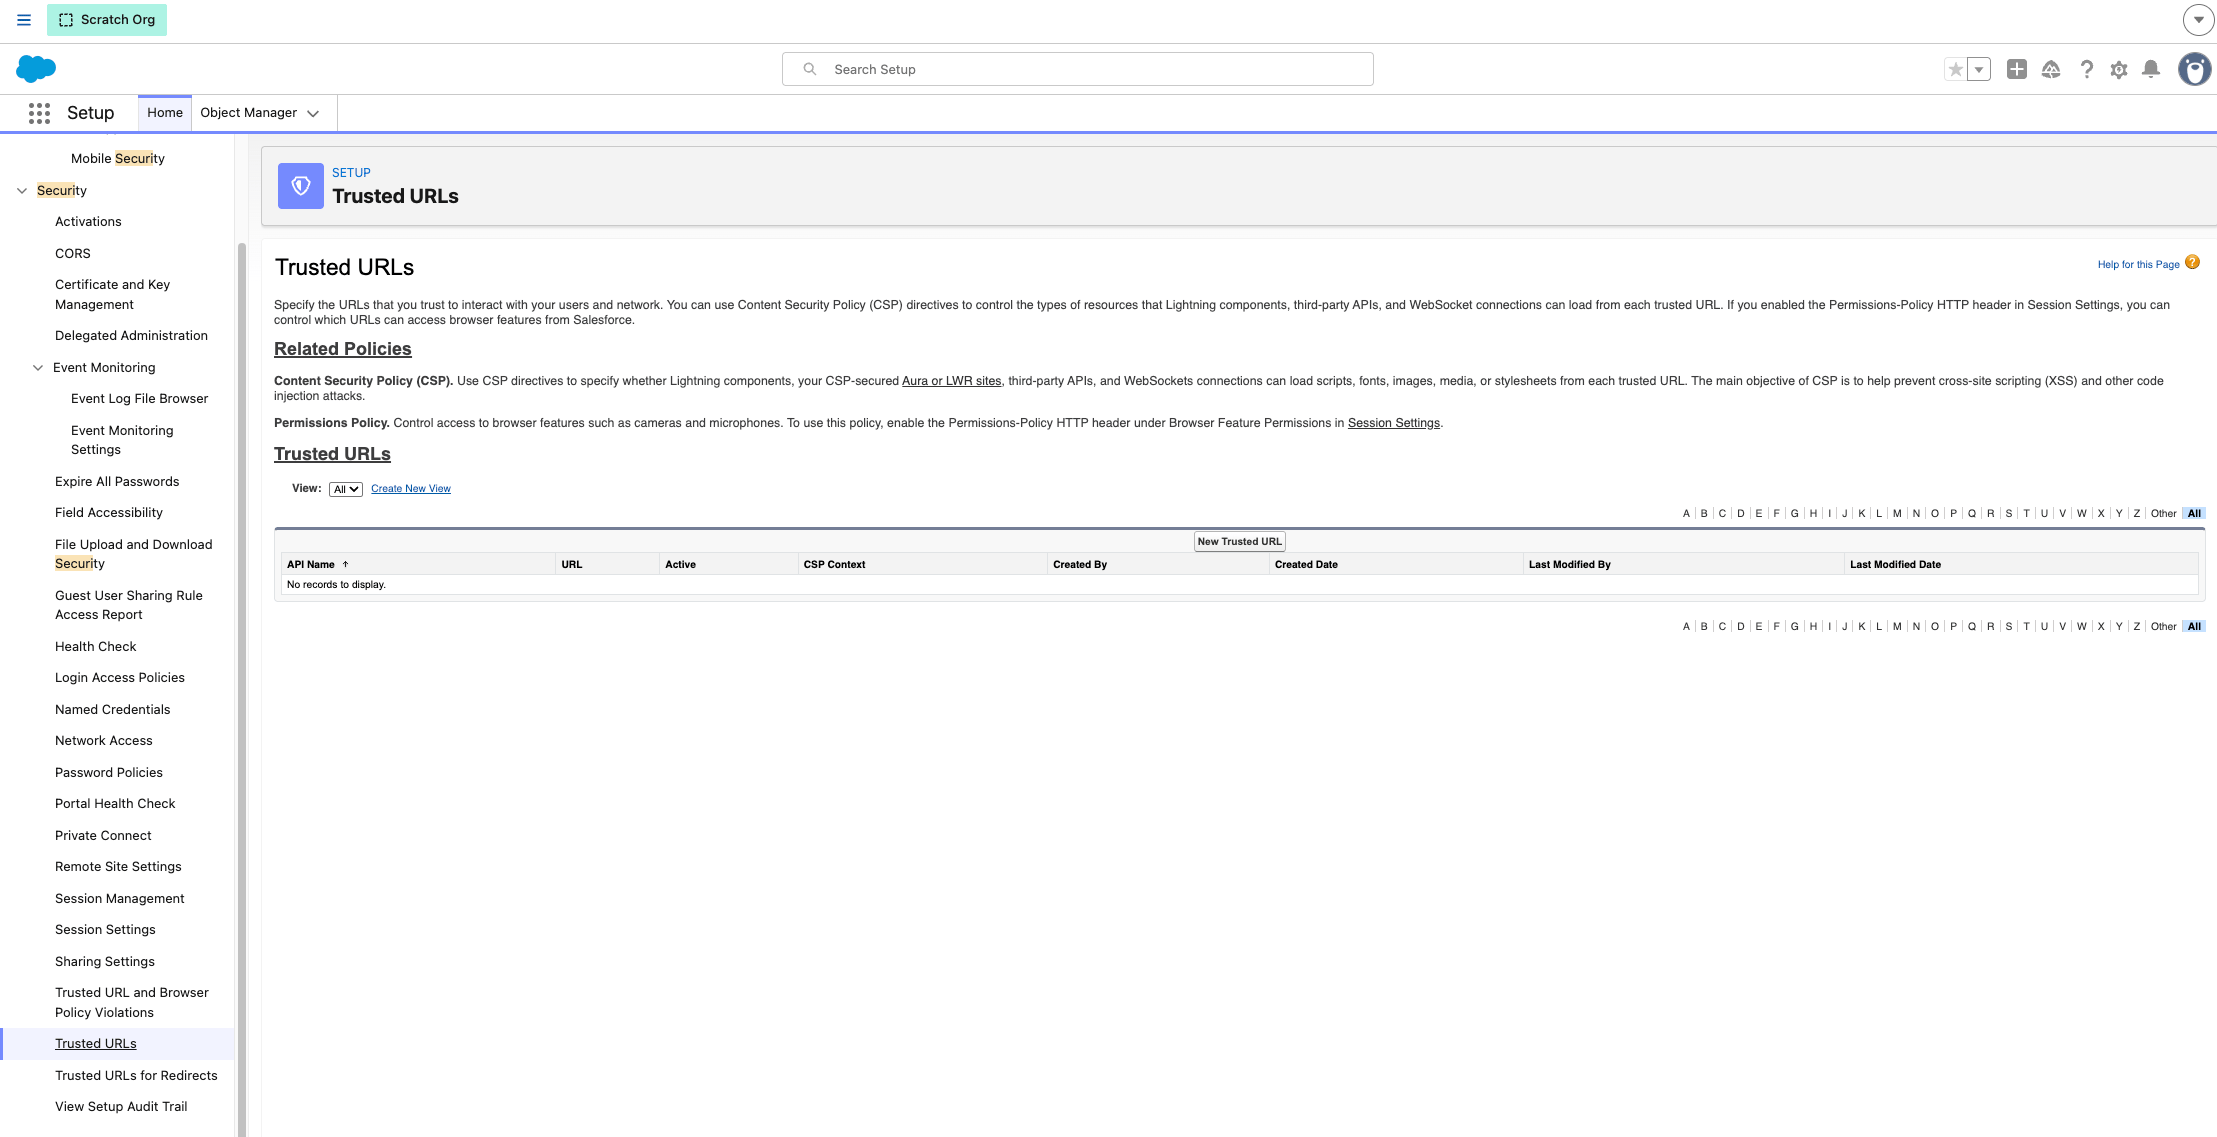 2. Añade la URL de la CDN de CloudTalk correspondiente a tu entorno:
| **Entorno** | **URL** |
| - | - |
| Producción | `https://cdn.cloudtalk.io` |
| Stage | `https://cdn.stage.cloudtalk.io` |
| Dev | `https://cdn.dev.cloudtalk.io` |
3\. Para esa URL, activa las directivas CSP: **connect-src**, **frame-src** e **img-src**.
2. Añade la URL de la CDN de CloudTalk correspondiente a tu entorno:
| **Entorno** | **URL** |
| - | - |
| Producción | `https://cdn.cloudtalk.io` |
| Stage | `https://cdn.stage.cloudtalk.io` |
| Dev | `https://cdn.dev.cloudtalk.io` |
3\. Para esa URL, activa las directivas CSP: **connect-src**, **frame-src** e **img-src**.
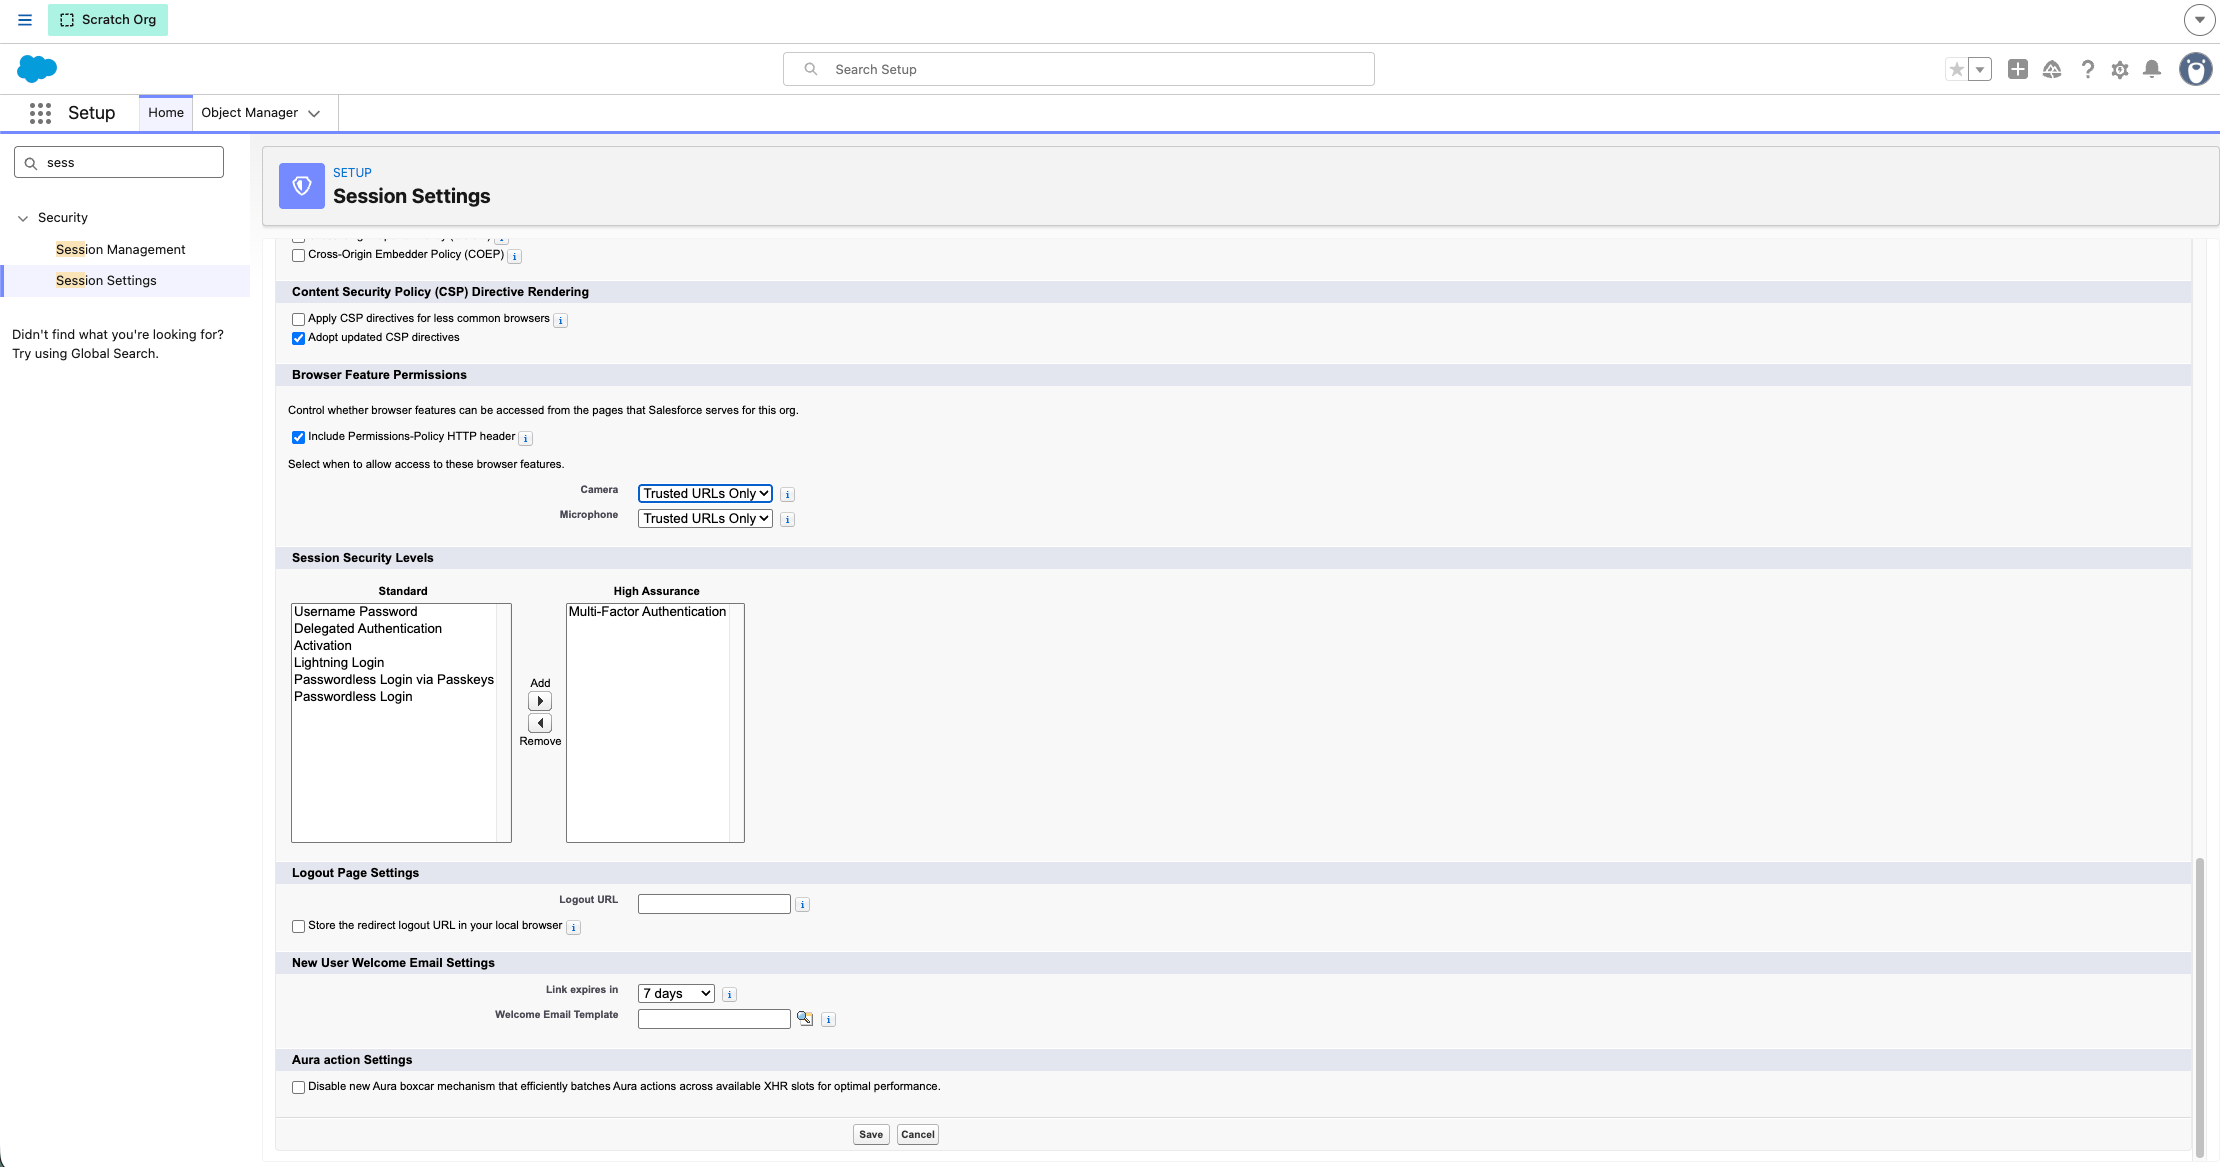
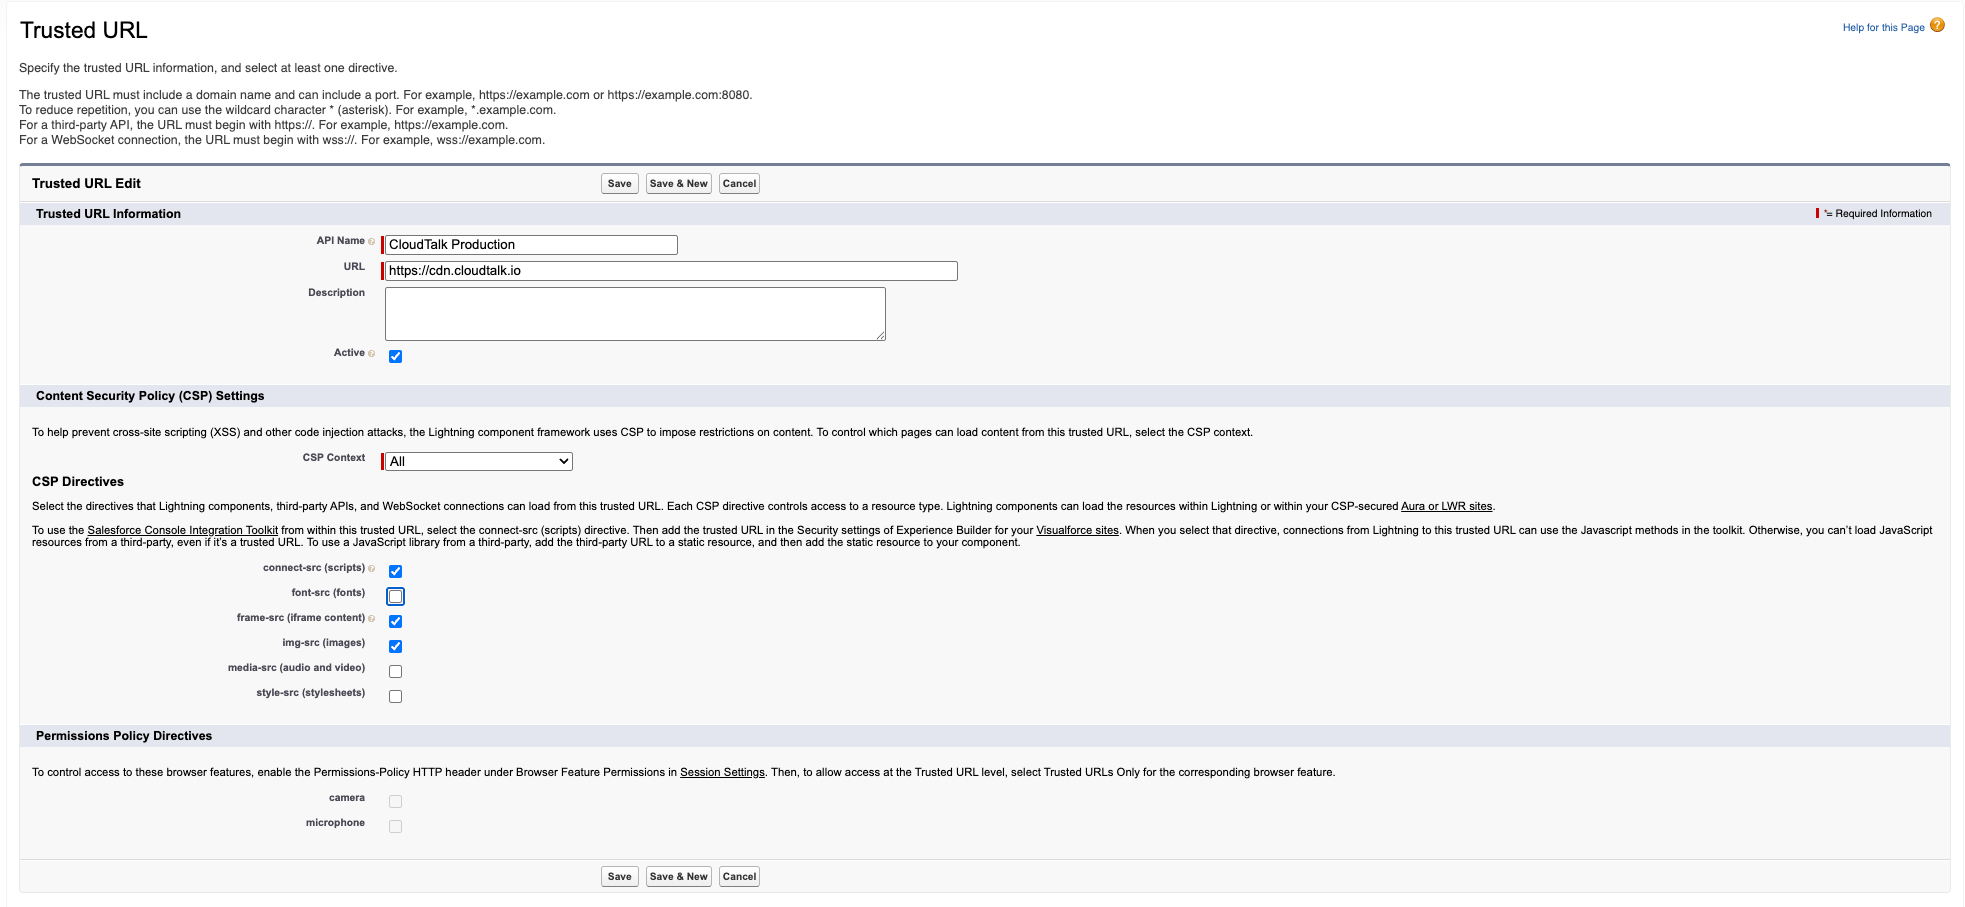 4\. Ve a **Setup > Session Settings > Browser Feature Permissions** y activa **Include Permission-Policy HTTP header**.
Paso 6: configura la presencia de los agentes y Omni-Channel
Crea un estado de presencia
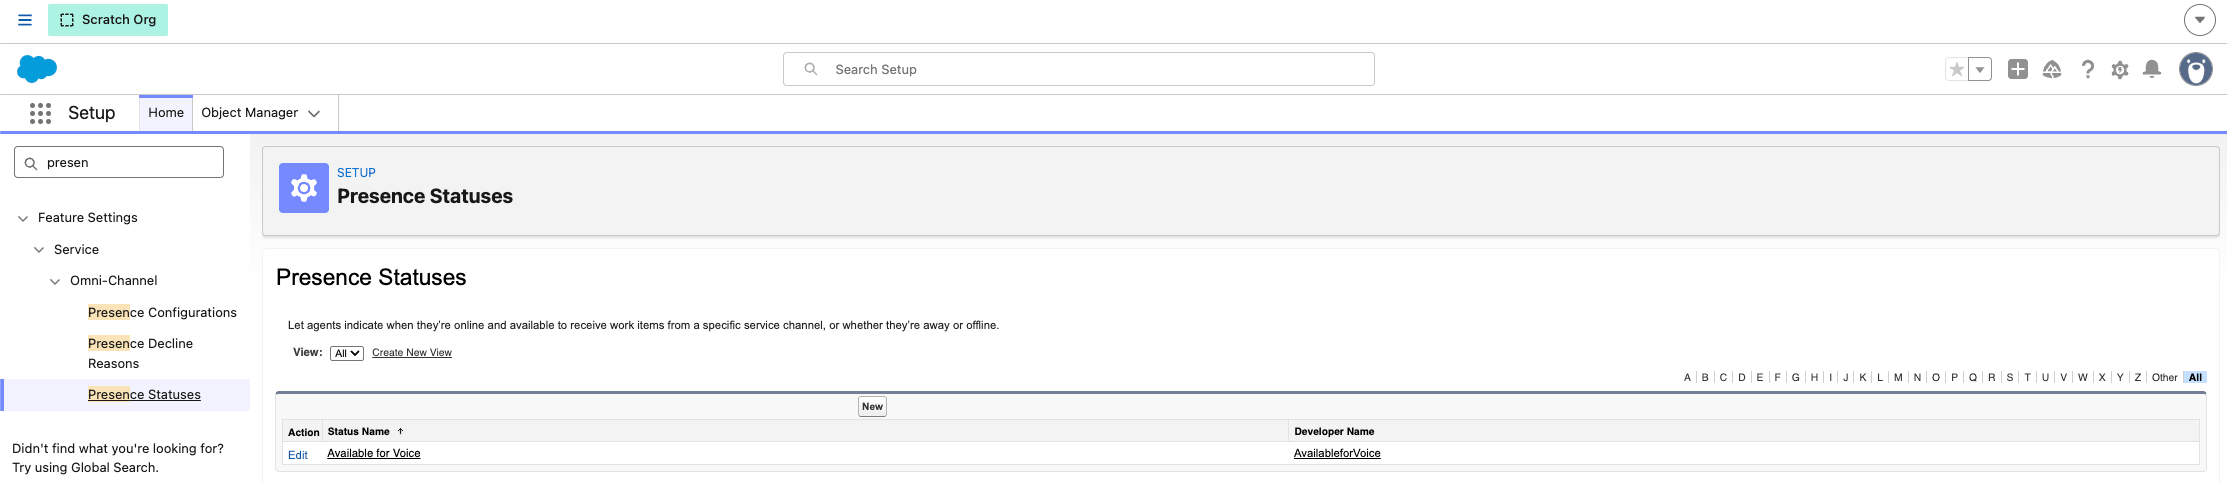
1. En Setup, crea un estado de presencia **Available**.
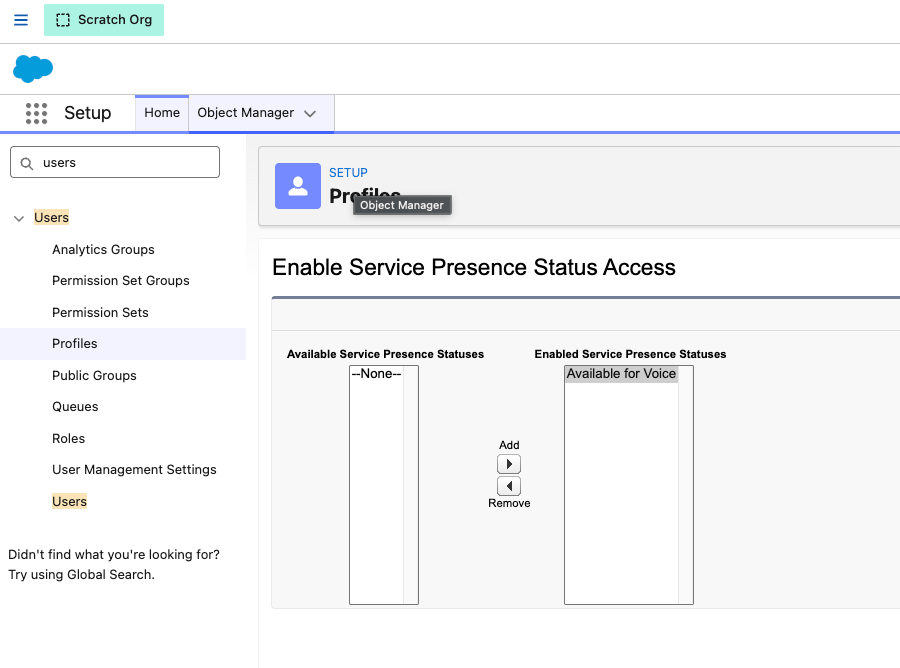
 2. Concédelo a través del perfil **System Administrator** (Setup > Profiles > enabled presence statuses).

Permite que los agentes rechacen llamadas
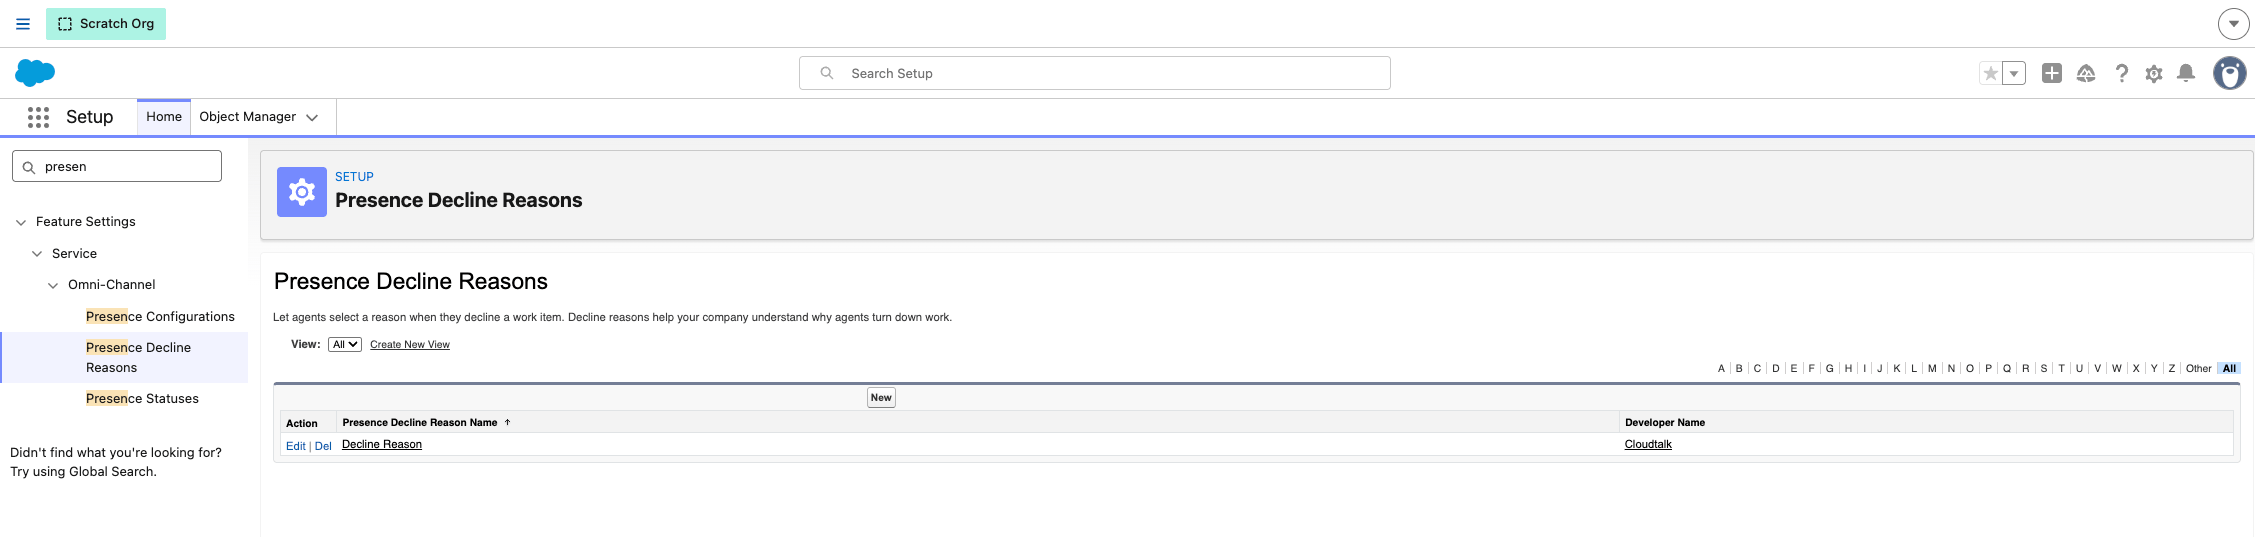
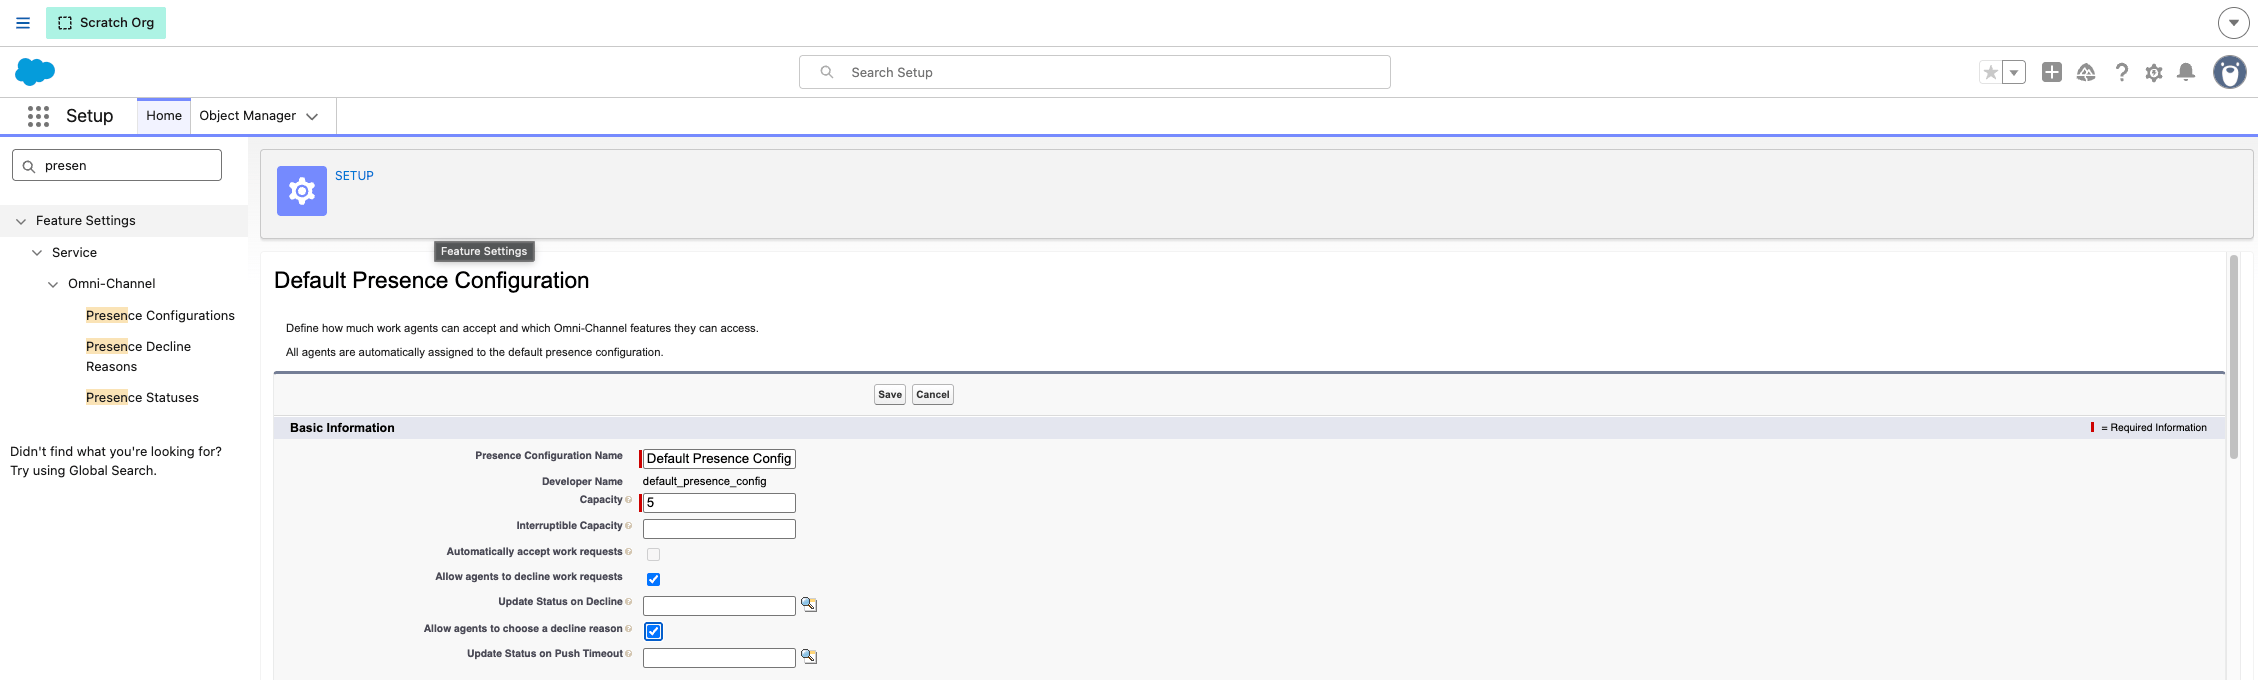
1. Abre **Setup > Presence Decline Reasons** y define al menos un motivo de rechazo.
 2. Abre **Setup > Presence Configurations** y activa:
* Allow agents to decline work requests
* Allow agents to choose a decline reason
2. Abre **Setup > Presence Configurations** y activa:
* Allow agents to decline work requests
* Allow agents to choose a decline reason
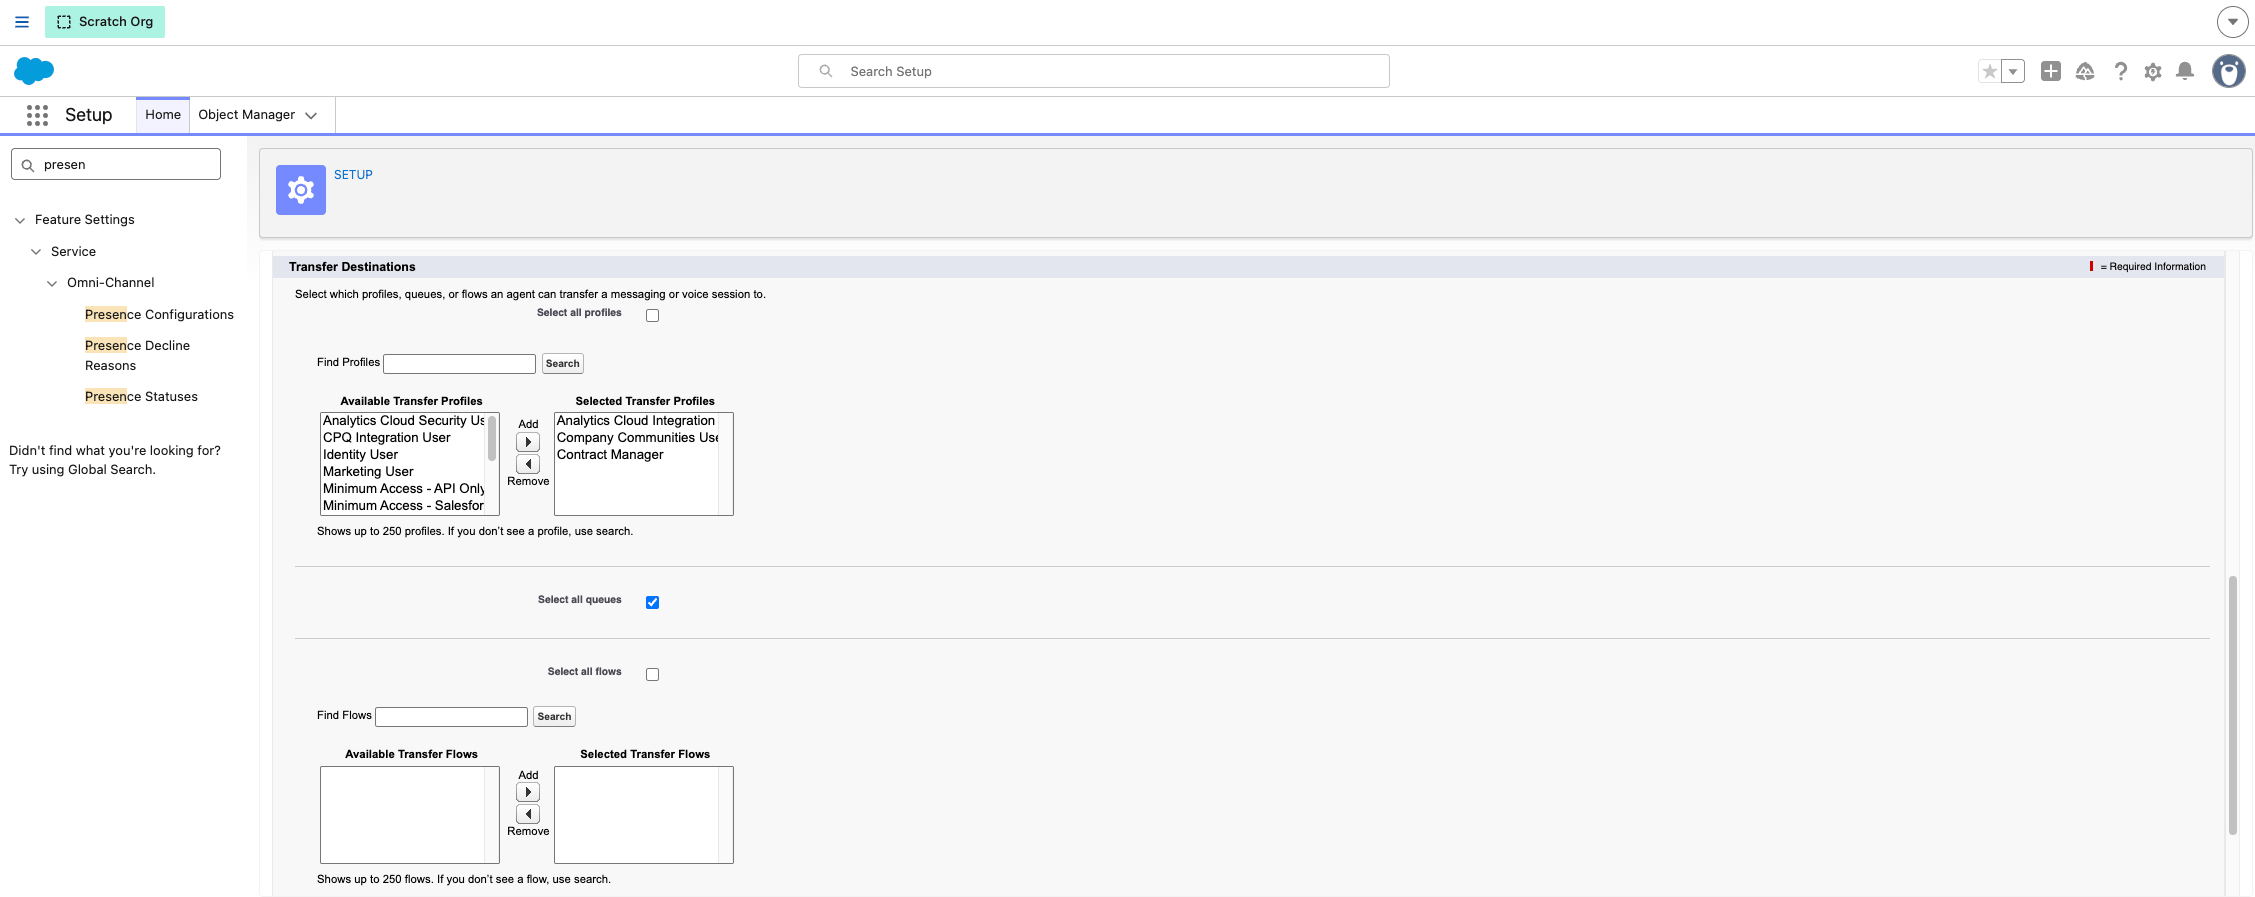
Configura los destinos de transferencia
En la configuración de presencia/Omni-Channel, define a qué perfiles y colas pueden transferir los agentes. Selecciona **todos los perfiles** y **todas las colas** para obtener la cobertura más amplia.
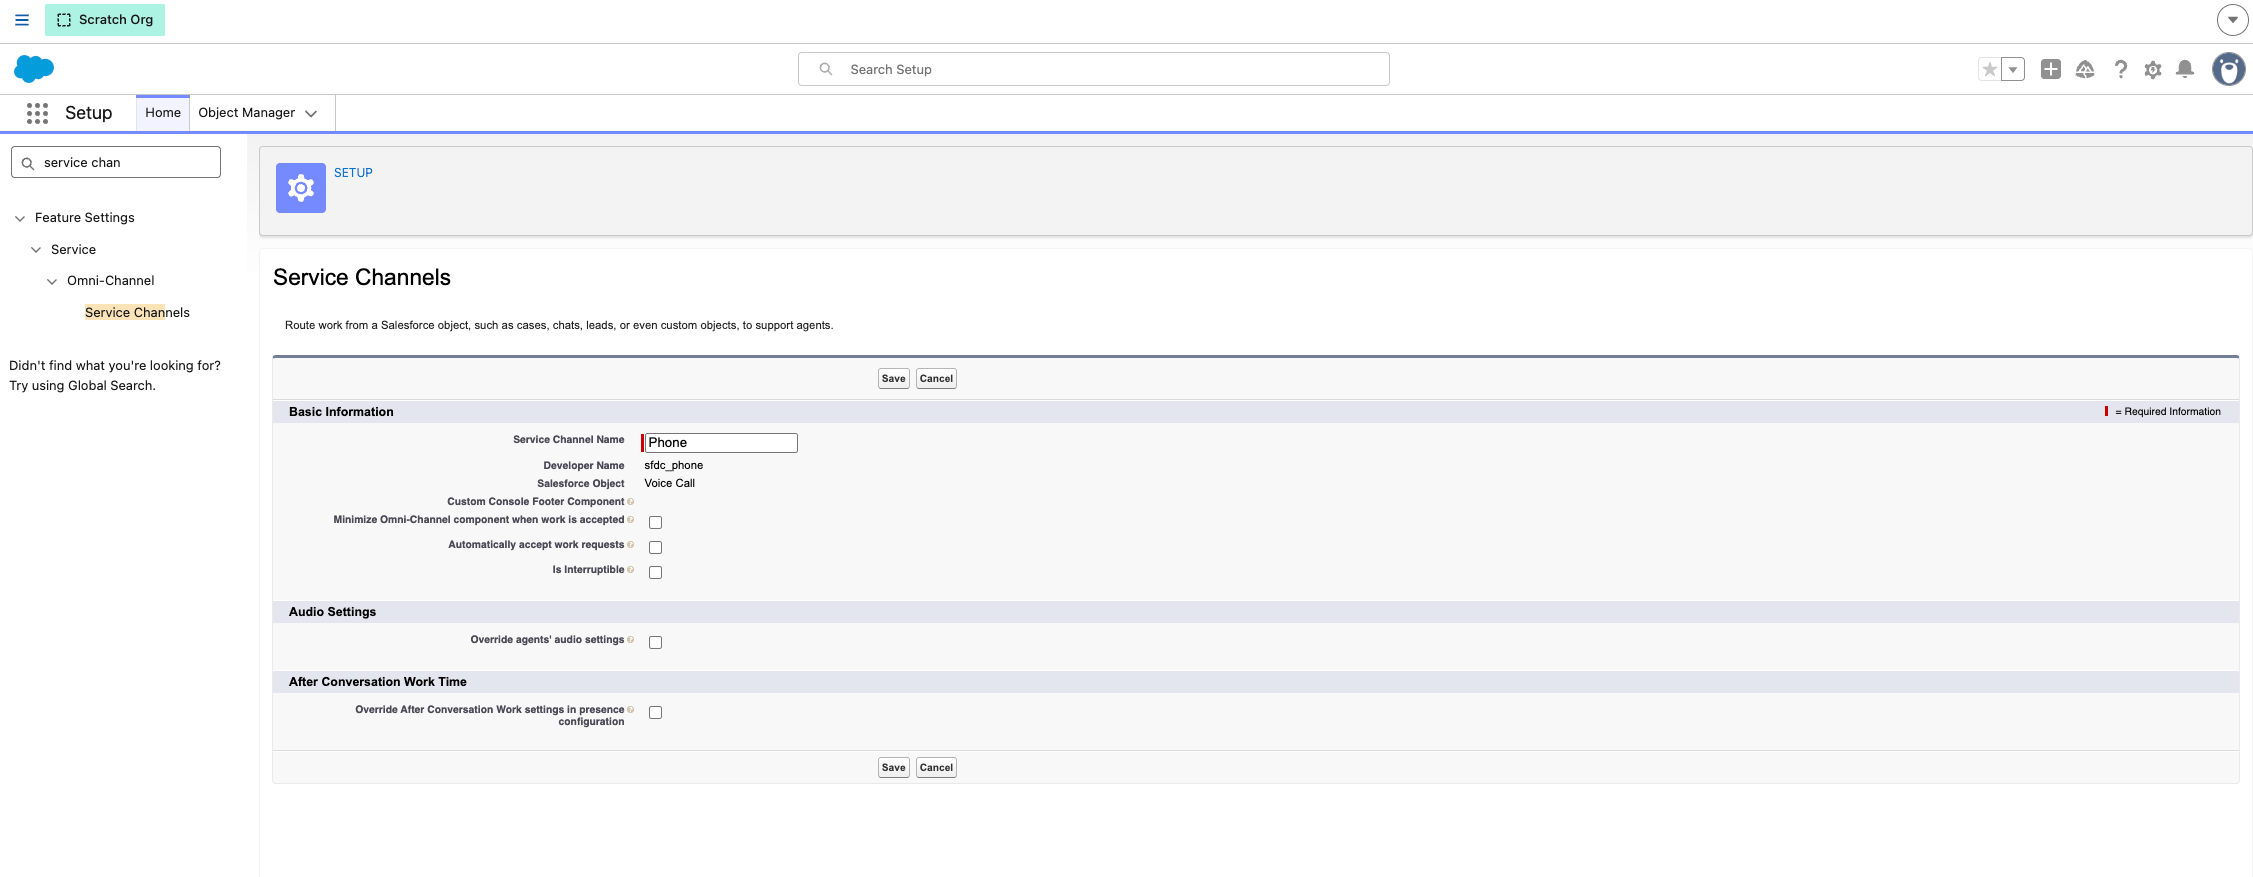
Mantén el panel de Omni-Channel abierto durante las llamadas
1. En Setup, busca **Service Channels** y modifica el canal de servicio **Phone**.
2. Desmarca **Minimize Omni-Channel component when work is accepted**.
Paso 7: personaliza la visualización de los registros
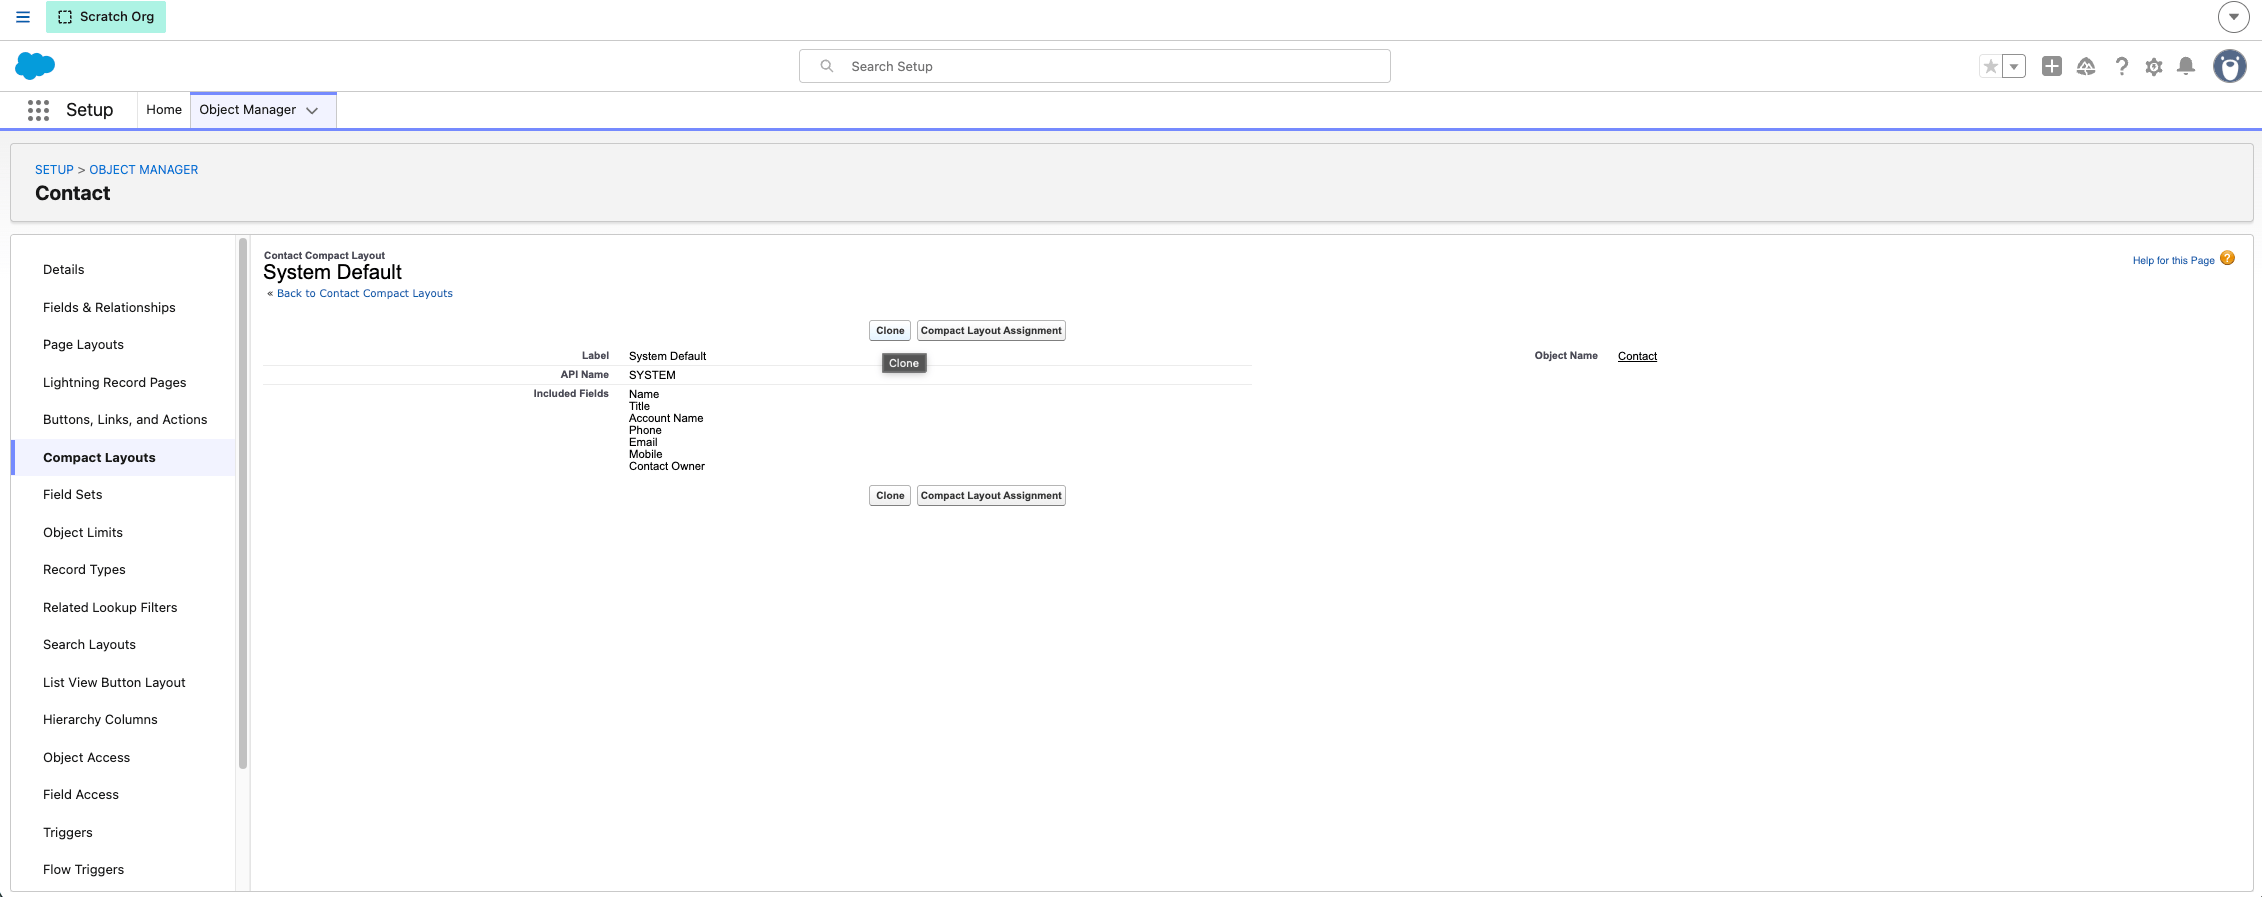
Muestra la información del contacto como encabezado
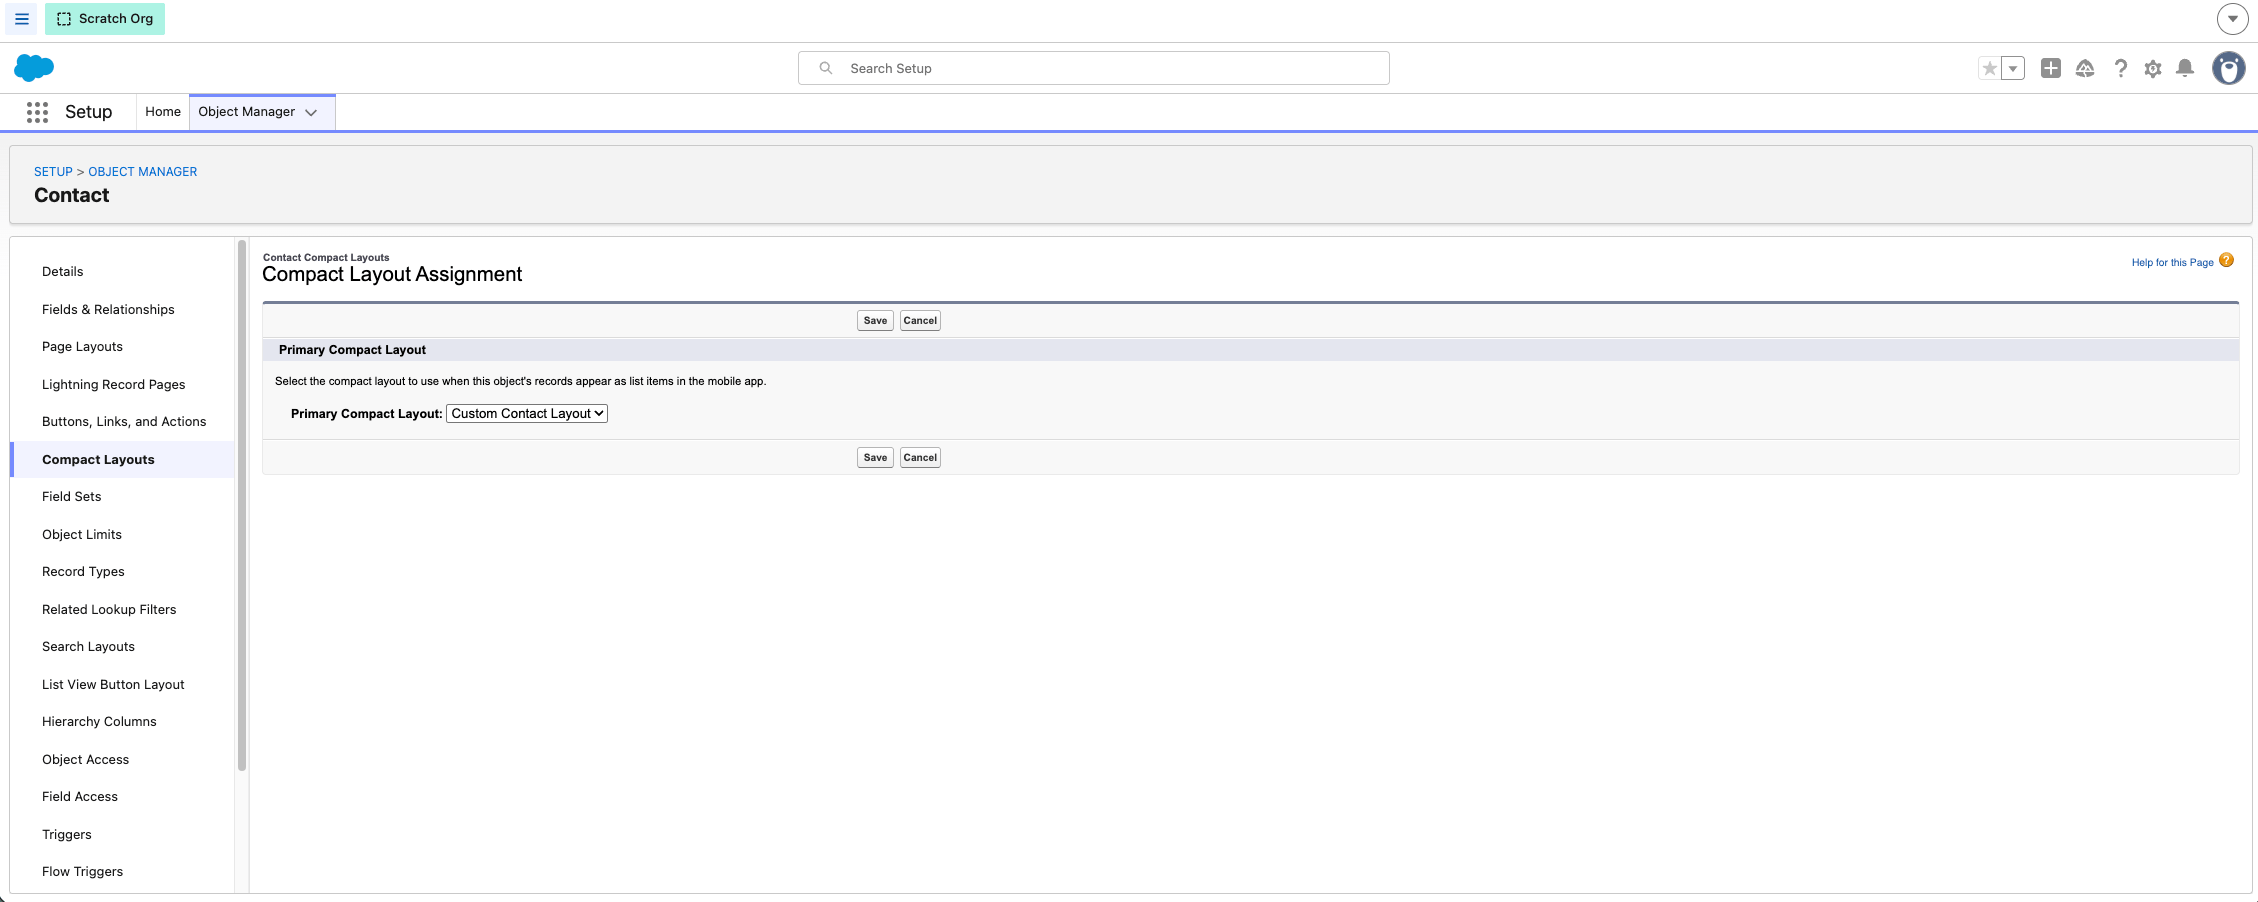
1. Abre **Object Manager > (objeto correspondiente) > Compact Layouts**.
2. Clona **System Default** y ponle un nombre (por ejemplo, «Custom»).
3. Mueve **Recipient Contact Info** a los campos seleccionados y colócalo en primer lugar.
4. Guarda y, a continuación, abre **Compact Layout Assignment** y asigna tu nuevo formato.
Muestra el historial de llamadas en el registro de contacto
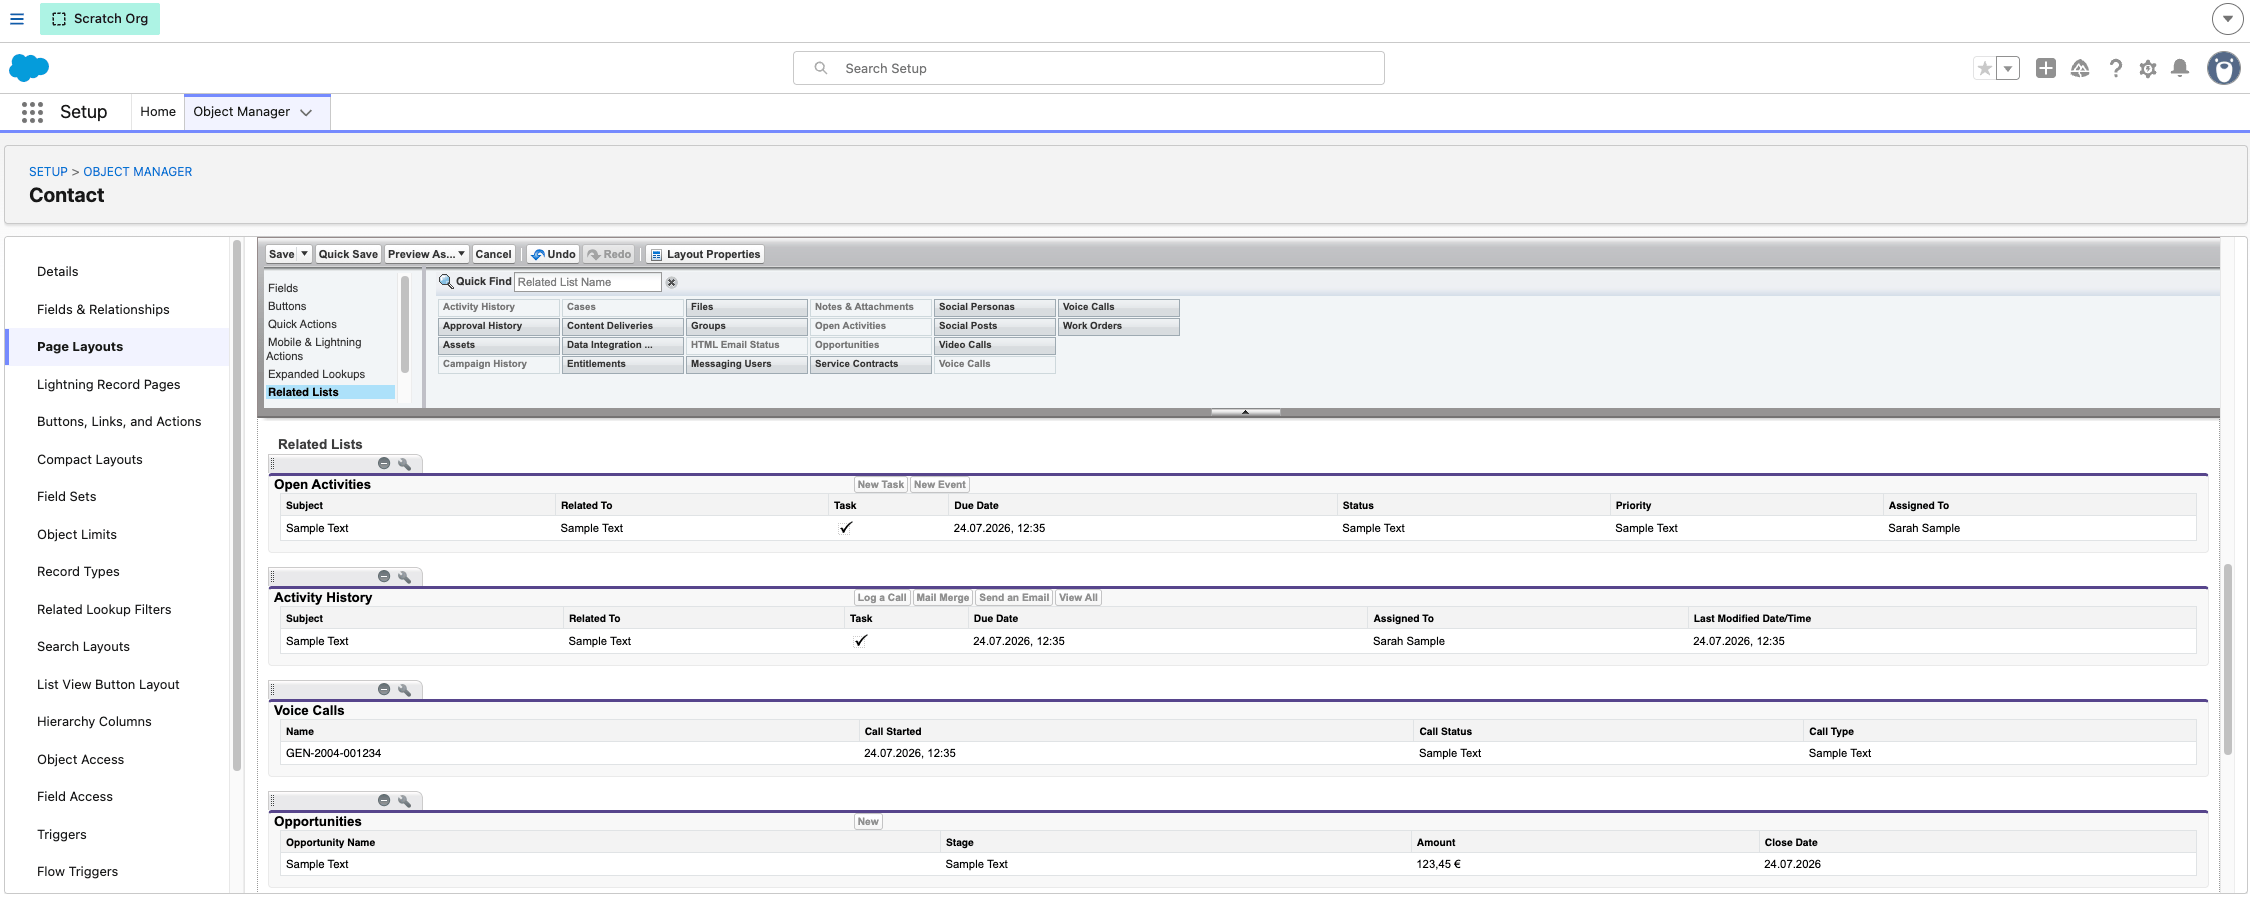
1. Abre **Object Manager > Contact > Page Layouts**.
2. Añade la lista relacionada **Voice Calls** al formato.
 **¡Listo!**
Los agentes que tengan asignado el conjunto de permisos y estén añadidos al centro de contacto ya pueden iniciar sesión en el widget de CloudTalk del panel de Omni-Channel y empezar a gestionar llamadas. Remítelos a la [guía de Salesforce Service Cloud Voice](/es/articles/14654473-salesforce-service-cloud-voice) para el uso diario.
***
*¿Necesitas ayuda o tienes alguna pregunta?* Escríbenos a través de nuestro [Portal de atención al cliente](https://support.cloudtalk.io/hc/en-us/requests/new?ticket_form_id=26305535257884): estamos aquí para ayudarte.
## Related topics
- [Salesforce Service Cloud Voice](/es/articles/14654473-salesforce-service-cloud-voice.md)
- [Configurar Salesforce](/es/articles/3368501-configure-salesforce.md)
- [Configuración de Conversación Einstein Insights](/es/articles/8290842-einstein-conversation-insights-setup.md)
This documentation is built and hosted on [Mintlify](https://mintlify.com), a developer documentation platform.
**¡Listo!**
Los agentes que tengan asignado el conjunto de permisos y estén añadidos al centro de contacto ya pueden iniciar sesión en el widget de CloudTalk del panel de Omni-Channel y empezar a gestionar llamadas. Remítelos a la [guía de Salesforce Service Cloud Voice](/es/articles/14654473-salesforce-service-cloud-voice) para el uso diario.
***
*¿Necesitas ayuda o tienes alguna pregunta?* Escríbenos a través de nuestro [Portal de atención al cliente](https://support.cloudtalk.io/hc/en-us/requests/new?ticket_form_id=26305535257884): estamos aquí para ayudarte.
## Related topics
- [Salesforce Service Cloud Voice](/es/articles/14654473-salesforce-service-cloud-voice.md)
- [Configurar Salesforce](/es/articles/3368501-configure-salesforce.md)
- [Configuración de Conversación Einstein Insights](/es/articles/8290842-einstein-conversation-insights-setup.md)
This documentation is built and hosted on [Mintlify](https://mintlify.com), a developer documentation platform.