> ## Documentation Index
> Fetch the complete documentation index at: https://help.cloudtalk.io/llms.txt
> Use this file to discover all available pages before exploring further.
# Using Campaigns with CloudTalk Dialer (Legacy)
> Guide for agents using campaigns in the legacy dialer.
This article explains how to use the CloudTalk Dialer, including how to manage contacts, handle calls, and navigate the dialer interface during a campaign.
**User level:** Admin**,** Agent, Supervisor
***
**Using the new AI Sales Dialer?** This article covers the legacy dialer. For the new AI Sales Dialer, see [Running a campaign](/en/articles/17025679-running-a-campaign).
Before you start
Campaigns must be configured in the dashboard before agents can run them. See [Setting up campaigns](/en/articles/8428838-setting-up-campaigns-legacy-dialer) for a full guide.
**CloudTalk Dialer Campaigns** help your team run organized, personalized outbound outreach with ease. With smart contact queues, CRM integration, and recent UX improvements, launching campaigns is now faster and simpler than ever.
CloudTalk Dialer is a powerful [add-on](/en/articles/13130387-understanding-pricing-plans-and-what-they-include#:~:text=pricing%20page.-,Add%2Dons,-CloudTalk%20offers%20additional) designed to supercharge your outbound efforts, but it’s not part of our standard packages by default.
**Don’t see the Dialer tab in your app?**
No worries! Just reach out to your dedicated *Customer Success Manager* or to our *[CloudTalk Support](https://support.cloudtalk.io/hc/en-us/requests/new?ticket_form_id=26305535257884)* team if you don’t have one.
Calling from the Dialer
To start making calls in a campaign:
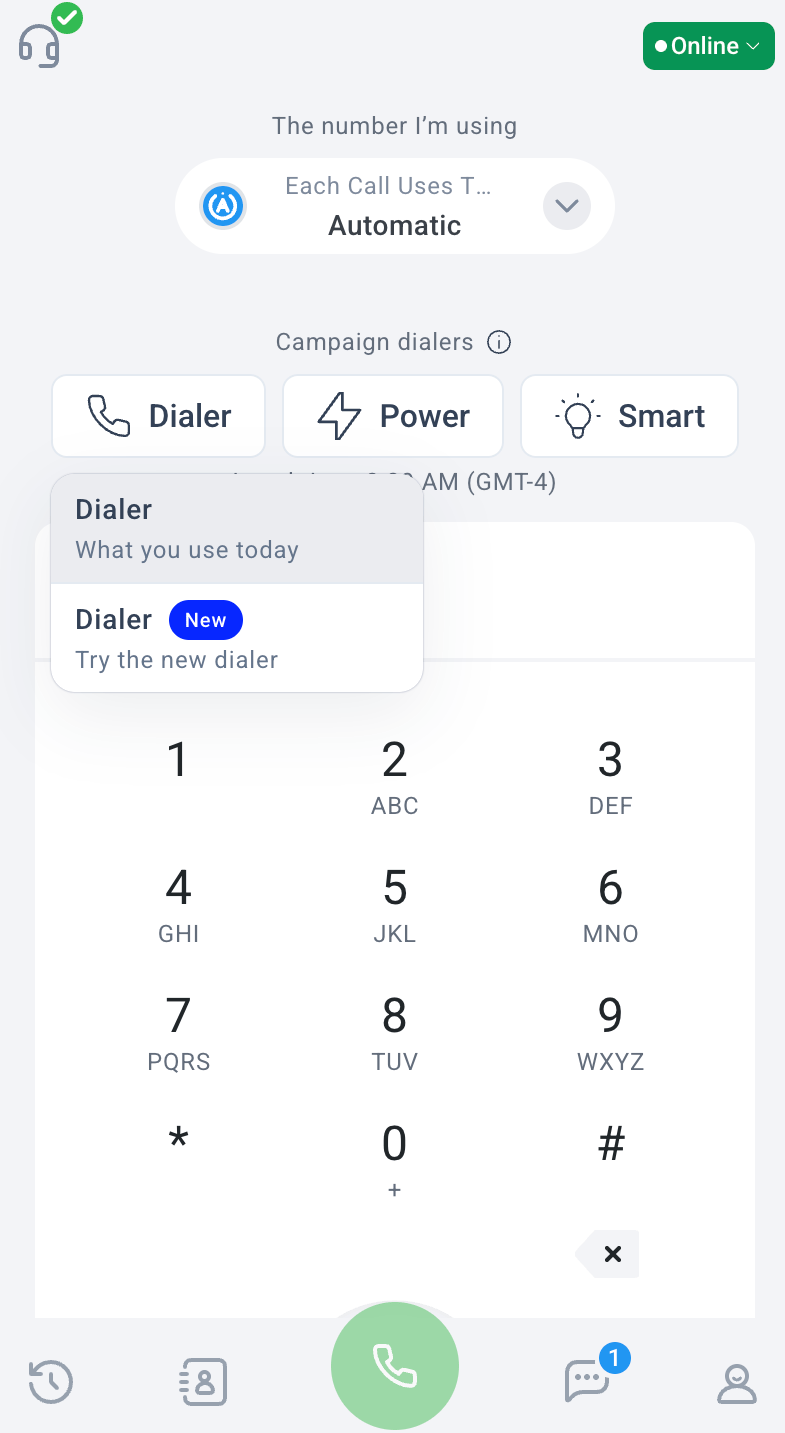
1. **Open your CloudTalk phone app** (Desktop, Webphone, or CTI) and click **Dialer**.
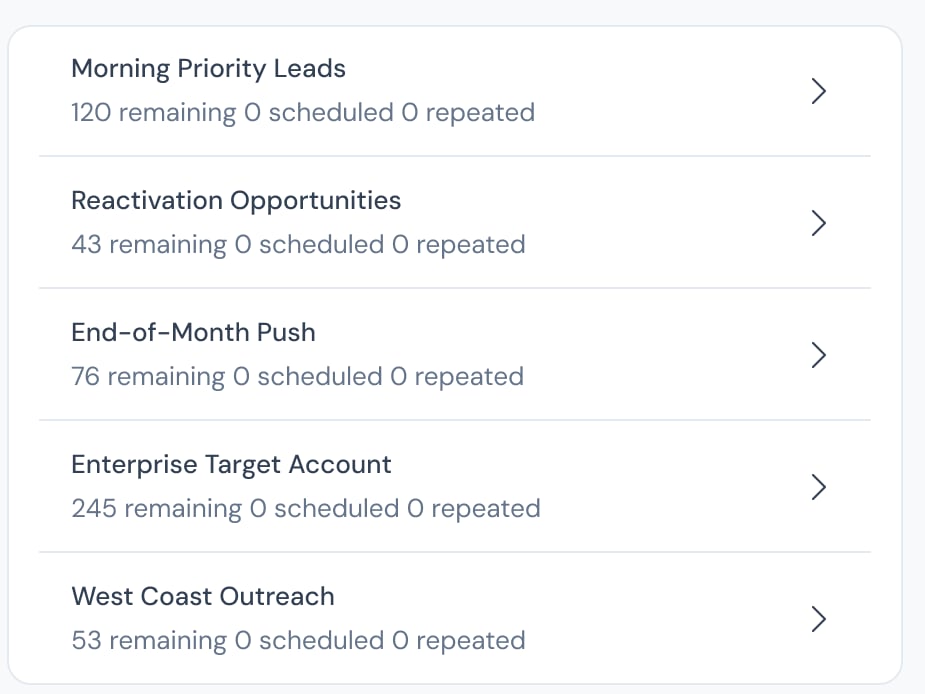
 2. If campaigns are configured for you, a list will display. **Select the campaign** you wish to start dialing through.
 3. Once your selected campaign opens, the phone interface presents CloudTalk Dialer to you.
4. To start dialing, click `Start session`. Depending on the type of dialer your are using in the campaign, different logic of dialing will be applied.
The dialing logic applied to your calls will vary depending on the dialing mode selected for your campaign. To fully understand how calls are managed, learn more about **[AI Sales Dialer: Sequential Mode (1 line)](/en/articles/17025671-sequential-mode-1-line)** or **[AI Sales Dialer: Parallel Mode (2+ lines)](/en/articles/17025675-parallel-mode-2-lines)**[.](/en/articles/17025675-parallel-mode-2-lines)
3. Once your selected campaign opens, the phone interface presents CloudTalk Dialer to you.
4. To start dialing, click `Start session`. Depending on the type of dialer your are using in the campaign, different logic of dialing will be applied.
The dialing logic applied to your calls will vary depending on the dialing mode selected for your campaign. To fully understand how calls are managed, learn more about **[AI Sales Dialer: Sequential Mode (1 line)](/en/articles/17025671-sequential-mode-1-line)** or **[AI Sales Dialer: Parallel Mode (2+ lines)](/en/articles/17025675-parallel-mode-2-lines)**[.](/en/articles/17025675-parallel-mode-2-lines)
Dialer Interface Overview
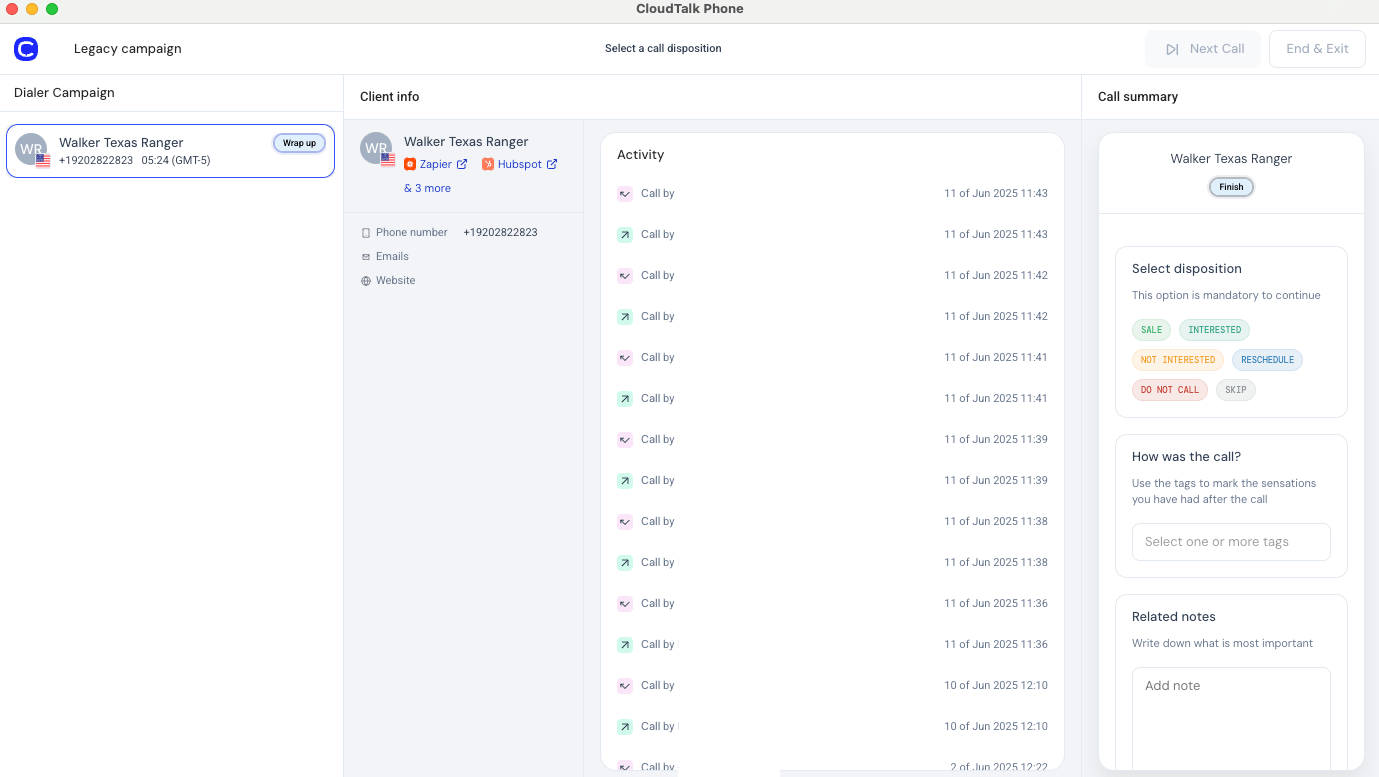
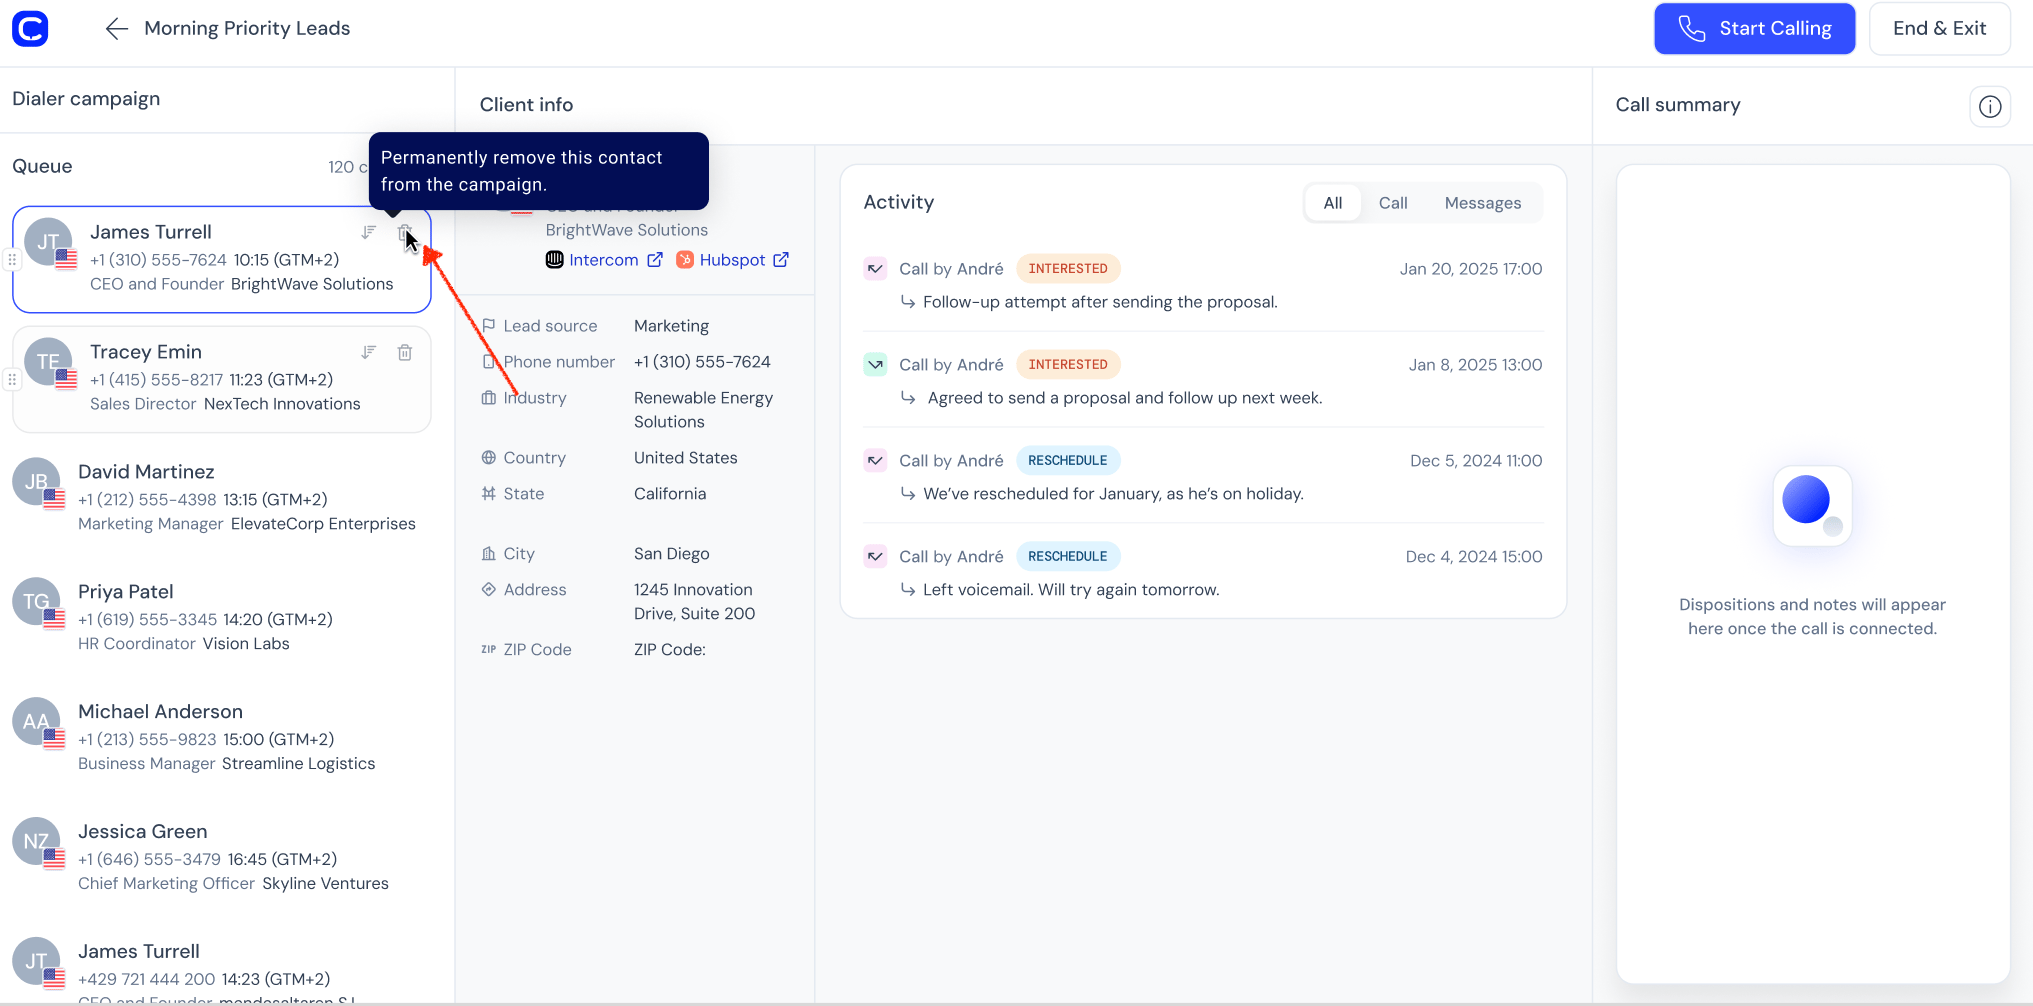
The dialer interface is divided into three main sections:
* **Contacts Queue**: contacts assigned to you for dialing
* **Client Info**: contact details and interaction history
* **Call Controls & Summary**: call actions and post-call input
On the Desktop app, you can **freely resize** the CloudTalk Dialer window both horizontally and vertically. The app remembers your preferred size for the next session.\
***Note***\*: This feature is available only in the Desktop app. The CTI (embedded) app has a fixed window size.\*
Contacts Queue
The **Contacts Queue** displays the contacts currently assigned to your agent for campaign dialing, offering a clear and organized view of upcoming calls.
How Campaign Queues Work
Only contacts that have **at least one phone number** are included in a campaign. A contact with no phone number can't be dialed, so it isn't added to the campaign or counted in the campaign's total contacts. This is why a campaign may show fewer contacts than the list or tag you built it from.
When an agent joins a campaign session, CloudTalk automatically assigns a personal queue to them:
Initially, **15 contacts are locked** to the agent upfront. Contacts are pulled in a specific order to optimize outreach:
1. **Rescheduled Contacts:** contacts that have been previously attempted and are now ready for a scheduled callback.
2. **Repeated Contacts**: contacts that were marked for retry with no specific reschedule time set.
3. **Fresh Contacts:** contacts that have never been dialed before within this campaign.
As soon as the agent dials the first 8 contacts, the system automatically begins replenishing their queue.
If an agent ends their session or is paused for more than 2 hours, any uncalled contacts from their personal queue are returned to the shared pool, making them available for other agents.
Managing Contacts in the Queue
Agents can manage their dialing queue directly during a session to prioritize contacts or remove irrelevant entries.
**Note:** Queue controls must be enabled by an admin during [campaign setup](/en/articles/8428838-setting-up-campaigns-legacy-dialer#:~:text=Give%20agents%20queue%20controls).
Depending on your permissions, the following actions are available:
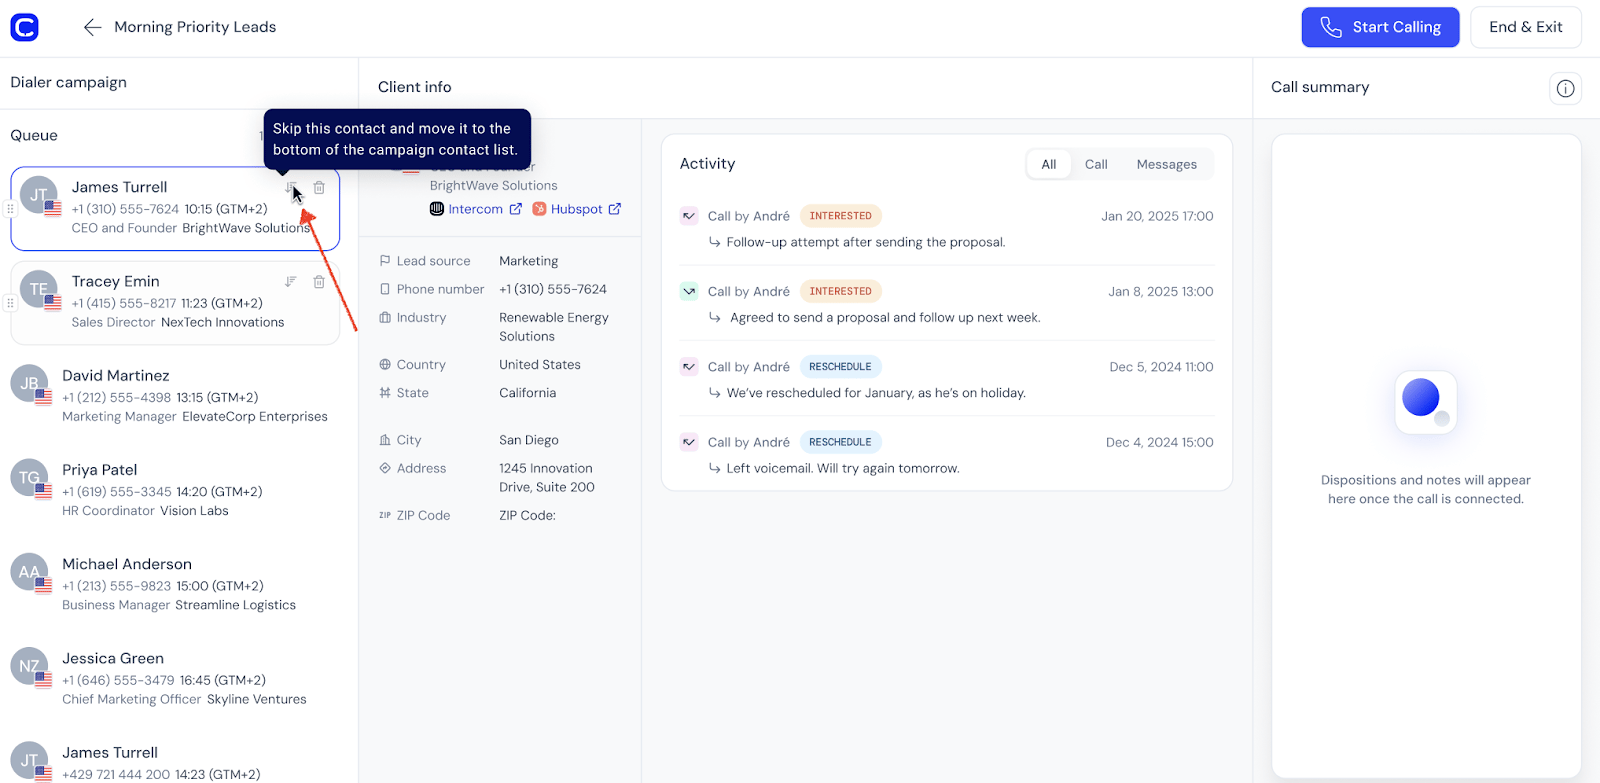
Skip Contact
If a contact is not relevant at the moment, you can skip it.
* The contact is removed from your current queue
* It is returned to the campaign pool **at the end of its current bucket** (for example, fresh or rescheduled contacts)
* The dialer immediately continues with the next contact
**Note:** Skipped contacts are not placed at the very end of the overall campaign. They are returned to the end of their respective bucket, preserving the campaign logic.
 **Will a skipped contact come back to me?** Yes, it can. Because the contact is returned to the end of its bucket (not the end of the entire campaign), it may reappear in your queue during the same session if the bucket has few remaining contacts. If you don't want the contact to come back during your current session, use **Remove.**
Remove Contact
If a contact should no longer be called (e.g., invalid or spam), you can remove it from the campaign.
* The contact is permanently removed from the campaign
* It will no longer be dialed in this campaign
* The contact is not deleted from CloudTalk
* The contact is flagged for review
Reorder Contacts
Before starting a dialing session, you can prioritize contacts in your queue:
* Drag and drop contacts using the reorder handle
* Move high-priority contacts to the top of the list
* The updated order determines the dialing sequence
* This change only affects your session and does not modify the overall campaign order
**Permissions**
Queue management actions may not be available to all users.
If you cannot skip, remove, or reorder contacts, contact your administrator.
Choosing the right action
Not sure whether to **Skip**, **Remove**, or select a call disposition? Use this guide:
| **I want to…** | **Action to use** |
| - | - |
| Pause on this contact and come back to it later in the session | **Skip** (moves to the end of its bucket; may return within the same session) |
| Stop this contact from appearing again during my current session | **Remove** (takes the contact out of your queue entirely for this campaign) |
| Mark that a conversation happened and no more attempts are needed | **Successful, Positive Outcome** or **Successful, Negative Outcome** |
| Stop all future re-dial attempts without a conversation (e.g. bad or invalid contact) | **Failed, No Retry** |
| Try this contact again later in the campaign | **Failed, Call Later** (returns to the pool as a repeated contact) |
| Schedule a follow-up at a specific time | **Reschedule** (pick a date and time; optionally "Assign to me") |
**Tip:** If a contact keeps reappearing after you skip it, that's by design, the bucket it belongs to is short. To stop further attempts, use **Remove**, or select a **Successful** or **Failed, No Retry** disposition.
Client Info
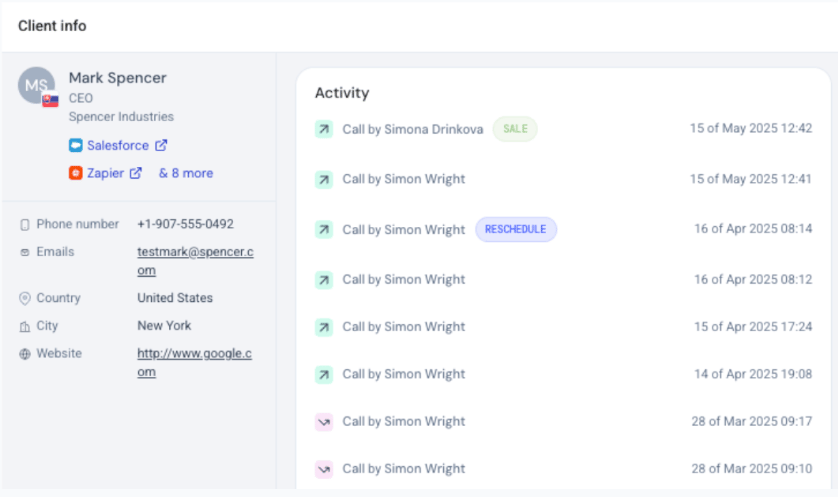
The **Client Info** panel provides agents with vital contact details and interaction history, enabling a personalized and informed approach to every call.
Contact Information Preview
Agents can quickly access key contact information at a glance:
* Only **filled fields are displayed** for clarity, ensuring you see only relevant data.
* All contact details are **accessible prior to initiating a call**, allowing for preparation.
* The preview includes **interaction history**, empowering agents to personalize their approach before even dialing.
Call History and Past Interactions
Within the Client Info panel, you can also view a comprehensive history of previous calls and interactions with each contact:
* **Understand past discussions and outcomes** to quickly get up to speed.
* **Review topics discussed** with the customer, facilitating more personalized and effective conversations.
Call Actions and Outcomes
On the right side of the interface, dialer provides features for agent to **record all necessary data related to each call**.
Active Call Features
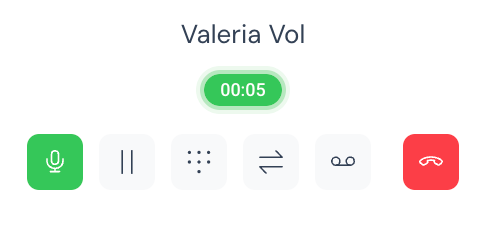
During an active call, agents can:
* Mute or unmute the call.
* Place the call on hold or resume it.
* Open the keypad for inputs.
* Transfer the call (cold transfer only).
* End the call.
Dispositions, Notes, and Tags
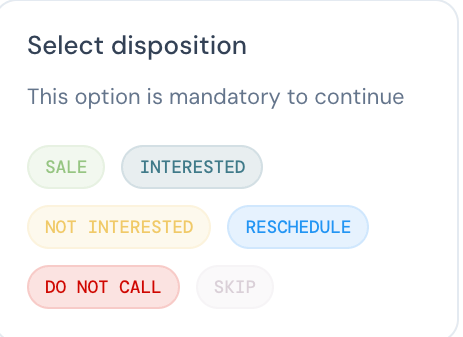
After completing a call, agents are prompted to:
* Select a **Call Disposition** to categorize the call - this step is required to proceed to the next call.
 - (*optional*) Apply relevant **Tags** to simplify tracking and reporting.
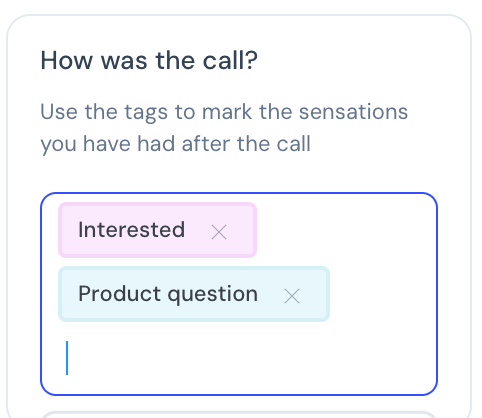 - Add optional **Notes** for detailed insights.
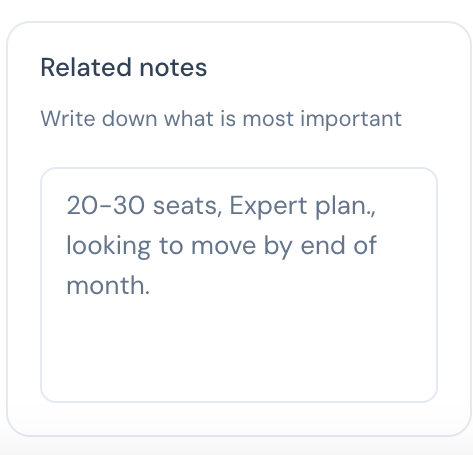 **Note:** The account-level **Mandatory Call Tagging** setting does not apply to Dialer calls. The Dialer enforces a mandatory call disposition instead. Tags can still be added, but they are never required here, even if Mandatory Call Tagging is enabled in **Account > Settings**. Learn more in [Call Tags](/en/articles/5854602-call-tags).
Choosing the Right Dispositions
Call dispositions are crucial for accurately categorizing call outcomes. Make sure to select the right disposition to reach your desired outcome. In the following sections, we'll detail how dispositions like **Reschedule**, **Successfull** and **Failed** call outcomes impact your campaign flow and contact management.
Reschedule
When the **Reschedule** disposition is selected, agents are prompted to choose a specific date and time for the call to be rescheduled.
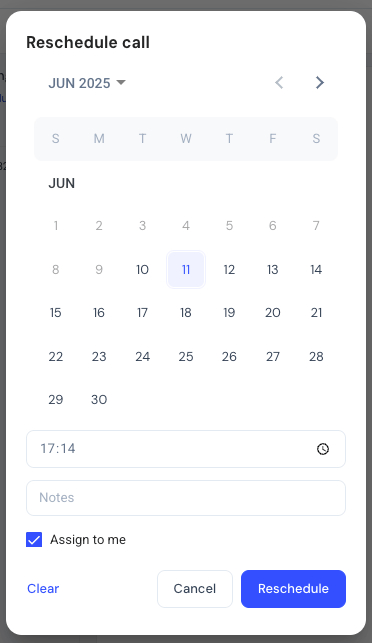 Agents also have the option to select **"Assign to me."** If the agent is available at the new time, the contact will be placed directly into their personal queue for up to 2 hours. However, if the agent is not available for the call within that window, the contact will be returned to the general pool of contacts, making it available to any other ready agent.
Successful
Calls finished with a disposition of either **"Successful, Negative Outcome"** or **"Successful, Positive Outcome"** typically indicate that a conversation occurred between the agent and the contact. These dispositions signify a clear result from the interaction, and no further attempts or actions are needed for that contact.
Failed
Calls concluded with a **"Failed, Call Later"** or **"Failed, No Retry"** disposition typically mean a successful connection with the client wasn't established (e.g., they didn't pick up).
* For a **"Failed, Call Later"** disposition, the contact goes back into the general pool and is prioritized in the queue as a repeated contact for a future attempt.
* For a **"Failed, No Retry"** disposition, the contact is marked as complete for that campaign, and no further attempts will be made.
💡 Learn more about campaign dispositions and their impact on Dialer behavior in [Setting up Campaigns](/en/articles/8428838-setting-up-campaigns-legacy-dialer#:~:text=the%20Queue.-,Disposition%20Setting,-%E2%9A%A0%EF%B8%8F%20Important%3A).
Session Results
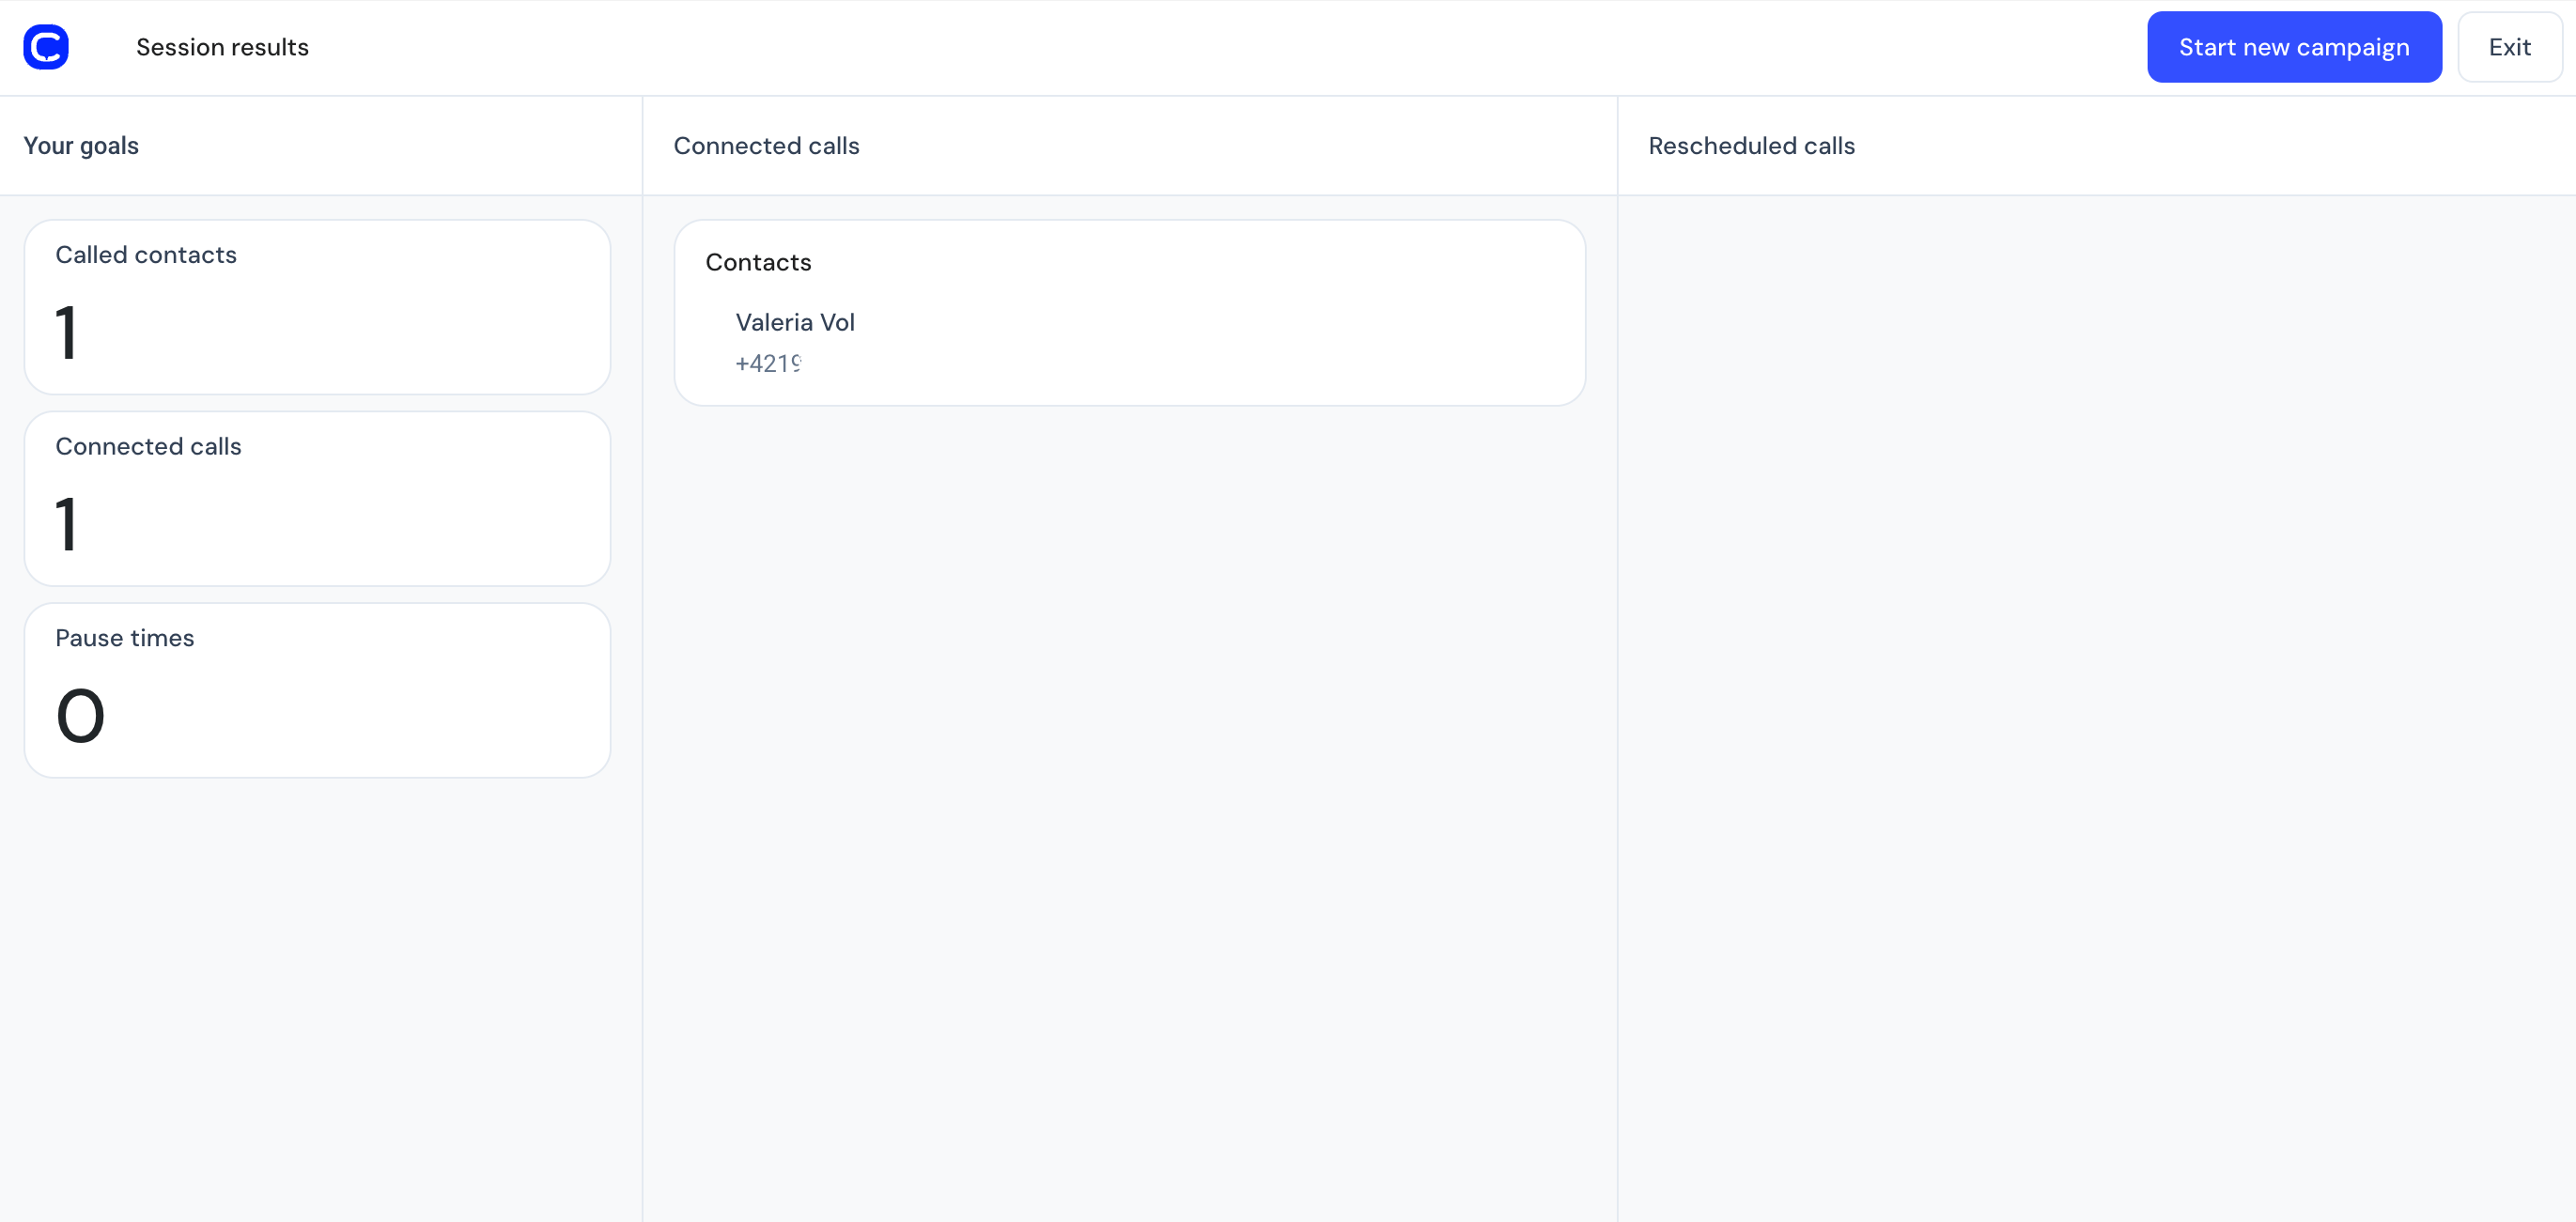
At the end of a campaign or your work session, agents can review their performance by clicking the **Exit** button in the top-right corner.
Session statistics include:
* Total contacts called
* Successful connections
* Rescheduled calls
* Breaks or campaign pauses
 ***
*Need help or have a question?* Just reach out through our [Support portal](https://support.cloudtalk.io/hc/en-us/requests/new?ticket_form_id=26305535257884) — we’re here for you.
## Related topics
- [Using Campaigns with Power Dialer](/en/articles/5782017-using-campaigns-with-power-dialer.md)
- [Using Pipedrive with Campaign Dialers](/en/articles/11508138-using-pipedrive-with-campaign-dialers.md)
- [Using Zoho CRM with Campaign Dialers](/en/articles/11503460-using-zoho-crm-with-campaign-dialers.md)
This documentation is built and hosted on [Mintlify](https://mintlify.com), a developer documentation platform.
***
*Need help or have a question?* Just reach out through our [Support portal](https://support.cloudtalk.io/hc/en-us/requests/new?ticket_form_id=26305535257884) — we’re here for you.
## Related topics
- [Using Campaigns with Power Dialer](/en/articles/5782017-using-campaigns-with-power-dialer.md)
- [Using Pipedrive with Campaign Dialers](/en/articles/11508138-using-pipedrive-with-campaign-dialers.md)
- [Using Zoho CRM with Campaign Dialers](/en/articles/11503460-using-zoho-crm-with-campaign-dialers.md)
This documentation is built and hosted on [Mintlify](https://mintlify.com), a developer documentation platform.